Previous Next

Distributor

REMOVAL & INSTALLATION

Piston Engines
1978–85 ALL MODELS
  1. Unfasten the clips or remove the screws which hold the distributor cap to the top of the distributor, then remove the cap. Note the location of the wire going to the No. 1 cylinder (the front cylinder on rear drive cars, or the cylinder on the left side of the car on front drive cars) where it enters the cap.
  2. Rotate the engine with the starter, or by using a socket wrench on the bolt retaining the crankshaft pulley (turning in the normal direction of rotation), until the timing mark on the pulley is aligned with the pin on the front cover. Check to see if the contact on the rotor is pointing toward the No. 1 spark plug wire's cap location (tower). If the rotor is half a turn away from the No. 1 plug wire, turn the crankshaft ahead one full rotation until the timing mark is again aligned with the pin.

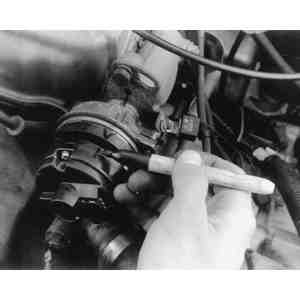
    Fig. 1: Matchmark the distributor body and rotor with the cylinder head or retaining bracket

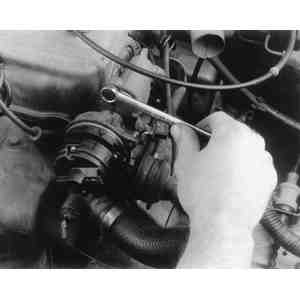
    Fig. 2: Use the correct size box wrench to remove the retaining/adjusting bolt

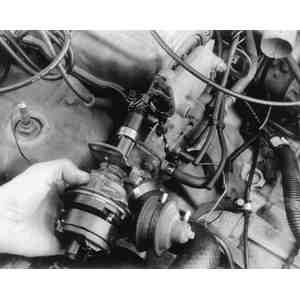
    Fig. 3: Withdraw the distributor assembly from the engine

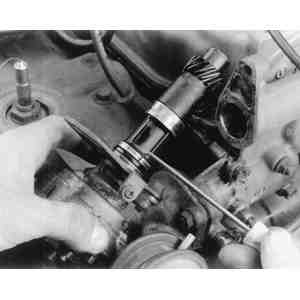
    Fig. 4: Check the condition of the O-ring

  3. Disconnect the vacuum advance or advance/retard line(s) at the advance unit, and disconnect the primary wire or wires at the connector near the distributor.
  4. Matchmark the distributor body and rotor with the cylinder head or retaining bracket.
  5. Remove the retaining/adjusting bolt, then pull the distributor out of the engine. If so equipped, remove the O-ring.

    NOTE: For easier installation, avoid rotating the engine with the distributor removed.

    To install:

    NOTE: If the engine has been rotated while the distributor was out, it will be necessary to turn the crankshaft until the point where the No. 1 cylinder is about to fire. This is known as Top Dead Center (TDC). To do this, remove the No. 1 spark plug and rotate the engine until you can feel compression building (with your finger over the spark plug hole). Then, rotate the engine until the timing mark on the front pulley is aligned with the pin on the front cover, and proceed with Step 6.

  6. Lightly oil and install a new O-ring near the top of the distributor shaft on applicable 1981–85 models.

    Fig. 5: Lubricate the O-ring on 1982–85 distributors

    Fig. 6: On FWD GLC, the distributor engages a notch in the rear of the camshaft. Do not remove the seal block (not shown) at the rear of the valve cover

  7. Lightly oil the distributor drive gear, then align the dimple on the gear with the mark cast into the base of the distributor body by rotating the shaft. Being careful not to rotate the shaft, insert the distributor back into the cylinder head with the distributor body and cylinder head matchmarks aligned.

    NOTE: The distributor used on front wheel drive GLCs does not have a drive gear. Instead, it has a blade which inserts into a groove in the rear end of the camshaft.

  8. Install the mounting bolt, but do not tighten it.
  9. Install the distributor cap, then reconnect the vacuum advance line and primary connector.
  10. If the distributor has ignition points and they have been disturbed, set the dwell as described in Section 2.
  11. Set the ignition timing, as described in Section 2.
1986–89 323
  1. Tag and disconnect the spark plug wires from the distributor cap, then route them off to the side and out of the way.

    NOTE: If the same distributor cap is to be reinstalled, remove the cap with the wires attached.

  2. Disconnect the vacuum hose(s) and the electrical connector from the distributor.

    Fig. 7: Distributor mounting — 1986–89 323 non-turbo

    Fig. 8: Distributor mounting — 1988–89 323 turbo

    Fig. 9: Distributor blade and rotor alignment — 1986–89 323 non-turbo

    Fig. 10: On 1988–89 turbocharged 323s, align the distributor blade with the groove in the housing

  3. Rotate the engine so that the No. 1 piston is at Top Dead Center (TDC) as follows:
    1. Engage the starter motor, or turn a socket wrench (in the direction of normal engine rotation) on the bolt retaining the crankshaft pulley, until the timing mark on the pulley is aligned with the pin on the front cover.
    2. Check to see if the contact on the rotor is pointing toward the No. 1 spark plug wire's cap location (tower). If the rotor is half a turn away from the No. 1 plug wire, turn the crankshaft ahead one full rotation until the timing mark is again aligned with the pin.
  4. Remove the distributor hold-down bolt(s) and withdraw the distributor from the cylinder head.
  5. Remove the O-ring seal and discard it.

    NOTE: For easier installation, avoid rotating the engine with the distributor removed.

    To install:

    NOTE: If the engine has been rotated while the distributor was out, it will be necessary to turn the crankshaft until the point where the No. 1 cylinder is at TDC. To do this, remove the No. 1 spark plug and rotate the engine until you can feel compression building (with your finger over the spark plug hole). Then, rotate the engine until the timing mark on the front pulley is aligned with the pin on the front cover, and proceed with Step 6.

  6. Coat the new O-ring seal with a light film of clean engine oil and install it into the cylinder head opening.

    NOTE: Make sure that the number one piston is at top dead center before installing the distributor.

  7. On non-turbocharged engines, turn the distributor blade so that it aligns with the small oil holes in the bottom of the distributor. On turbocharged engines, align the distributor blade with the grooved matchmark on the body.
  8. Install the distributor, then engage the wiring connector, vacuum hose(s) and spark plug wires.
  9. Set the ignition timing, as described in Section 2.
1986–89 626 AND MX-6
  1. Tag and disconnect the spark plug wires from the distributor cap, then route them off to the side and out of the way.

    NOTE: If the same distributor cap is to be reinstalled, remove the cap with the wires attached.

  2. On non-turbocharged engines, disconnect the vacuum hoses and wiring. On turbocharged engines, disconnect the electrical coupler.

    Fig. 11: Distributor blade and rotor alignment — 1988–89 626/MX-6

  3. Rotate the engine so that the No. 1 piston is at Top Dead Center (TDC) as follows:
    1. Engage the starter motor, or turn a socket wrench on the bolt retaining the crankshaft pulley (in the normal direction of engine rotation), until the timing mark on the pulley is aligned with the pin on the front cover.
    2. Check to see if the contact on the rotor is pointing toward the No. 1 spark plug wire's cap location (tower). If the rotor is half a turn away from the No. 1 plug wire, turn the crankshaft ahead one full rotation until the timing mark is again aligned with the pin.
  4. Loosen the lockbolt(s) and remove the distributor.
  5. Remove and discard the O-ring from the coupling shaft.

    WARNING
    For easier installation, do not rotate the engine with the distributor removed, unless necessary.

    To install:

    NOTE: If the engine has been rotated while the distributor was out, it will be necessary to turn the crankshaft until the point where the No. 1 cylinder is at TDC. To do this, remove the No. 1 spark plug and rotate the engine until you can feel compression building (with your finger over the spark plug hole). Then, rotate the engine until the timing mark on the front pulley is aligned with the pin on the front cover, and proceed with Step 6.

  6. Install a new O-ring onto the coupling shaft, then apply a coat of clean engine oil to the O-ring and to the driven gear.
  7. On 1986–87 models, first align the dimple on the distributor drive gear with the mark cast into the base of the distributor body by rotating the shaft.
  8. On 1988–89 models, align the shaft coupling blade with the alignment marks on the distributor body, then turn the distributor over and check that the rotor is aligned as shown in the illustration.
  9. Install the distributor and engage the wiring connector, vacuum hose(s) ad spark plug wires.
  10. Set the ignition timing, as described in Section 2.
929
  1. Tag and disconnect the spark plug wires from the distributor cap, then route them off to the side and out of the way.

    NOTE: If the same distributor cap is to be reinstalled, remove the cap with the wires attached.

  2. Disengage the distributor electrical connector.
  3. Rotate the engine so that the No. 1 piston is at Top Dead Center (TDC) as follows:
    1. Engage the starter motor, or turn a socket wrench on the bolt retaining the crankshaft pulley (in the normal direction of engine rotation), until the yellow mark on the pulley is aligned with the "T'' mark on the timing scale.
    2. Check to see if the contact on the rotor is pointing toward the No. 1 spark plug wire's cap location (tower). If the rotor is half a turn away from the No. 1 plug wire, turn the crankshaft ahead one full turn until the marks are again aligned.
  4. Loosen the lockbolt and remove the distributor. Remove and discard the O-ring from the distributor shaft.

    WARNING
    For easier installation, do not rotate the engine with the distributor removed, unless necessary.

    To install:

    NOTE: If the engine has been rotated while the distributor was out, it will be necessary to turn the crankshaft until the point where the No. 1 cylinder is at TDC. To do this, remove the No. 1 spark plug and rotate the engine until you can feel compression building (with your finger over the spark plug hole). Then, rotate the engine until the timing mark on the front pulley is aligned with the "T'' mark on the timing scale, and proceed with Step 5.

  5. Install the new O-ring onto the distributor shaft and lightly oil both the O-ring and the driven gear. Be sure to use only clean engine oil.
  6. Align the matchmarks on the distributor housing with the driven gear.
  7. Install the distributor, then engage the electrical connector and the spark plug wires.
  8. Set the ignition timing, as described in Section 2. Torque the lockbolt to 14–18 ft. lbs. (19–24 Nm) once the timing is set.
Rotary Engines
1979–85 RX-7
  1. Rotate the engine in its normal direction of rotation until the first (TDC or "Leading'') timing mark aligns with the pin on the front cover. Matchmark the body of the distributor and the engine rotor housing.
  2. The easiest method to move the high tension wires out of the way it to simply remove the cap and set it aside with the wires still attached. However, if you wish to keep the cap with the distributor, tag the wires for identification, then remove them from the cap.

    Fig. 12: Removing the RX-7's distributor. On 1980–85 models, disconnect the low tension wiring at the multi-plug connector on the fender wall

    Fig. 13: When removing and installing the distributor, make sure that the leading (yellow) timing mark on the front pulley and the pointer on the engine case are aligned

  3. Disconnect the vacuum advance and, if equipped, vacuum retard hoses. Disengage the primary electrical connector (1979) or the pick-up coil and condenser lead wiring (1980–85).
  4. Remove the distributor adjusting bolt. Pull the distributor vertically out of the engine.

    WARNING
    For easier installation, do not rotate the engine with the distributor removed, unless necessary.

    To install:

  5. Make sure the engine has not been disturbed. If it has been rotated, again turn the crankshaft until the first timing mark lines up with the pin on the front cover. Then, align the dimple in the distributor gear with the dot or line cast into the body of the distributor (see illustrations).
  6. Insert the distributor carefully and slowly into the engine with the distributor body and rotor housing matchmarks aligned. Avoid allowing the shaft to turn and be careful not to damage the housing when inserting the gear.
  7. Install the adjusting bolt, but do not tighten. Turn the distributor until the leading points just start to open (or signal rotor and pick-up coil align), then tighten the adjusting bolt.
  8. Install the vacuum hoses, electrical connectors, and high tension wires in reverse of the removal procedure.
  9. If ignition points have been disturbed or replaced (1979 only), set the dwell as described in Section 2.
  10. Set the ignition timing, as described in Section 2.

Previous Next