Previous Next

Oil Pan

REMOVAL & INSTALLATION

Carbureted Engine

NOTE: The only components that can be serviced by removing the oil pan are the oil strainer and the oil pressure control valve.

  1. Drain the engine oil.

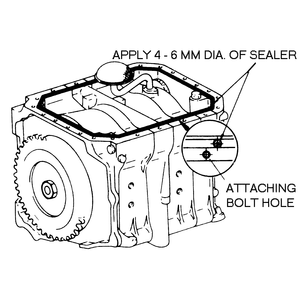
    Fig. 1: Apply sealant before installing the oil pan

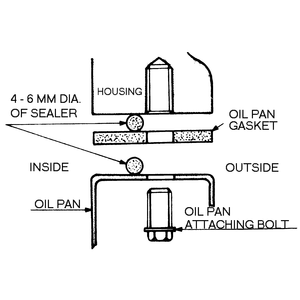
    Fig. 2: Apply sealant to both the top and bottom of the oil pan gasket. Be sure that it loops around the bolt holes toward the inside

  2. Disconnect the oil level sensor and the oil thermo unit (non-California vehicles).
  3. Remove the pan bolts, then lower the pan.
  4. Thoroughly clean the old gasket material off the pan and engine mating surfaces.

    To install:

  5. Apply a continuous bead of sealer (Mazda Part No. 8527 77 739 or equivalent) to the pan surface. The bead should be 0.16-0.24 in. (4–6mm) wide and should overlap at the end. Apply the sealer as shown in the illustration.
  6. Fit the gasket on the pan, then apply an identical bead of sealer on top of the gasket.
  7. Position the pan and torque the bolts to 6-8 ft. lbs. (8–11 Nm).
  8. Connect the oil level sensor and, if applicable, the oil thermo unit.
  9. Fill the crankcase with engine oil (see Section 1 for details).
Fuel Injected Engine
  1. Disconnect the negative battery cable. Drain the engine oil.
  2. Raise and safely support the vehicle, then remove the engine under cover.
  3. Disconnect the oil level sensor and, if so equipped, the oil thermo unit.

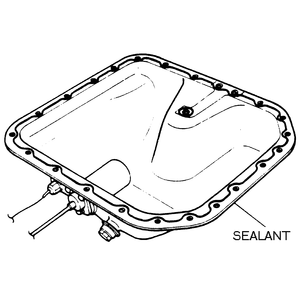
    Fig. 3: Apply sealant to a gasketless oil pan in a similar manner — 1986–89 RX-7

  4. Support the engine from above with a suitable hoist and engine sling, then remove the right-side engine mount nut and lift the engine about 2–3 in. (51–76mm) to gain working clearance.
  5. Remove the pan bolts. Separate the pan from the housing using an appropriate prying tool, then lower the pan from the engine.
  6. Thoroughly clean the old gasket material off the pan and engine mating surfaces.

    To install:

  7. Apply a continuous bead of sealer, (Mazda Part No. 8527 77 739 or equivalent) to the pan surface. The bead should be from 0.16–0.24 in. (4–6mm) wide and should overlap at the end. Make sure the bolt holes are properly encircled by the sealant bead.
  8. Install the gasket on the pan, then apply an identical bead of sealer on top of the gasket. Install the gasket and torque the bolts to 6–8 ft. lbs. (8–11 Nm). The oil pan must be installed no more than 30 minutes after the sealant is applied.

    NOTE: Some engines are not equipped with an oil pan gasket. On these engines, apply the sealant in the same manner described above, but only apply the sealant to the pan surface.

  9. Carefully lower the engine to its normal position, then fasten the engine mount nut.
  10. Connect the oil level sensor and, if applicable, the oil thermo unit.
  11. Install the engine under cover, then lower the vehicle.
  12. Fill the crankcase with oil and connect the negative battery cable.

Previous Next