

- Disconnect the negative battery cable.
- Raise the front of the car and safely support it on jackstands.
- Remove the under cover, if applicable, and drain the engine oil. Remove
the engine splash shield or skid plate.
- Remove the clutch slave cylinder, if so equipped. Do not disconnect the
hydraulic line; let the cylinder hang or support it with rope or wire.
- Remove the engine rear brace attaching bolts and loosen the bolts on the
left side, if present.
- Disconnect the emission line from the oil pan, if so equipped.
- Loosen the front motor mounts, raise the front of the engine and support
with a wooden block to gain clearance, if necessary (except on front wheel
drive GLCs and 626s).
- On front wheel drive cars, loosen the bolts attaching the exhaust pipe to
the manifold and lower the pipe; also, disconnect the engine torque brace.
On the 626, disconnect the No. 3 engine mount, located near the driver's side
of the pan.
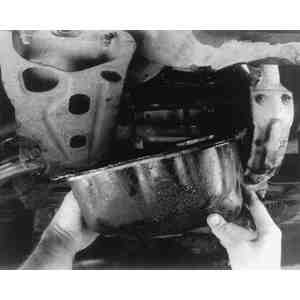
| Fig. 1: Lower the oil pan after removing the retaining
bolts and any obstructions
|
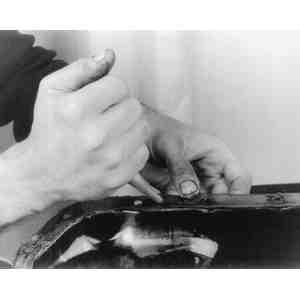
| Fig. 2: Carefully examine the flange of the oil pan
and clean off all traces of old gasket or sealer. Clean the engine
block's mating surface, too
|
| Fig. 3: Apply a continuous bead of sealant to the
flange of a gasketless oil pan
|
| Fig. 4: When installing with a gasket, apply sealant
to the joints where the front cover and rear main seal mate with the
block
|
- Unfasten the oil pan retaining bolts, then remove the oil pan and allow
it to rest on the crossmember. Remove the oil pump pickup tube, if necessary,
to remove the oil pan.
To install:
- Thoroughly clean all the gasket mating surfaces. Check the oil pan for cracks
or other damage in the area of the bolt holes. Remove the oil pan drain plug
and check the pan threads for wear and damage. Clean up the threads with a
tap, as required.
- Install the oil pump pickup tube, if previously removed.
- On 1983–87 2.0L engines, there is no gasket. Apply a gasket forming
sealant as shown in the illustration before installing the pan. Be sure to
install the pan and torque the retaining bolts within 30 minutes.
- On engines using a pan gasket, apply sealer to the joints between the front
cover and block, as well as the rear main seal housing and block, before installing
the gasket. Install the oil pan and torque the retaining bolts.
- On front wheel drive cars, fasten the engine torque brace and the No. 3
engine mount, if applicable. Connect the exhaust pipe to the manifold.
- On rear wheel drive cars, remove the wooden support block, if applicable,
then lower the front of the engine and fasten the motor mounts.
- If so equipped, connect the emission line to the oil pan.
- Tighten the bolts on the left side of the engine, then install the rear
brace attaching bolts, if applicable.
- Install the clutch slave cylinder, if applicable.
- Install the engine splash shield or skid plate.
- Lower the vehicle and fill the crankcase to the proper level.
- Connect the negative battery cable. Start the engine and inspect for leaks.
- Disconnect the negative battery cable. Raise and safely support the front
of the vehicle. Drain the engine oil.
| Fig. 5: Apply sealant to the shaded area of the oil
pan flange before attaching the gasket
|
- Remove the engine splash shields. Disconnect and lower the exhaust pipe.
Reposition the components, as required, in order to gain access to the oil
pan retaining bolts.
- Remove the oil pan retaining bolts and the stiffening strips that go under
the bolts, then lower the oil pan.
To install:
- Thoroughly clean all the gasket mating surfaces. Check the oil pan for cracks
or other damage in the area of the bolt holes. Remove the oil pan drain plug
and check the pan threads for wear and damage. Clean up the threads with a
tap, as required.
- Apply sealer to the joints between the front cover and block, as well as
the rear main seal housing and block. Also apply sealer to the concave portion
of the flange at each end of the oil pan, as illustrated. Place a new gasket
on the pan, then install the pan and stiffener onto the block. Torque the
pan retaining bolts to 52–78 inch lbs. (6–9 Nm).
- Connect the exhaust pipe and install the splash shields. Lower the vehicle
and fill the crankcase to the proper level.
- Connect the negative battery cable. Start the engine and inspect for leaks.
- Disconnect the negative battery cable. Mount engine support tool 49 B017
5A0, or equivalent, and suspend the engine. Raise and safely support the front
of the vehicle.
- Drain the engine oil. Remove the engine under cover assembly.
- Remove the exhaust pipe bracket and disconnect the exhaust pipe. Remove
the turbocharger bracket.
- Unfasten the oil pan retaining bolts. Remove the oil pan from the engine
by prying gently on the area where the pan mates with the transaxle and nowhere
else. Loosen the mounting member bolts until the pan can be removed.
To install:
- Clean all the gasket contact surfaces thoroughly. Check the oil pan for
cracks or other damage in the area of the bolt holes. Remove the oil pan drain
plug and check the pan threads for wear and damage. Clean up the threads with
a tap, as required.
- Apply sealer to the joints between the front cover and the block, as well
as the rear main seal housing and the block. Install the gaskets onto the
oil pump body and the rear cover making sure that the projections are properly
positioned in the notches.
- Apply a continuous bead of silicone sealant to the oil pan inside the bolt
holes. Position the oil pan onto the transaxle and install the transaxle mounting
bolts. Torque the upper bolt to 27–38 ft. lbs. (37–51 Nm) and
the lower bolt to 14–19 ft. lbs. (19–26 Nm). Install the oil pump
retaining bolts and torque to 69–95 inch lbs. (8–11 Nm) in several
steps.
- Attach the turbocharger bracket to the block. Connect the exhaust pipe and
install the exhaust pipe bracket. Install the engine undercovers, then lower
the vehicle.
- Remove the engine support tool and fill the crankcase to the proper level.
- Connect the negative battery cable. Start the engine and inspect for leaks.
NOTE: These vehicles use a gasketless oil pan.
To install:
- Disconnect the negative battery cable.
- Raise and safely support the front of the vehicle. Drain the engine oil.
- Unbolt and remove the exhaust pipe and gusset plate. Remove the clutch housing
under cover.
- Remove the right-hand subframe.
- Remove the oil pan retaining bolts and lower the oil pan. Wedge a scraper
or small prying tool between the pan and the stiffener to achieve separation.
Remove the oil strainer and stiffener. Discard the strainer gasket and purchase
a new one.
NOTE: Be careful not to bend the oil pan when separating
it from the block.
To install:
- Check the oil pan for cracks or other damage in the area of the bolt holes.
Remove the oil pan drain plug and check the pan threads for wear and damage.
Clean up the threads with a tap, as required.
- Thoroughly clean all contact surfaces and apply a continuous bead of silicone
sealant to the stiffener around the inside of the bolt holes. Raise the stiffener
up onto the bottom of the block and install the retaining bolts. Torque the
retaining bolts to 61–104 inch lbs. (7–12 Nm). Install a new strainer
and gasket, then torque the bolts to 69–104 inch lbs. (8–12 Nm).
- Apply silicone sealant to the oil pan contact surface in the same manner
as the stiffener. Raise the oil pan up and against the stiffener, then install
its retaining bolts. Torque the retaining bolts to 61–104 inch lbs.
(7–12 Nm).
- Lower the vehicle and fill the crankcase to the proper level.
- Connect the negative battery cable. Start the engine and check for oil leaks.
NOTE: Some of these vehicles use a gasketless oil pan.
- Disconnect the negative battery cable.
- Raise and safely support the front of the vehicle.
- Drain the engine oil. Remove the engine under cover.
- Remove the oil pan retaining bolts. With a scraper or suitable prying tool,
separate the oil pan from the block and remove it.
NOTE: Be careful not to bend the oil pan when separating
it from the block.
To install:
- Thoroughly clean all the gasket mating or contact surfaces. Check the oil
pan for cracks or other damage in the area of the bolt holes. Remove the oil
pan drain plug and check the pan threads for wear and damage. Clean up the
threads with a tap, as required.
- On oil pans with a gasket, apply sealer to the joints between the front
cover and block, as well as the rear main seal housing and block. On gasketless
oil pans, apply a continuous bead of sealant to the oil pan flange around
the inside of the bolt holes and overlap the ends.
- Raise the oil pan onto the block and install the retaining bolts. Torque
the bolts to 69–95 inch lbs. (8–11 Nm).
- Install the engine undercover and lower the vehicle. Fill the crankcase
to the proper level.
- Connect the negative battery cable. Start the engine and check for leaks.