Previous Next

RIDGE REMOVAL AND HONING

  1. Before the piston is removed from the cylinder, check for a ridge at the top of the cylinder bore. This ridge occurs because the piston ring does not travel all the way to the top of the bore, thereby leaving an unused portion of cylinder bore.
  2. In order to see the extent of the ridge more clearly, clean away any carbon buildup at the top of the cylinder with sandpaper. If the ridge is slight, it will be safe to remove the pistons without damaging the rings or piston ring lands. If the ridge is severe, and easily catches your fingernail, it will have to be removed using a ridge reamer.

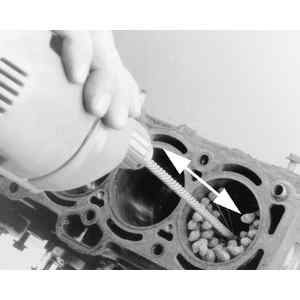
    Fig. 1: Using a ball-type cylinder hone is an easy way to finish the cylinder bore

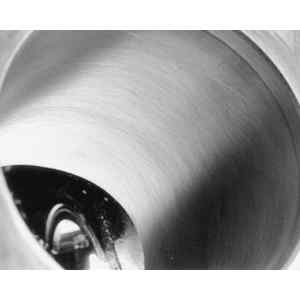
    Fig. 2: A properly cross-hatched cylinder bore

    NOTE: A severe ridge is an indication of excessive bore wear. Before removing the piston, check the cylinder bore diameter with a bore gauge, as explained in the piston and connecting rod cleaning and inspection procedure. Compare your measurement with specification. If the bore is excessively worn, all cylinders will have to bored (to maintain balance), then oversize pistons and rings must be installed.

  3. Before reaming the ridge, cover the piston top with a rag to minimize the amount of metal which enters the cylinder. Install the ridge removal tool in the top of the cylinder bore, then carefully follow the manufacturer's operating instructions. Only take off the amount of material necessary to remove the ridge. Clean up all metal shavings before attempting to remove the piston/rod assembly.

    WARNING
    Be very careful if you are unfamiliar with operating a ridge reamer. It is very easy to remove more cylinder bore material than you want, possibly requiring a cylinder overbore and piston replacement that may not have been necessary.

  4. After the piston and connecting rod assembly have been removed, check the clearances as explained in the piston and connecting rod cleaning and inspection procedure, to determine whether boring and honing or just light honing are required. If boring is necessary, consult an automotive machine shop. If light honing is all that is necessary, proceed to Step 5.
  5. Honing is best done with the crankshaft removed, to prevent damage to the crankshaft and to make post-honing cleaning easier, since the honing process will scatter metal particles. However, if you do not want to remove the crankshaft, position the connecting rod journal for the cylinder being honed as far away from the bottom of the cylinder bore as possible, and wrap a shop cloth around the journal.
  6. Honing can be done either with a flexible glaze breaker-type hone or with a rigid hone that has honing stones and guide shoes. The flexible hone removes the least amount of metal, and is especially recommended if your piston-to-cylinder bore clearance is on the loose side. The flexible hone is useful to provide a finish on which the new piston rings will seat. A rigid hone will remove more material than the flexible hone and requires more operator skill.
  7. Regardless of which type of hone you use, carefully follow the manufacturer's instructions for operation.
  8. The hone should be moved up and down the bore at sufficient speed to obtain a uniform finish. A rigid hone will provide a definite cross-hatch finish; operate the rigid hone at a speed to obtain a 45–65°included angle in the cross-hatch. The finish marks should be clean, but not sharp, and free from embedded particles and torn or folded metal.
  9. Periodically during the honing procedure, thoroughly clean the cylinder bore and check the piston-to-bore clearance with the piston for that cylinder.
  10. After honing is completed, thoroughly wash the cylinder bores and the rest of the engine with hot water and detergent. Scrub the bores well with a stiff bristle brush and rinse thoroughly with hot water. Thorough cleaning is essential, for if any abrasive material is left in the cylinder bore, it will rapidly wear the new rings and the cylinder bore. If any abrasive material is left in the rest of the engine, it will be picked up by the oil and carried throughout the engine, damaging bearings and other parts.
  11. After the bores are cleaned, wipe them down with a clean cloth coated with light engine oil, to keep them from rusting.

Previous Next