If the rear main oil seal is being replaced independently of any other parts,
it can be done with the engine in place. If the rear main oil seal and the rear
main bearing are being replaced together, the engine must be removed.
- Remove the transmission/transaxle, as described in Section 7 of this manual.
- On models equipped with a manual transmission/transaxle, remove the pressure
plate, clutch disc and flywheel.
- On models equipped with an automatic transmission/transaxle, remove the
driving plate (flexplate).
- Punch two holes in the crankshaft rear oil seal. They should be punched
on opposite sides of the crankshaft, just above the bearing cap-to-cylinder
block split line.
- Install a sheet metal screw in each hole. Pry against both screws at the
same time to remove the oil seal.
- Clean the oil recess in the cylinder block and bearing cap. Clean the oil
seal surface on the crankshaft.
To install:
- Coat the seal surfaces with oil. Coat the oil surface and the steel surface
on the crankshaft with Lubriplate® or equivalent white grease. Install
the new oil seal and make sure that it is not cocked. Be sure that the seal
surface was not damaged.
- On models equipped with a manual transmission/transaxle, install the flywheel,
clutch disc and pressure plate. Be sure to coat the threads of the flywheel
attaching bolts with oil-resistant sealer.
- On models equipped with an automatic transmission/transaxle, install the
driving plate (flexplate).
- Install the transmission/transaxle, as described in Section 7.
NOTE: You will need a seal installer designed for the replacement
seal and an arbor press to install the new seal. You might want to take the
seal and rear cover (into which the seal fits), to an automotive machine shop
to have the seal pressed in.
- Remove the transaxle, as described in Section 7 of this manual.
- On models equipped with a manual transaxle, remove the pressure plate, clutch
disc and flywheel.
- On models equipped with an automatic transaxle, remove the driving plate
(flexplate).
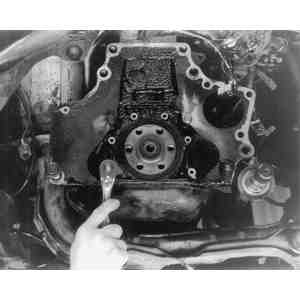
| Fig. 1: Removing the rear main oil seal from a 1983–87
2.0L engine
|
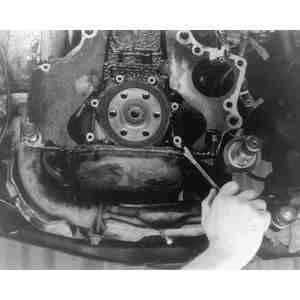
| Fig. 2: Unfasten the rear cover retaining bolts .
. .
|
| Fig. 3: . . . and separate the cover from the engine
block
|
| Fig. 4: Remove the rear cover assembly (2.0L engine
shown; 1.6L similar)

|
| Fig. 5: Pressing in a new rear main oil seal for
a 2.0L engine
|
- Using a rag as a pivot point, pry the seal out with a flat tipped screwdriver.
- Unbolt and remove the rear cover.
To install:
- Apply a coating of oil to the lip of the new seal. Start the seal into the
rear cover by hand, then press it in using a seal installer (which fits precisely
into the inner seal bore) and an arbor press. It must be straight and the
front edge of the seal must align with the front edge of the cover.
- Install the rear cover onto the engine, torquing the bolts to 6–9
ft. lbs. (8–12 Nm) on the 2.0L engine and 69–95 inch lbs. (8–11
Nm) on the 1.6L engine.
- On models equipped with a manual transaxle, install the flywheel, clutch
disc and pressure plate. Be sure to coat the threads of the flywheel attaching
bolts with oil-resistant sealer.
- On models equipped with an automatic transaxle, install the driving plate
(flexplate).
- Install the transaxle, as described in Section 7.
- Disconnect the negative battery cable. Raise and support the vehicle safely.
- Remove the transaxle, as described in section 7.
- If equipped with a manual transaxle, remove the pressure plate, the clutch
disc and the flywheel. If equipped with an automatic transaxle, remove the
drive plate from the crankshaft.
- Remove the rear oil pan-to-seal housing bolts.
- Remove the rear main seal housing bolts and the housing from the engine.
- Remove the oil seal from the rear main housing.
- Clean the gasket mounting surfaces.
To install:
- Coat the new seal and housing with oil. Press the seal into the housing,
using an arbor press.
- Complete installation in reverse of the removal procedure. Be sure to use
new gaskets and apply sealant to the oil pan mounting surface. Torque the
rear seal housing bolts to 6–8 ft. lbs. (8–11 Nm).
- Raise and support the vehicle safely.
- Remove the transmission from the vehicle, as described in Section 7.
- If equipped with a manual transmission, remove the clutch pressure plate
and flywheel.
- If equipped with automatic transmission, remove the flywheel assembly.
- Drain the engine oil, then remove the oil pan.
- Unfasten the rear main seal cover retaining bolts and remove the cover.
Remove the seal from the cover.
To install:
- Installation is the reverse of the removal procedure. Be sure to apply clean
engine oil to the seal before pressing it into the cover. Torque the cover
retaining bolts to 5–8 ft. lbs. (7–11 Nm).
- After installing the rear cover, cut away the portion of the gasket that
projects out toward the oil pan side.

