NOTE: Perform solenoid replacement with the starter motor removed
from the car. On later model starters, the solenoid is referred to as a magnetic
switch; these terms are interchangeable.
- Disconnect the negative battery cable.
CAUTION
This is necessary, since the wiring coming from the battery could ground
and cause a fire or other damage!
- Detach the field strap, the "hot wire'' from the battery, and the ignition
wiring connector from the solenoid terminals.
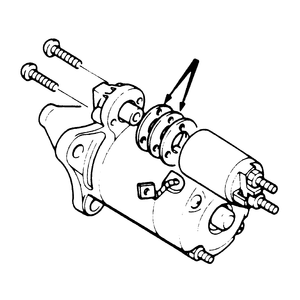
- Remove the solenoid securing bolts.
| Fig. 1: Magnetic switch (solenoid) mounting
|
| Fig. 2: To check pinion gap, energize the solenoid
with jumper wires . . .
|
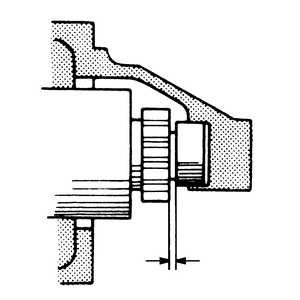
| Fig. 3: . . . and insert a feeler gauge between the
front of the pinion gear and the starter body
|
- Withdraw the solenoid, washers, spring and plunger, lifting the assembly
to disconnect the plunger where it engages with the fork.
- Assemble the plunger, spring, washers and solenoid assembly and engage the
plunger with the fork.
- Hold the plunger assembly in place and install the attaching screws.
- Reconnect the starter-to-solenoid wiring.
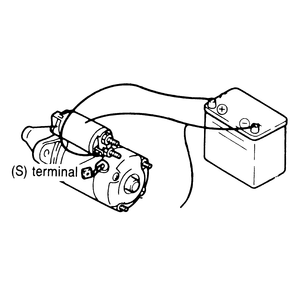
- Assemble the solenoid, then check the pinion gap as follows:
- Leave the connection between solenoid terminal M and
the starter motor disconnected.
- Energize the solenoid by running one jumper wire from the battery's
positive (+) terminal to the S terminal connection of
the solenoid, and another jumper wire from the negative (-) battery terminal
to the body of the solenoid.
- The solenoid will engage without spinning the starter.
- Measure the pinion gap with a feeler gauge, as shown. If it is not 0.020–0.079
in. (0.5–2.0mm), correct it by changing the number of washers (increase
the number of washers to reduce the gap).
WARNING
The solenoid should not be energized for more than 20 seconds at a time,
or it will overheat.

