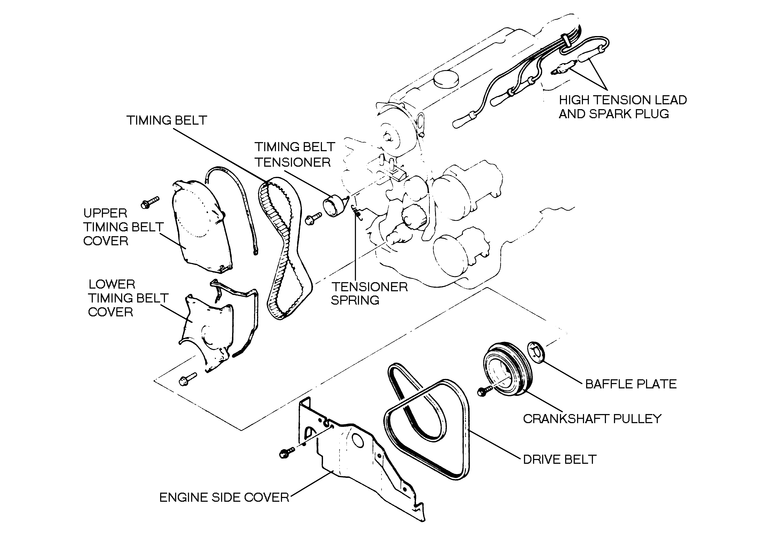
NOTE: For access, safely support the car, then remove the right
front wheel and splash shield.
- Loosen the alternator mounting bolts and relieve belt tension, then remove
the alternator belt.
- Unfasten the attaching bolts, then remove the upper timing belt cover and
gasket.
| Fig. 1: Remove the bolts which fasten the upper timing
belt cover . . .
|
| Fig. 2: . . . and remove the cover
|
| Fig. 3: Unfasten the four mounting bolts which retain
the crankshaft pulley . . .
|
| Fig. 4: . . . and remove the pulley
|
| Fig. 5: If necessary, pull outward slightly on the
fender skirt to provide clearance for crankshaft pulley removal

|
| Fig. 6: Unfasten and remove the lower timing belt
cover
|
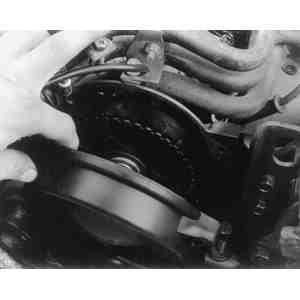
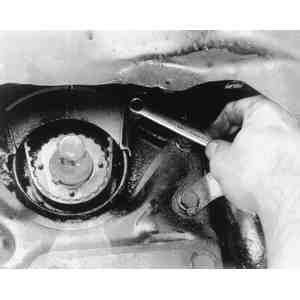
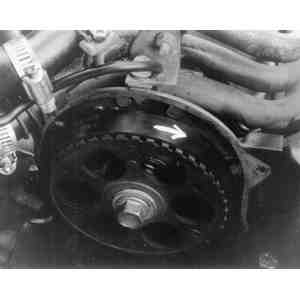
| Fig. 7: Align the camshaft pulley mark (A) with the
V-notch at the top of the front housing
|
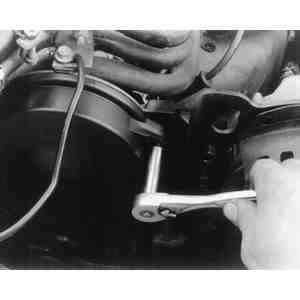
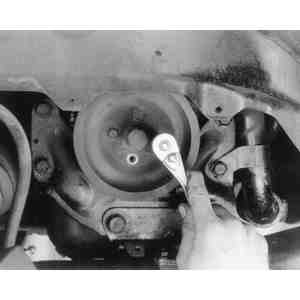
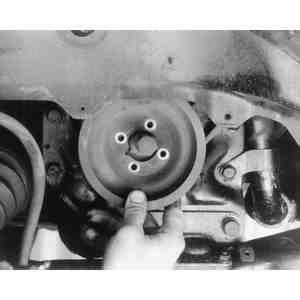
- Unfasten the four mounting bolts and remove the front pulley from the hub
on the crankshaft. Then, remove the attaching bolts and the lower timing belt
cover and gasket.
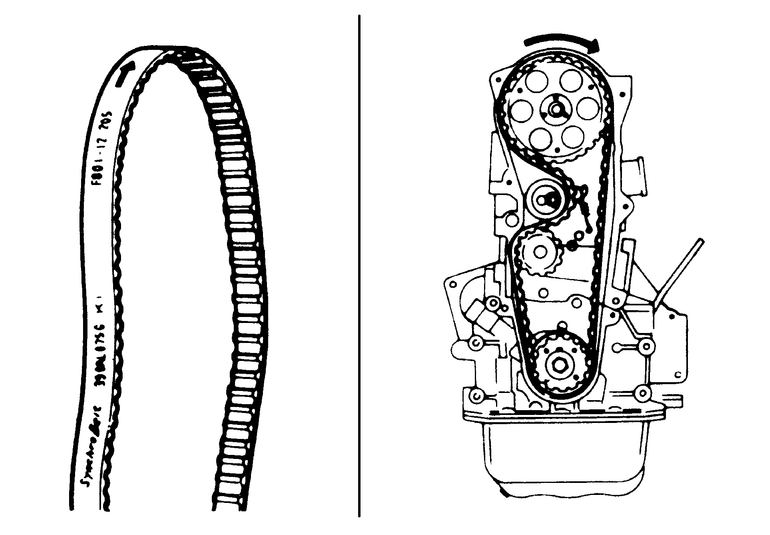
- Now, rotate the engine in its normal direction (clockwise when viewed from
the passenger's side) until the camshaft pulley mark (A) aligns with the V-notch
at the top of the front housing. At this point, the notch in the crankshaft
pulley will align with the arrow on the front housing. Note that if the belt
has jumped time, these marks will not align simultaneously. If that is true,
your first step after belt removal should be align the crankshaft marks.
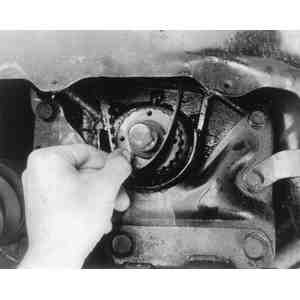
- Loosen the tensioner lockbolt until it can be turned by hand. Then, remove
the tensioner spring (brake pliers may be helpful).
- Mark the direction of rotation on the belt if it may be reused and remove
it. Inspect the belt and replace if it is oil soaked, or shows excessive wear,
peeling, cracking, or hardening. Inspect the tensioner for free and smooth
rotation; replace if it does not turn smoothly.
To install:
- Position the tensioner all the way toward the intake valve side.
- Install a new belt or reinstall the old one with the arrow indicating the
proper direction of rotation (that is, the arrow should point clockwise around
the top pulley when viewed from the passenger side of the car). Make sure
the belt teeth engage the water pump pulley and the camshaft/crankshaft pulleys,
with the belt running straight from top to bottom on the right side. Then,
route the belt around the tensioner pulley.
| Fig. 8: Align the notch in the crankshaft pulley
with the arrow on the front housing
|
| Fig. 9: Use a wrench to loosen the tensioner lockbolt
|
| Fig. 10: If the timing belt is reusable, mark its
direction of rotation before removal
|
| Fig. 11: Slip the timing belt off the crankshaft
pulley and remove from above
|
| Fig. 12: Install the timing belt around the camshaft,
crankshaft, and water pump pulleys, then inside the tensioner pulley.
If present, be sure the directional arrow on the belt points in the
proper direction
|
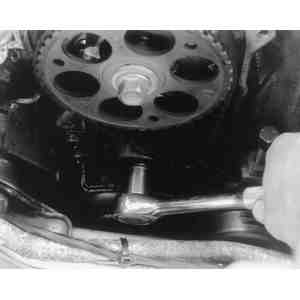
- Install the spring to the tensioner. With a wrench on the crankshaft pulley,
turn the engine in its normal direction of rotation until the crankshaft has
rotated two turns and verify that the camshaft pulley returns to its former
position. Torque the tensioner lockbolt to 28–38 ft. lbs. (38–51
Nm). If the belt is a used one, check deflection. Under 22 lbs. (10 kg) pressure,
the belt should deflect 0.47–0.55 in. (12–14mm). You can repeat
this step to reseat and retension the belt, then recheck deflection. If a
used belt won't pass the test, replace it.
- Install the lower timing belt cover, using a new gasket if necessary. Torque
the bolts to 5–7 ft. lbs. (7–9 Nm). Do the same with the upper
cover.
- Install the front pulley and alternator belt. Be sure to properly tension
the belt.
- Install the splash shield and right front wheel, then lower the car.
- Disconnect the negative battery cable.
- Tag and disconnect the spark plug wires, then remove the spark plugs (for
easier crankshaft rotation).
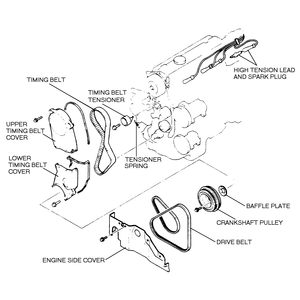
- Remove the engine side cover and the accessory drive belts.
- Unbolt the crankshaft pulley, then remove the upper and lower timing belt
covers along with their gaskets. Remove the crankshaft pulley baffle plate
and note how it is installed. The curved side should be facing out.
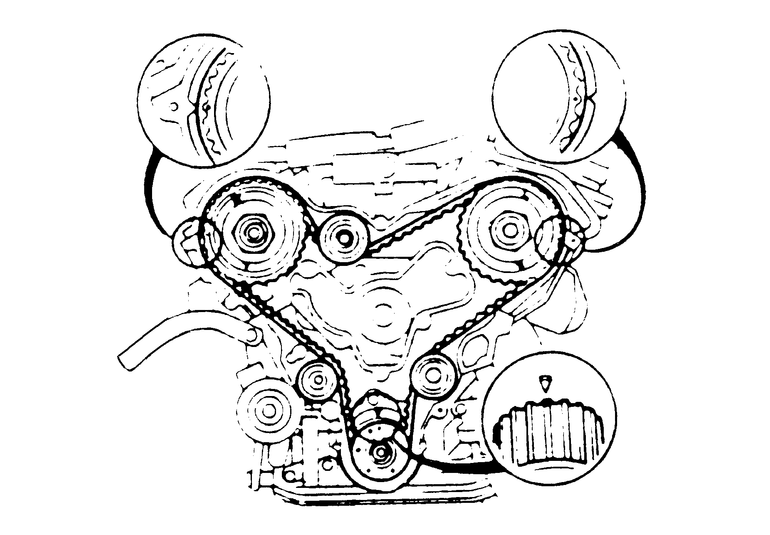
- Engage the timing belt pulley's lockbolt with an appropriate size metric
socket and breaker bar, then turn the crankshaft in its normal direction of
rotation until the "arrowed'' 1 mark on the camshaft is aligned
with the mark on top of the front housing (see illustration). Unbolt and remove
the tensioner, then disconnect the tensioner spring from its mount.
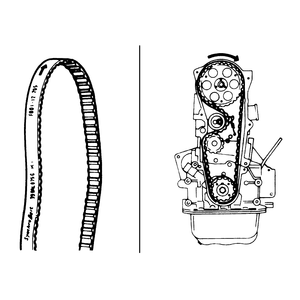
| Fig. 13: Timing belt components — 1988–89
626 and MX-6
|
| Fig. 14: Camshaft pulley and front housing timing
mark alignment — 1988–89 626 and MX-6

|
| Fig. 15: Timing belt pulley and front housing timing
mark alignment — 1988–89 626 and MX-6
|
| Fig. 16: Checking timing belt deflection on 1988–89
626 and MX-6
|
- Remove the timing belt. If the old timing belt is to be reused, mark the
direction of rotation, prior to removal. Keep the timing belt away from dirt,
grease and oil.
- Inspect the belt and replace if it is oil soaked, or shows excessive wear,
peeling, cracking, or hardening. Inspect the tensioner for free and smooth
rotation; replace if it does not turn smoothly. Replace all damaged components
as necessary.
To install:
- Align the timing mark on the timing belt pulley with the matchmark on the
lower front housing. Recheck the camshaft pulley and front housing alignment
marks. Turn the camshaft as necessary to realign the marks.
- Install the spring and tensioner with the attaching bolt. Connect the spring
to its anchor. Using a small prybar wrapped in a rag, gently pry on the tensioner
until the spring is fully extended, then temporarily tighten the tensioner
bolt to hold it in place.
- Install the timing belt. (A used belt should be installed in the original
direction of rotation as indicated by the rotational arrow marked on the belt
prior to removal.) Make sure that there is no looseness on the water pump
pulley and idler pulley side of the belt.
- Loosen the tensioner lockbolt and turn the crankshaft twice in the direction
of engine rotation to align the timing marks on the camshaft and crankshaft
pulleys.
- Make sure that all timing marks are aligned correctly. If not, remove the
timing belt tensioner and timing belt, then repeat Steps 8–11 until
all the timing marks are correctly aligned.
- Torque the tensioner lockbolt to 27–38 ft. lbs. (37–51 Nm).
Apply 22 lbs. (10 kg) of pressure to the belt and check the timing belt deflection.
Deflection should be 0.35–0.39 in. (9–10mm) for a used belt, or
0.30–0.33 in. (8–9mm) for a new belt . If the deflection is not
correct, loosen the tensioner lockbolt and adjust the tension. Repeat Steps
11–13 to adjust the tension. If it still cannot be brought to specification,
replace the tensioner spring.
- Install the baffle plate so that the curved side faces outward. Install
the upper and lower timing belt covers, using new gaskets if necessary.
- Install the crankshaft pulley and tighten the bolts in a criss-cross pattern
to 9–13 ft. lbs. (12–18 Nm). Install all the accessory drive belts
and adjust the drive belt tension.
- Install the engine side cover. Lightly coat the threads of the spark plugs
with anti-seize compound. Install the spark plugs and torque to specification.
Connect the spark plug wires.
- Connect the negative battery cable. Check and/or adjust the ignition timing
as required.
NOTE: On some vehicles, it may be necessary to remove the No.
3 engine mount nuts and lower the engine to remove the crankshaft pulley.
- Disconnect the negative battery cable. Remove the engine side cover.
- Remove the power steering and/or air conditioning belt, if applicable.
- Remove the alternator drive belt and the alternator.
- Unfasten and remove the water pump pulley. Unfasten the bolts and washers,
then remove the crankshaft pulley along with its spacer.
| Fig. 17: Align the marks as shown before removing/installing
the timing belt — 1986–89 323 non-turbo
|
NOTE: A separate A/C and/or power steering drive pulley
may be mounted in front of the crankshaft pulley.
- Unbolt, then remove the upper and lower timing belt covers along with their
gaskets.
- Tag and disconnect the spark plug wires, then remove all four spark plugs
(to make crankshaft rotation easier).
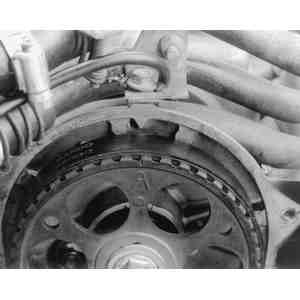
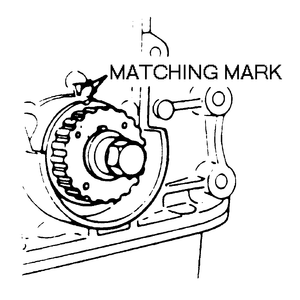
- Using a socket on the crankshaft bolt, turn the engine in its normal direction
of rotation until the trailing (second) mark on the camshaft pulley aligns
with the matching mark on the end of the cylinder head cover (see the illustration).
- Remove the bolt mounting the timing belt tensioner to the front of the block.
Remove the washer, the tensioner spring and the tensioner. If you plan of
reusing the belt, be sure to mark the direction of rotation, then remove the
timing belt.
- Inspect the belt and replace if it is oil soaked, or if it shows excessive
wear, peeling, cracking, or hardening. Inspect the tensioner for free and
smooth rotation; replace if it does not turn smoothly. Replace all damaged
components as necessary.
To install:
- Position the tensioner on the block, then install the bolt and washer, just
starting the threads. Connect the spring, then slide the tensioner as far
as it will go to the left (away from tensioning the belt), so that spring
tension is maximized. Tighten the bolt enough to hold the tensioner in this
position.
- Check to make sure that the marks on the camshaft pulley and cylinder head
cover are still aligned. Also, check that the marks on the front of the block
and the timing belt pulley are still aligned; realign the marks, if necessary.
- Install the timing belt. (If the belt is being reused, make sure that the
directional arrow is facing in the normal direction of rotation.) The belt
should be installed so that the pulleys and teeth mesh, the right side is
slightly tight, and the timing marks remain aligned.
- Loosen the tensioner lockbolt. Turn the crankshaft two full revolutions
in the normal direction of engine rotation (clockwise), so that the timing
marks again align. If the marks align, proceed to Step 14. If they do not
align, reshift the tensioner away from tensioning the belt and lock it there
with the bolt. Remesh the teeth on the belt so the timing marks align and
the right side of the belt is straight, then repeat this step.
- Torque the tensioner lockbolt to 14–19 ft. lbs. (19–26 Nm).
Place a ruler near the right side of the belt at the center of the span. Depress
the belt with a thumb and measure the deflection while applying 22 lbs. (10
kg) pressure. The belt should deflect 0.35–0.39 in. (9–10mm) on
1986 models, 0.35–0.51 in. (9–13mm) on 1987 models, or 0.47–0.51
in. (12–13mm) on 1988–89 models. If the tension is correct, proceed
to Step 15. If the tension is incorrect, do not try to adjust the belt by
hand. Instead, fix any binding in the mechanism, if present; otherwise, replace
the tensioning spring and repeat Steps 12–14.
- Install the timing belt covers, using new gaskets if necessary. Torque the
retaining bolts to 69–95 inch lbs. (8–11 Nm).
- Install the spark plugs, torquing to 11–17 ft. lbs. (15–23 Nm),
and reconnect the plug wires.
- Install the baffle plate along with the crankshaft pulley and spacer. (Be
sure to also install the A/C and/or power steering drive pulley, if applicable.)
Torque the pulley bolts to 9–13 ft. lbs. (12–18 Nm).
NOTE: Be sure to raise the engine and fasten the No. 3
engine mount bracket, if previously moved.
- Install and tension the drive belts, then install the engine side cover.
- Connect the negative battery cable.
- Disconnect the negative battery cable. Remove the engine side cover.
- Remove the required accessory drive belts, then remove the water pump pulley
and crankshaft pulley. (An A/C and/or power steering drive pulley may also
be attached to the crankshaft pulley.)
NOTE: Support the engine with a suitable hoist and remove
the No. 3 engine mount installation bolts, then lower the engine in order
to remove the air conditioning and/or power steering drive pulley and the
crankshaft pulley.
| Fig. 18: Timing mark alignment — 1988–89
323 turbo
|
- Tag and disconnect the spark plug wires, then remove all four spark plugs
(to make crankshaft rotation easier).
- Rotate the crankshaft so that the No. 1 piston is at TDC.
- Remove the timing cover assembly retaining bolts. Remove the upper, middle
and lower timing covers and gaskets from their mountings.
- Remove the baffle plate. Remove the timing belt tensioner and spring, then
remove the timing belt. (If the old belt is being reused, first mark its direction
of rotation.)
- Inspect all parts. Check the belt for peeling and cracks or for excessively
worn/broken teeth. Check the tensioner for rough rotation.
To install:
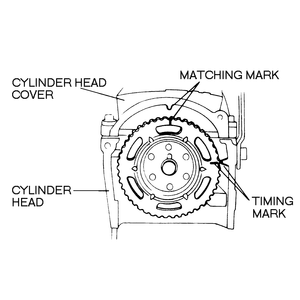
- Be sure that the timing mark on the timing belt pulley is aligned with the
mark on the engine. Also, be sure that the camshaft pulleys are properly aligned
as shown in the timing mark illustration. (Note that the I mark
on the intake side camshaft pulley should be at the top. The E mark
on the exhaust side camshaft pulley should also be at the top.)
- Install the spring and tensioner with the attaching bolt. Move the tensioner
to the left until the spring is fully extended, then temporarily tighten the
tensioner bolt to hold it in place.
- Install the timing belt by keeping as much tension on the right side of
the belt as possible. Used belts must be installed in their original direction
of rotation.
- Turn the crankshaft twice in the normal direction of rotation and make sure
that all the timing marks are aligned (see illustration). Loosen the tensioner
lockbolt and apply tension to the belt.
- Torque the tensioner lockbolt to 27–38 ft. lbs. (37–51 Nm),
then turn the crankshaft twice in the normal direction of rotation to ensure
that all the timing marks are still correctly aligned.
- Measure the belt tension by applying 22 lbs. (10 kg) of pressure between
the camshaft pulleys. The deflection should be 0.33–0.45 in. (8.5–11.5mm)
between the pulleys for both new and used timing belts.
- If the timing belt tension is not within specifications, repeat Steps 11–13
or replace the tensioner spring.
- Install the lower, middle and upper timing belt covers, using new gaskets
if necessary.
- Lightly coat the threads of the spark plugs with a suitable anti-seize compound
and torque the plugs to 11–17 ft. lbs. (15–23 Nm). Reconnect the
plug wires.
- Position the baffle plate, making sure that the curved surface faces outward,
then install the crankshaft pulley. (Be sure to also install the A/C and/or
power steering drive pulley, if applicable.) Torque the pulley bolts to 9–13
ft. lbs. (12–17 Nm).
- Install the water pump pulley and torque its mounting bolts to 6–8
ft. lbs. (8–11 Nm).
- Raise the vehicle and install the No. 3 engine mount bracket. Torque the
bolts to 44–63 ft. lbs. (60–85 Nm). Remove the lifting equipment,
then install and properly tension the drive belts.
- Install the engine side cover and connect the negative battery cable. Check
and/or adjust the ignition timing, as required.
- Rotate the engine so that the No. 1 piston is at TDC. Properly relieve the
fuel system pressure, as described in Section 5.
- Disconnect the negative battery cable and drain the cooling system.
- Tag and disconnect the spark plug wires, then remove all six spark plugs
(to make crankshaft rotation easier).
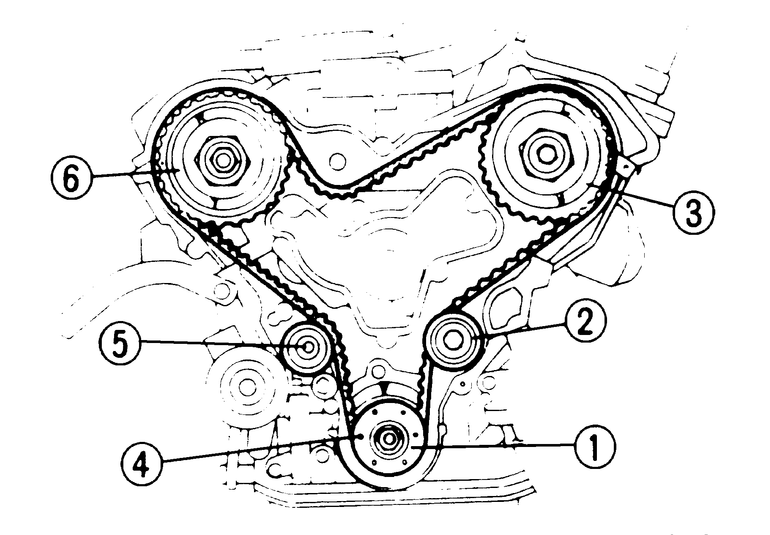
| Fig. 19: Timing mark alignment — 929
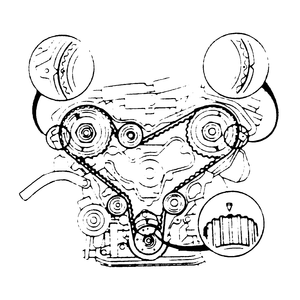
|
| Fig. 20: Loading the timing belt auto tensioner — 929
|
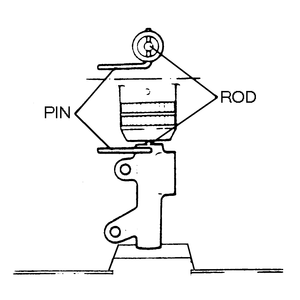
| Fig. 21: Once the tensioner is loaded, use an "L''
shaped pin or a small Allen wrench to hold it in place
|
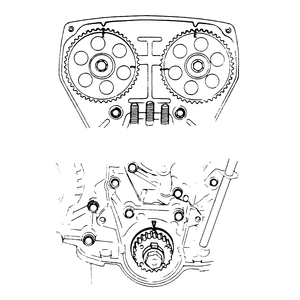
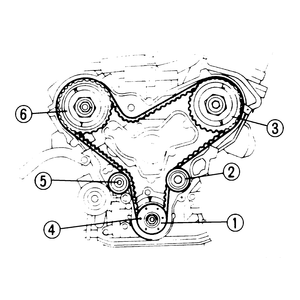
| Fig. 22: Install the timing belt onto the pulleys
in the order shown
|
- Remove the fresh air duct, the cooling fan and radiator cowling. Remove
the drive belts.
- Remove the air conditioning compressor idler pulley. If necessary, unfasten
the compressor and position it to the side.
- Remove the crankshaft pulley and baffle plate. Remove the coolant bypass
hose and the upper radiator hose.
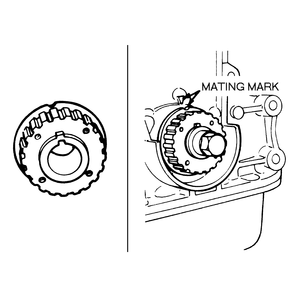
- Remove the timing belt cover assembly retaining bolts. Remove the left and
right timing belt covers and gaskets. Turn the crankshaft to align the mating
marks of the pulleys.
- Remove the upper idler pulley. Remove the timing belt. If reusing the belt,
be sure to mark the direction of rotation. Remove the timing belt auto tensioner.
To install:
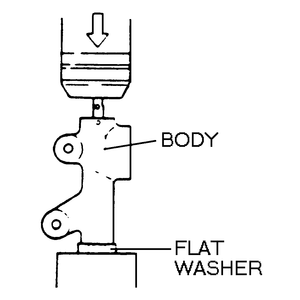
- Reload the timing belt tensioner as follows:
- Place a flat washer on the bottom of the tensioner body to prevent damage
to the body and position the unit on an arbor press.
- Press the rod into the tensioner body. Do not use more than 2,000 lbs
of pressure.
- Once the rod is fully inserted into the body, insert a suitable "L''
shaped pin or a small Allen wrench through the body and the rod to hold
the rod in place.
- Remove the unit from the press.
- Install the tensioner onto the block and torque the mounting bolt to 14–19
ft. lbs. (19–26 Nm).
NOTE: Leave the pin in place, it will be removed later.
- Make sure that all the timing marks are aligned properly. With the upper
idler pulley removed, wrap the timing belt around each pulley in the order
shown in the illustration. Install the upper idler pulley and torque the mounting
bolt to 27–38 ft. lbs. (37–51 Nm). Rotate the crankshaft twice
in the normal direction of rotation to align all the timing marks.
- Make sure all the marks are aligned correctly. If not, repeat Step 11.
- Remove the pin or wrench from the tensioner. Again turn the crankshaft twice
in the normal direction of rotation, and make sure that all the timing marks
are aligned properly.
- Check the timing belt deflection by applying 22 lbs. (10 kg) of force midway
between the right-side camshaft pulley and the lower idler pulley. If the
deflection is not 0.20–0.28 in. (5–7mm), repeat the adjustment
procedure.
NOTE: Excessive belt deflection is caused by auto tensioner
failure or an excessively stretched timing belt.
- Install the left and right timing belt covers, using new gaskets if necessary.
- Connect the coolant bypass hose and the upper radiator hose to their respective
fittings.
- Install the crankshaft pulley and baffle plate. Torque the retaining bolts
to 7–11 ft. lbs. (10–15 Nm).
- Reposition and fasten the air conditioner compressor, if necessary. Install
the air conditioning compressor idler pulley.
- Install and properly tension the drive belts.
- Install the cooling fan, radiator cowling and fresh air duct.
- Lightly coat the threads of the spark plugs with a suitable anti-seize compound
and torque the plugs to 11–17 ft. lbs. (15–23 Nm). Reconnect the
plug wires.
- Fill the cooling system to the proper level.
- Connect the negative battery cable. Check and adjust the ignition timing,
if necessary.