
- Drain the cooling system.
- Remove the cooling fan and radiator cowling.
- Remove the drive belts and fan pulley.
- Remove the water pump.
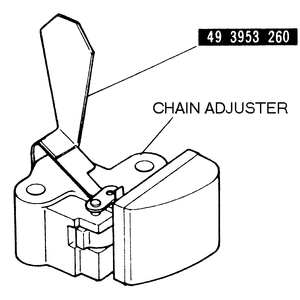
| Fig. 1: Install a chain adjuster guide (Part No.
49 3953 260) or equivalent clamping tool, before removing or installing
the chain adjuster — rear wheel drive GLC and 1979–82
626

|
- Remove the blind cover (located just above the crankshaft pulley).
- Push in the chain adjuster's slipper head and install a chain adjuster guide
(Part No. 49 3953 260) or equivalent clamping tool on the chain adjuster.
- Unfasten and remove the chain adjuster, with the adjuster guide attached.
To install:
- With the clamping tool still attached, fasten the chain adjuster to the
cylinder block.
- Adjust the chain tension as follows:
- Slightly rotate the crankshaft in its normal direction.
- Remove the two blind plugs and aluminum washers from the timing chain
cover.
- Loosen the guide strip attaching screws.
- Press the top of the chain guide strip through the opening in the top
right side of the timing chain cover (626s) or through the opening of
the cylinder head (GLCs). Insert a screwdriver through the two holes in
the timing chain cover, and tighten the guide strip attaching screws.
NOTE: On GLCs, you must first remove the cylinder head
cover to access the top of the chain guide strip.
- Remove the clamping tool from the tensioner. (Let the spring-loaded
slipper head take up the slack in the chain).
- Install the blind plugs and aluminum washers.
- Install the blind cover and gasket.
- If applicable, install the cylinder head cover with a new gasket.
- Install the water pump with a new gasket.
- Install the fan pulley and drive belts. Properly tension the belts.
- Install the cooling fan and radiator cowling.
- Fill the cooling system to the proper level.
The chain tensioner is located on the left upper side of the timing chain cover;
it is operated by a spring and hydraulic pressure. The tensioner has a one-way
locking system and an automatic release device. After assembly, it will automatically
adjust when the engine is rotated one or two times. No disassembly of the tensioner
is required.
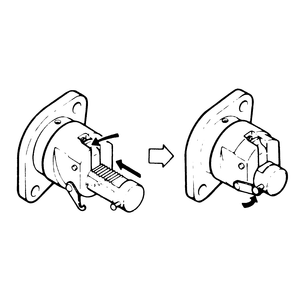
| Fig. 2: Resetting the timing chain tensioner — front
wheel drive GLC

|
- The tensioner is retained by two bolts. Remove the bolts and the tensioner.
- Check the number of teeth showing on the sleeve of the tensioner. If thirteen
or more notches are showing, the timing chain is stretched and must be replaced.
To install:
- Push the sleeve back into the body and lock it with the swivel catch on
the tensioner body.
- Position and fasten the tensioner onto the timing chain cover.
NOTE: After installation, the catch is released by the
action of the timing chain when the engine is rotated one-to-two revolutions.
The sleeve projects automatically, providing proper chain adjustment.

