NOTE: On front wheel drive GLC models, the manufacturer recommends
engine removal before removing the timing chain. However, you might be
able to remove/install the timing chain without removing the engine.
Before performing this procedure without removing the engine, be certain that
sufficient clearance exists, and be careful not to damage any components. If
the engine must be removed, follow the engine removal procedure earlier in this
section, then proceed to Step 9 of the following procedure.
- Rotate the engine so that the No. 1 piston is at TDC.
- Drain the crankcase and the cooling system.
- Remove the radiator hoses, thermostat housing, thermostat, fan, water pump
and radiator.
- Remove all lower and side splash/skid shields. Remove the crankshaft pulley
and any driven units (alternator, air pump, etc.) that will interfere with
timing chain cover removal.
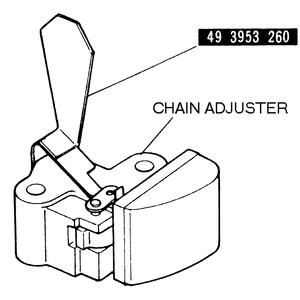
- On rear wheel drive models, remove the blind cover (a small plate retained
by two or three bolts that covers the chain adjuster), then install a chain
adjuster guide (Part No. 49 3953 260) or equivalent clamping tool, to prevent
the chain adjuster's slipper head from popping out.
- Remove the oil pan, as described earlier in this section.
- Remove the rocker arm cover. Unfasten the cylinder head bolts, in the proper
sequence, as described earlier in this section. Remove the rocker assembly.
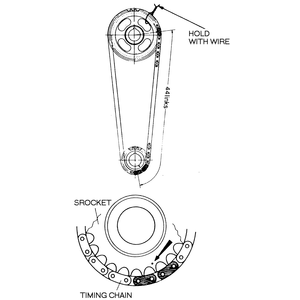
- Temporarily wire the timing chain to the camshaft sprocket, as illustrated,
to maintain their relationship. Then, remove the camshaft sprocket and chain
from the camshaft.
NOTE: Do not remove the timing chain from the camshaft
sprocket; if they do become separated, their reference marks will need to
be aligned before installation.
- On GLC front wheel drive models, remove the chain tensioner (located on
the upper left side of the timing chain cover).
| Fig. 1: Install a chain adjuster guide (Part No.
49 3953 260) or equivalent clamping tool, before removing or installing
the chain adjuster — rear wheel drive GLC and 1979–82
626

|
| Fig. 2: Wire the camshaft sprocket and timing chain
together to maintain their proper relationship — 626
shown (GLC wagon similar)

|
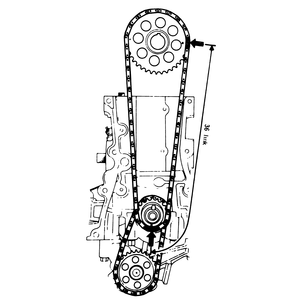
| Fig. 3: Timing chain and sprocket alignment — 1.5L
front wheel drive GLC. (The smaller chain and sprocket at the bottom
drive the oil pump)

|
- Unfasten and remove the timing chain front cover.
- If so equipped, remove the oil slinger from the crankshaft.
- Remove the timing chain and sprocket from the crankshaft. If necessary,
loosen the timing chain guide strip and remove the chain adjuster.
NOTE: On some engines, you must first remove an oil pump
sprocket and drive chain.
To install:
- Inspect the slipper head of the chain adjuster, the chain guide strip and
the vibration damper for wear or damage. Check the adjuster spring for loss
of tension. Replace parts as necessary.
- Install the timing chain onto the crankshaft sprocket, being careful to
match the shiny link (or pair of links) on the timing chain with the timing
mark on the sprocket (see the appropriate illustration). Then, align and slide
the sprocket onto the crankshaft. If applicable, also attach the oil pump
sprocket and drive chain, and the oil slinger. Be sure to install the shaft
key.
NOTE: When installing the oil pump sprocket, check the
chain for excessive slack and replace it, if necessary. On 1979–82
626 models, the slack should be 0.015 in. (0.38mm). Adjusting shims (between
the oil pump and mounting) are available in thicknesses of 0.006 in. (0.15mm).
- If applicable, install the timing chain adjuster with the adjuster guide
attached (except front wheel drive GLC). Make sure the adjuster spring is
fully compressed.
- If previously removed, position the cylinder head on the engine block with
a new gasket.
- Install the wired sprocket and timing chain on the camshaft, being careful
to install/align the shaft key. Then, remove the wire.
WARNING
If the chain comes off the sprocket, be sure to rematch the shiny mark on
the timing chain with the timing mark on the sprocket. Failure to maintain
this alignment can result in incorrect timing, as well as engine damage.
- Install the rocker assembly, then torque the cylinder head bolts in sequence,
as described earlier in this section.
- Position a new timing chain cover gasket, then install the cover.
- Adjust the timing chain tension on all but front wheel drive GLCs as follows:
- Rotate the crankshaft slightly in its normal direction.
- Remove the blind plugs and aluminum washers from the two holes in the
timing chain cover.
- If necessary, loosen the guide strip attaching screws.
- Press the top of the chain guide strip through the opening in the top
right side of the timing chain cover (626s) or through the opening of
the cylinder head (GLCs). Insert a screwdriver through the two holes in
the timing chain cover, and tighten the guide strip attaching screws.
- Remove the clamping tool from the tensioner. (Let the spring-loaded
slipper head take up the slack in the chain).
NOTE: The timing chain should now have the proper tension;
therefore no further manual adjustment is required.
- Install the blind plugs and aluminum washers in the two holes of the
timing chain cover.
- Install the blind cover and gasket on the chain cover.
- On GLC front wheel drive models, reset and install the chain tensioner on
the upper left side of the timing chain cover.
- Install the rocker arm cover with a new gasket.
- Install the oil pan with a new gasket, as described earlier in this section.
- Complete installation in the reverse of removal.
NOTE: If applicable, refer to the GLC's engine installation
procedure, earlier in this section.
- Fill the crankcase and cooling system to their proper levels.


