Previous Next

Valves

REMOVAL & INSTALLATION

  1. Remove the cylinder head from the engine, as previously described. Position the cylinder head on a suitable workstand.
  2. Attach a special Valve Spring Lifter and Pivot combination (such as Mazda Part Nos. 49 0636 100A and either 49 G030 222 or 49 BO12 006, depending on engine model) to the valve head and spring cap (retainer).

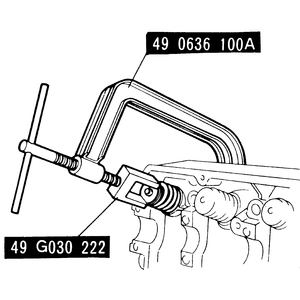
    Fig. 1: A suitable valve spring lifter and pivot combination may be used to remove and install valves in the cylinder head

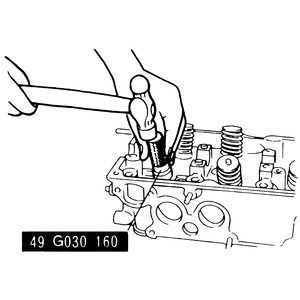
    Fig. 2: Invert the cylinder head and withdraw the valve from the cylinder head bore

    Fig. 3: Gently tap the valve stem seal onto the valve guide, using a suitable driver (such as an appropriately sized socket)

    NOTE: If such a tool is not available, you may substitute a Valve Spring Lifter (such as Mazda Part No. 49 0223 105B or equivalent), which is applied from the top side only.

  3. Screw down or otherwise compress the valve spring until the two valve keys (keepers) can be removed from the groove in the valve head. Remove the keepers, then slowly release the spring tension. Remove the spring retainer and valve spring.
  4. Remove the valve stem seal from the valve guide.
  5. Invert the cylinder head and withdraw the valve from the cylinder head bore.
  6. Inspect and repair or replace components, as necessary.

    To install:

  7. Insert the valve through the cylinder head bore.
  8. Apply a coating of engine oil to the inner surface of the new valve stem seal. Gently tap the valve stem seal onto the valve guide, using Valve Seat Pusher 49 G030 160 or equivalent, and a hammer.
  9. Position the valve spring and spring retainer over the valve stem. Compress the spring (using the same tool as in the removal procedure) until the keeper groove is fully exposed.
  10. Securely position the keepers in the groove, then release the spring tension, and remove the compressor tool. The spring pressure against the retainer should lock the keepers firmly in place.

Previous Next