Previous Next

Water Pump

REMOVAL & INSTALLATION

Rear Wheel Drive GLC
  1. Drain the engine coolant into a suitable container.
  2. Remove the retaining bolt and cooling fan from the water pump.
  3. Remove the drive belt(s) and the water pump pulley.
  4. Remove the nuts and washers which retain the water pump.
  5. Remove the water pump and gasket.

    To install:

  6. Thoroughly clean all gasket surfaces.
  7. Position the water pump with a new gasket.
  8. Install and tighten the mounting nuts and washers.
  9. Attach the water pump pulley.
  10. Install and tension the drive belt(s).
  11. Attach the cooling fan to the water pump.
  12. Refill the system with coolant. Start the engine and check for leaks.
Front Wheel Drive GLC
  1. Drain the engine coolant into a suitable container.
  2. Jack up the front of the car and safely support it on jackstands.
  3. Remove the under cover and the drive belt.
  4. Disconnect the lower hose and bypass pipe with O-ring.
  5. Unbolt and remove the water pump.

    To install:

  6. Thoroughly clean all gasket surfaces.
  7. Position the water pump with a new gasket.
  8. Install and tighten the mounting bolts.
  9. Apply vegetable oil to the O-ring on the bypass hose. Connect the bypass hose and the lower hose to the water pump.
  10. Install and tension the drive belt.
  11. Attach the under cover.
  12. Remove the jackstands and carefully lower the car.
  13. Refill the system with coolant. Start the engine and check for leaks.
1979–82 626
  1. Drain the engine coolant into a suitable container.
  2. Remove the cooling fan and fan drive assembly.
  3. Remove the radiator cowling.
  4. Remove the air pump drive belt, if so equipped.
  5. Remove the alternator drive belt.
  6. Disconnect the lower hose and the bypass hose.
  7. If so equipped, disconnect the heater hose.
  8. Unbolt and remove the water pump.

    To install:

  9. Thoroughly clean all gasket surfaces.
  10. Position the water pump with a new gasket.
  11. Install and tighten the mounting bolts.
  12. If applicable, connect the heater hose.
  13. Connect the bypass hose and the lower hose.
  14. Install and tension the alternator drive belt.
  15. If applicable, install and tension the air pump drive belt.
  16. Install the radiator cowling.
  17. Install the cooling fan and fan drive assembly.
  18. Refill the system with coolant. Start the engine and check for leaks.
1983–87 626
  1. Turn the crankshaft so that the No. 1 cylinder is at TDC.
  2. Drain the engine coolant into a suitable container.
  3. Remove the alternator drive belt.
  4. Remove the upper timing belt cover.

    Fig. 1: Grasp the water pump by its pulley . . .

    Fig. 2: . . . and withdraw it from the engine

    Fig. 3: Use a gasket scraper to remove old gasket material

    Fig. 4: Don't forget to remove gasket material from the inlet pipe mating surface

  5. Remove the engine side cover (splash shield).
  6. Remove the crankshaft pulley.
  7. Remove the lower timing belt cover.
  8. Unfasten its mounting bolt and remove the timing belt tensioner and spring.
  9. Remove the timing belt.
  10. Disconnect the inlet pipe from the water pump.
  11. Unbolt and remove the water pump.

    To install:

  12. Thoroughly clean all gasket surfaces.
  13. Position the water pump with a new gasket.
  14. Install and tighten the mounting bolts.
  15. Connect the inlet pipe with a new gasket.
  16. Install the timing belt tensioner and spring, as described later in this section.
  17. Install the timing belt, as described later in this section.
  18. Install the lower timing belt cover.
  19. Attach the crankshaft pulley.
  20. Install the engine side cover.
  21. Install the upper timing belt cover.
  22. Install and tension the alternator drive belt.
  23. Refill the system with coolant. Start the engine and check for leaks.
1986–87 323
  1. Turn the crankshaft so that the No. 1 cylinder is at TDC.
  2. Drain the engine coolant into a suitable container.
  3. Remove the alternator drive belt.
  4. Remove the water pump pulley.
  5. Remove the oil pump (crankshaft) pulley.
  6. Remove the timing belt cover.
  7. Unfasten its mounting bolt and remove the timing belt tensioner and spring.
  8. Remove the timing belt.
  9. Disconnect the cooling inlet pipe from the water pump.
  10. Unbolt and remove the water pump.

    To install:

  11. Thoroughly clean all gasket surfaces.
  12. Position the water pump with a new gasket.
  13. Install and tighten the mounting bolts.
  14. Connect the cooling inlet pipe with a new gasket.
  15. Install the timing belt tensioner and spring, as described later in this section.
  16. Install the timing belt, as described later in this section.
  17. Install the timing belt cover.
  18. Attach the oil pump pulley.
  19. Install the water pump pulley.
  20. Install and tension the alternator drive belt.
  21. Refill the system with coolant. Start the engine and check for leaks.
1988–89 626/MX-6
  1. Disconnect the negative battery cable.
  2. Turn the crankshaft so that the No. 1 piston is at TDC.
  3. Drain the engine coolant into a suitable container.
  4. Remove the crankshaft pulley.
  5. Remove the upper timing belt cover.
  6. Remove the lower timing belt cover.
  7. Remove the baffle plate.
  8. Unbolt and remove the timing belt tensioner and spring.
  9. Unbolt and remove the idler pulley from the water pump housing.
  10. Remove the timing belt.
  11. Unfasten the water pump retaining bolts and remove the water pump with the O-ring seal and three rubber seals. Discard the seals and O-ring.

    To install:

  12. Remove all the old gasket fragments, oil and grease from the water pump housing and the cylinder block. Install the three rubber seals, as shown in the illustration.
  13. Install the new O-ring in the water pump sealing groove. To avoid dropping the O-ring when positioning the water pump, coat the inside of the seal groove with silicone sealant to hold the O-ring in place. Do not apply sealant to the contact surfaces.
  14. Position the water pump with a new gasket onto the block and align all bolt holes. Install the retaining bolts and torque them to 14–19 ft. lbs. (19–26 Nm).
  15. Install the idler pulley and torque the pulley bolt to 27–38 ft. lbs. (37–51 Nm).
  16. Install the timing belt tensioner and spring.
  17. Install the timing belt.
  18. Install the baffle plate, along with the lower and upper timing belt covers.
  19. Install the crankshaft pulley.
  20. Refill the cooling system to the proper level and connect the negative battery.
  21. Start the engine and check for leaks.

    Fig. 5: Water pump seal installation on 1988–89 626/MX-6

929

NOTE: This procedure requires removal of the automatic timing belt tensioner. Before the tensioner is re-installed, it must be reset using an arbor press or vice.

  1. Disconnect the negative battery cable.
  2. Tag and disconnect the high tension leads, then remove the spark plugs.
  3. Turn the crankshaft so that the No. 1 piston is at TDC.
  4. Drain the engine coolant into a suitable container.
  5. Disconnect and remove the fresh air duct at the air cleaner assembly.
  6. Remove the cooling fan and radiator cowling.
  7. Remove any accessory drive belts which engage the crankshaft pulley.
  8. Remove the water pump pulley.
  9. Remove the A/C compressor idler pulley.
  10. Remove the crankshaft pulley and baffle plate.
  11. Disconnect the coolant bypass hose.
  12. Disconnect the upper radiator hose.
  13. Remove the left timing belt cover and gasket.
  14. Remove the right timing belt cover and gasket.
  15. Remove the upper idler pulley.
  16. Turn the crankshaft to align the mating marks of the pulleys, then remove the timing belt.

    NOTE: If reusing the belt, be sure to mark its direction of rotation.

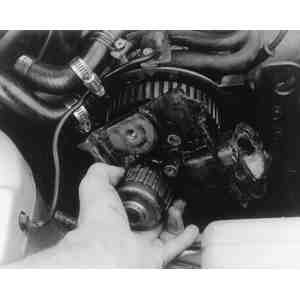
  17. Remove the timing belt auto tensioner.
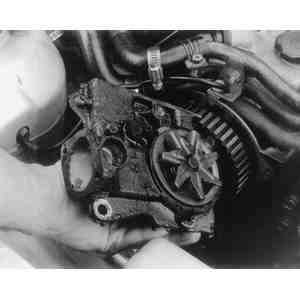
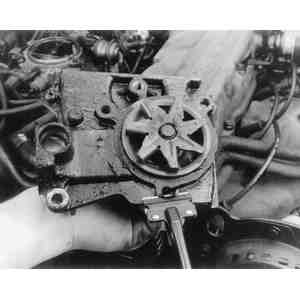
  18. Remove the retaining bolts and nuts, then separate the water pump from the cylinder block. Remove and discard the old gasket.

    To install:

  19. Remove all the old gasket material from the water pump and cylinder block mating surfaces.
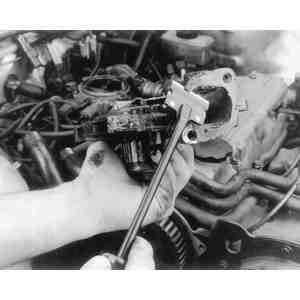
  20. Install the new gasket onto the water pump, then position the water pump onto the block. Install the retaining nuts and bolts. Torque the nuts and bolts to 14–19 ft. lbs. (19–26 Nm).
  21. Reset the tensioner as follows:
    1. Place a flat washer on the bottom of the tensioner body (to prevent damage to the body plug) and position the unit in an arbor press or vice.
    2. Slowly press the rod into the tensioner body, with a maximum of 2,200 lbs. (1,000 kg) of pressure.
    3. Once the rod is fully inserted into the body, insert a suitable L-shaped pin or a small Allen wrench through the body and rod, in order to hold the rod in place.
    4. Remove the tensioner from the press or vice and install it on the block, then torque the mounting bolt to 14–19 ft. lbs. (19–26 Nm). Leave the pin/Allen wrench in place; it will be removed later.
  22. Make sure that all the timing marks are aligned properly. With the upper idler pulley removed, wrap the timing belt over each pulley in the order shown in the illustration.

    NOTE: A used timing belt must be re-installed so that it rotates in its original direction.

  23. Install the upper idler pulley and tighten its retaining bolt to 27–38 ft. lbs. (37–51 Nm).
  24. Rotate the crankshaft twice in the normal direction of rotation and align all the timing marks.

    NOTE: If the matching marks do not align, remove the upper idler pulley, then repeat Steps 22–24.

  25. Remove the pin/Allen wrench from the tensioner. Again turn the crankshaft twice in the normal direction of rotation and make sure that all the timing marks are aligned properly.
  26. Check the timing belt deflection by applying 22 lbs. (10 kg) of force. If the deflection is not 0.20–0.28 in. (5–7mm), repeat the resetting procedure.

    NOTE: Excessive belt deflection is caused by auto tensioner failure or an excessively stretched timing belt. If correct tension cannot be obtained, the belt and/or tensioner must be replaced.

  27. Install the timing belt gaskets and covers.
  28. Connect the upper radiator hose.
  29. Connect the coolant bypass hose.
  30. Install the baffle plate.
  31. Install the crankshaft pulley.
  32. Install the A/C compressor idler pulley.
  33. Install the water pump pulley.
  34. Install and tension the accessory drive belts which were removed.
  35. Install the cooling fan and radiator cowling.
  36. Install the fresh air duct.
  37. Apply anti-seize compound or molybdenum-based lubricant to the spark plug threads. Install and tighten the spark plugs to 11–17 ft. lbs. (15–23 Nm), then connect the plug wires.
  38. Refill the cooling system to the proper level and connect the negative battery cable.
  39. Start the engine and check for leaks.

Previous Next