NOTE: These systems are highly complex and are covered by an
extended warranty. Therefore, only simple adjustments are included here.
- Check all hoses and vacuum sensing tubes for improper connections and signs
of wear; replace as necessary.
- Disconnect the hose which runs from the air control valve to the air cleaner
at the air cleaner assembly.
- Disconnect the vacuum sensing tube from the relief solenoid valve, which
can be identified by the blue spot of paint on its body.
- Start the engine and run it at idle. Place your finger over the disconnected
hose to the air cleaner; no vacuum should be present.
- Detach the electrical connection of the anti-afterburn solenoid valve; vacuum
should now be present in the hose. If not, the anti-afterburn valve, its solenoid
valve or its vacuum lines are defective and must be replaced.
Test the No. 1 anti-afterburn valve as follows:
- Warm up the engine and run it at idle speed.
- Locate the hose that runs between the air control valve and the air pump.
Disconnect the hose at the air pump.
- Place a finger over the opening of the air hose and check that no air is
sucked into the hose at idle speed.
- Have an assistant increase the idle speed to just over 3,000 rpm, then quickly
release the accelerator pedal. Make sure air is sucked into the hose for a
few seconds while the engine is decelerating. If not, replace the air control
valve.
Test the No. 2 anti-afterburn valve as follows:
- Warm up the engine and run it at idle speed.
- Locate the hose that runs between the air cleaner and the No. 2 anti-afterburn
valve. Disconnect the hose at the air cleaner.
- Place a finger over the opening of the air hose and check that no air is
sucked into the hose at idle speed.
- Have an assistant increase the idle speed to just over 3,000 rpm, then quickly
release the accelerator pedal. Make sure air is sucked into the hose for a
few seconds while the engine is decelerating. If not, replace the air control
valve.
- Warm up the engine and run it at idle speed.
- Locate the hose that runs between the air control valve and the air pump.
Disconnect the hose at the air pump.
- Place a finger over the opening of the air hose and check that no air is
sucked into the hose at idle speed.
- Have an assistant increase the idle speed to just over 3,000 rpm, then quickly
release the accelerator pedal. Make sure air is sucked into the hose for a
few seconds while the engine is decelerating. If not, replace the air control
valve.
NOTE: This test procedure applies only to vehicles equipped
with a manual transmission.
- Remove the air cleaner assembly.
- Check all vacuum hoses for tears and/or deterioration. Replace as required.
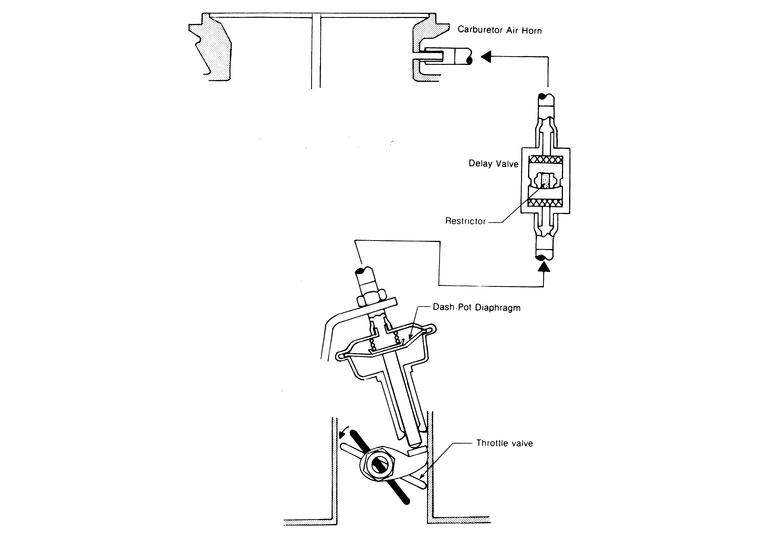
- Make sure the dashpot plunger rod does not keep the throttle lever from
returning to its idle stop when closed.
| Fig. 1: A dashpot affects closing of the throttle
valve on some RX-7s

|
- Quickly operate the throttle lever; the dashpot plunger rod should quickly
extend.
- Release the throttle lever; the plunger rod on the dashpot should slow its
return to the idle position.
- Connect a tachometer to the engine.
- Start and run the engine until it reaches normal operating temperature.
Make sure the idle speed is within specifications; adjust as necessary.
- Disconnect the vacuum sensing tube from the top of the dashpot and move
the throttle lever away from the dashpot plunger rod. Close the vacuum inlet
at the top of the dashpot with your finger.
- Release the throttle lever and check the engine speed at which the dashpot
stops moving after it has been pushed in by the throttle lever. This speed
should be 1,650–1,850 rpm. If not, loosen the locknut on the dashpot
and adjust by turning the dashpot body. Repeat Step 9 to verify the adjustment.
NOTE: On 1980–82 models, this test procedure applies
only to vehicles equipped with a manual transmission.
- Remove the air cleaner assembly (carbureted models only).
- Check to see that the dashpot does not keep the throttle lever from returning
to the idle stop.
- Quickly operate the throttle lever fully; when the throttle lever is open,
the dashpot plunger rod should quickly extend.
- Release the throttle lever. The lever should quickly snap closed until it
hits the dashpot plunger rod, then slowly close until it reaches its stop.
- Connect a tachometer to the engine. Run the engine until it reaches normal
operating temperature, then make sure the idle speed is correct.
- Move the throttle lever until it is away from the dashpot plunger rod.
- Slowly close the throttle lever and note the engine speed when the throttle
lever just touches the dashpot plunger rod. If engine speed is not 3,500–3,900
rpm for 1980 models, 3,800–4,200 rpm for 1981–85 carbureted models,
or 2,350–2,650 rpm for fuel injected models, loosen the locknut and
adjust the dashpot by turning it until its plunger rod is in the correct position.
- On turbocharged models, drain the cooling system and remove the intercooler.
- Manually open the throttle valve fully, then push the dashpot actuating
rod with your finger; verify that the rod retracts slowly into the dashpot.
- Release the rod and check that it returns quickly to its original position.
- If the dashpot does not operate as described, adjust or replace it. (Dashpot
adjustment is described later in this section.)
The coasting valve allows additional air into the intake manifold to prevent
engine misfire during deceleration at engine speeds over 1,150 rpm. It is regulated
by the engine control unit and the idle switch on the carburetor.
- Connect a tachometer to the engine.
- Warm the engine to its normal operating temperature.
- Detach the electrical connection from the coasting valve, then attach a
voltmeter to the harness side of the connection. Disconnect the vacuum sensing
tube from the dashpot diaphragm on 1979 models.
- Start the engine and increase the engine speed to 3,000 rpm, using the throttle.
Quickly release the throttle lever; current flow should stop when the engine
speed falls below 1,050–1,250 rpm (1,000–1,200 rpm on Canadian
models). Shut off the engine.
- Disconnect the voltmeter, then detach the air hose (running from the coasting
valve to the air cleaner) at the air cleaner assembly.
NOTE: Do not yet reconnect the coasting valve electrical
connection.
- Start the engine. There should be no vacuum at the air hose. Activate the
coasting valve by attaching jumper wires to its electrical connection from
the battery; when the engine is running, vacuum should be present in the air
hose.
| Fig. 2: Testing the coasting valve — 1979–80
RX-7

|
- Warm up the engine to its normal operating temperature.
- Disconnect the hose from the coasting valve to the air cleaner at the air
cleaner assembly.
- With the engine running at idle, place a finger over the hose opening and
verify that air is not drawn into the hose.
- Detach the connector from the shutter solenoid valve; air should be drawn
into the disconnected hose as the idle roughens. At that same moment, check
that the coasting valve rod retracts into the coasting valve approximately
0.4 in. (10mm).