CAUTION
The fuel system is under pressure even when the fuel pump is not in operation.
Always relieve the fuel system pressure before servicing the system. Also, wrap
a clean cloth around the fuel connection when loosening to catch any fuel spray
from residual pressure and take precautions to avoid the risk of fire.
- Remove the storage compartment located behind the driver's seat and detach
the fuel pump connector. Properly relieve the fuel system pressure.
- Raise the vehicle and support it safely.
- Remove the pump bracket clamp bolt.
- Disconnect the inlet and outlet hoses from the fuel pump and plug the lines.
Make a note of where each hose connects.
- Remove the fuel pump from its bracket.
To install:
- Position the fuel pump in its bracket. Unplug, then connect the fuel lines
to their proper fittings.
- Install the pump bracket clamp bolt, then lower the vehicle.
- Attach the fuel pump connector and install the storage compartment.
- Lift up the rear mat.
- Unfasten and remove the fuel pump cover.
- Relieve the fuel system pressure by running the engine and disengaging the
fuel pump electrical connector.
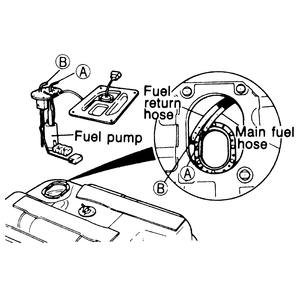
- Disconnect and plug the main fuel and fuel return hoses. Make a note of
where each hose connects.
- Unfasten the retaining screws and remove the fuel pump from the tank.
To install:
- Install the fuel pump into the fuel tank and fasten the retaining screws.
- Connect the main fuel hose (labeled A in the illustration)
to the A fitting on the pump. Do the same for the B hose.
Secure the hoses with the hose clips and make sure they are tight.
- Attach the pump's electrical connector.
- Install the fuel pump cover and reposition the rear mat.
| Fig. 1: The fuel pump is mounted inside the fuel
tank, beneath a cover plate — 1986–89 RX-7

|

