- Disconnect the negative battery cable.
NOTE: Place masking tape on the instrument panel pad directly
below the instrument cluster to prevent damage to the pad during the procedure.
- Remove the meter hood by removing the screw above either dial, and pulling
the hood off the dash.
- Remove the wood grain center panel cover by removing the screw from the
left side and unclipping the panel on the right.
- Unfasten the three screws located under the front edge of the crash pad,
and remove the pad.
- Reach behind the speedometer and disconnect the cable by pressing on the
flat surface of the connector.
- Remove the three screws from the instrument cluster, and pull the cluster
out of the dash.
- Detach the multiple connectors from the rear of the unit and remove the
cluster from the vehicle.
- Installation is the reverse of the removal procedure.
- Disconnect the negative battery cable.
- Put masking tape along the panel just below where the cluster will come
out to protect it.
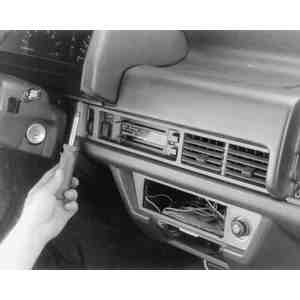
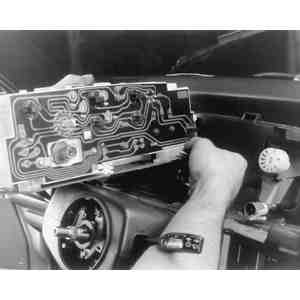
- Unfasten the tripmeter knob (1), screws (2), and clips (3), then remove
the meter hood (4), as referenced in the illustration.
- Remove the wood grain center panel cover by unfastening the screw from the
left side and unclipping the panel on the right.
- Unfasten the three screws located under the front edge of the instrument
panel pad, then remove the pad.
- Remove the three screws from the top of the combination instrument cluster,
and pull the cluster outward.
- Disconnect the speedometer cable by pressing on the flat surface of the
plastic connector. Detach the wiring connectors and remove the cluster.
- Installation is the reverse of the removal procedure.
| Fig. 1: Meter hood removal — GLC
sport dash
|
- Disconnect the negative battery cable.
- Remove the steering wheel.
- Remove the column cover.
- Disconnect the speedometer cable.
- Unfasten and remove the meter hood.
- Remove the meter assembly attaching screws, then detach the wire connections
and remove the combination meter assembly.
- Installation is the reverse of the removal procedure.
| Fig. 2: Unfasten all of the upper and lower retaining
screws . . .
|
| Fig. 3: . . . and remove the meter hood
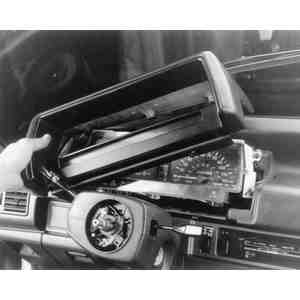
|
| Fig. 4: Remove the screws retaining the meter assembly
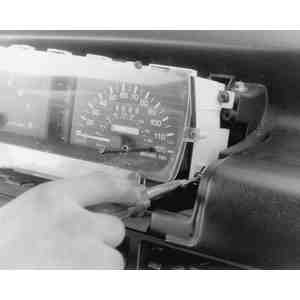
|
| Fig. 5: Unfasten the electrical connectors from the
rear of the meter assembly
|
- Disconnect the negative battery cable. Tilt the steering wheel downward.
- Remove the cover from the top of the meter hood. Remove the two screws from
the top of the meter assembly.
- Remove the two attaching screws from the underside of the meter hood. Then,
remove the four screws from the underside of the assembly.
- Remove the four screws attaching the meter assembly to the hood. Pull the
assembly out slightly, then depress the retaining clip and disconnect the
plugs.
- Disconnect the speedometer cable and remove the light. Pull the assembly
out.
- Installation is the reverse of the removal procedure.
- Disconnect the negative battery cable.
- Tilt the steering wheel downward. Disconnect the speedometer cable from
the rear of the cluster by reaching up behind the cluster and unscrewing the
collar.
- Remove the four screws from the underside of the instrument cluster assembly
where it attaches to the underside of the dash and the three screws from the
underside of the hood.
- Remove the two screws attaching the cluster to the hood at the top. Then,
pull the assembly slightly outward and detach the wiring connectors. In order
to disconnect the plugs, you must depress the retaining clips.
- Remove the cluster assembly.
- Installation is the reverse of the removal procedure.
- Disconnect the negative battery cable.
- Remove the shift lever knob. On vehicles equipped with an automatic transaxle,
first remove the two attaching screws that hold the shift knob to the shaft.
- Remove the rear console mounting screws, then pull the console rearward
to remove it.
- Remove the front console mounting screws.
- Pry the ornament from the steering wheel pad, then remove the steering wheel
mounting nut.
- Remove the horn cap. Attach a suitable puller and remove the steering wheel.
- Remove the attaching screws and separate the upper and lower column covers.
Unfasten the under cover attaching screws and remove the under cover. Reach
behind the hood release and remove the nut and hood release knob.
- Remove the meter hood attaching screws and pull the meter hood out until
the electrical connectors are visible and accessible. Disconnect the speedometer
cable at the speedometer. Detach all the connectors from the rear of the meter
hood and remove it.
- Remove the attaching screws and pull the meter assembly outward. Detach
the speedometer cable and meter connectors, then remove the meter assembly.
To install:
- Rest the meter assembly on top of the combination switch and connect the
wiring to the rear of the unit. Fasten the speedometer cable to the speedometer
cable connection.
- Gently push the meter into the dash and secure with the attaching screws.
- Attach the meter hood electrical connectors and push the meter hood into
place. Fasten the meter hood with the attaching screws.
- Install the hood release knob and the under cover.
- Assemble the upper and lower column cover with the attaching screws.
- Install the steering wheel, cap, mounting nut and ornament.
- Install the front console retaining screws. Push the rear console into place
and secure with the attaching screws.
- Install the shift lever knob.
- Connect the negative battery cable and check all the meter functions for
proper operation.
- Disconnect the negative battery cable.
- Remove the three screws from under the top edge of the instrument hood.
- Pull the hood out for access, unplug the electrical connectors to the cluster
switches on either side, and remove it.
- Unfasten the screw located near the bottom of the cluster on either side.
Remove the cluster from the dash, unplugging the connectors when you can reach
them.
To install:
- Rest the cluster on the dash and plug in all the connectors. Push the cluster
into the dash and install the side attaching screws.
- Plug in the meter hood connectors and install the meter hood into the dash.
Install the top instrument hood retaining screws.
- Connect the negative battery cable. Check the meter functions for proper
operation.
- Remove the steering wheel, upper and lower column covers and the combination
switch assembly.
- Unfasten the attaching screws and remove the meter hood.
- Remove the meter attaching screws and pull the meter out until the electrical
connectors are visible. Disconnect the speedometer cable at the speedometer.
Detach all the connectors from the rear of the meter and remove it.
To install:
- Rest the meter on the dash and plug all the electrical connectors into the
rear of the unit. Connect the speedometer cable to the speedometer. Push the
meter into the dash and install the attaching screws.
- Install the meter hood.
- Install the combination switch, upper and lower steering wheel column covers
and steering wheel.
- Check the meter functions for proper operation.
- Disconnect the negative battery cable.
- Disconnect the speedometer cable at the transmission.
- Remove the ashtray and detach the cigarette lighter connector.
- Gently pry the horn cap loose, then remove the steering wheel nut and the
horn pad. Remove the steering wheel using a suitable steering wheel puller.
DO NOT strike the steering wheel with a hammer, as its collapsibility might
be severely impaired.
- Remove the steering wheel upper and lower cover assemblies.
- Unscrew and pull the switch panel out and away from the dash. Detach the
electrical connectors and remove the switch panel.
- Remove the meter hood attaching screws and pull the meter hood out until
the electrical connectors are visible. Disconnect the speedometer cable at
the speedometer. Detach all the connectors from the rear of the meter cluster
and remove it.
To install:
- Rest the meter assembly on the dash and connect the speedometer cable to
the speedometer. Plug in all the electrical connections to the rear of the
meter assembly. Gently push the meter into the dash opening and install the
attaching screws.
- Plug in the switch panel connectors and push the panel into the dash. Install
the attaching screws.
- Assemble the upper and lower steering wheel covers and install the attaching
screws.
- Install the steering wheel, horn pad, steering wheel nut and horn cap.
- Attach the cigarette lighter connector and install the ashtray.
- Connect the speedometer cable to the transmission.
- Connect the negative battery cable and check all the meter functions for
proper operation.
- Disconnect the negative battery cable.
- Unscrew the speedometer cable from the back of the instrument cluster.
- Pull off the steering wheel center cap.
- Remove the steering wheel as described in Section 8 of this manual.
- On 1979–83 models, pull the light switch knob off the shaft.
- Remove the upper and lower steering column covers. On 1984–85 models,
remove the combination switch and detach the cluster switches (left side:
hazard and headlight retractor switches; right side: rear wiper, rear washer
and rear defroster switches) from the sides of the cluster. The switches are
retained by screws.
- On 1979–83 models, remove the instrument cluster cover by unfastening
the two upper screws. On 1984–85 models, gently pry the meter hood from
the face of the cluster assembly.
- Remove the instrument cluster attaching screws, draw out the instrument
cluster and unfasten the multiple connectors from the back of the cluster.
Remove the instrument cluster.
To install:
- Rest the cluster on the dash and plug in all the connectors. Gently push
the cluster into the dash and install the attaching screws.
- On 1984–85 models, push the meter hood onto the face of the cluster
until it locks in place. On 1979–83 models, install the cover with the
attaching screws.
- On 1984–85 models, connect the switch assemblies to the cluster and
install the combination switch. On 1979–83 models, push the light switch
knob onto the shaft. Install the upper and lower steering wheel covers.
- Install the steering wheel and horn cap.
- Connect the speedometer cable and the negative battery cable. Check all
the meter functions for proper operation.
The instrument cluster front bezel contains switches for headlamps and other
lighting, cruise control, turn signals and headlamp high beams, and windshield
wipers.
- Unfasten the seven screws which secure the bezel and switch assembly.
- Pull the cluster gently and disconnect the instrument cluster wiring harness
from the switch assemblies.
- Remove the bezel, then withdraw the switch assemblies from the rear of the
unit.
- Unfasten the mounting screws, then disconnect the speedometer cable and
wiring connectors.
- Installation is the reverse of the removal procedure.

