Loosen the front lug nuts, then raise the front of the vehicle and support
it safely. Remove the front wheels.
Remove the brake line clip and separate the brake line from the strut tower
mounting tab. Position the brake line off to the side.
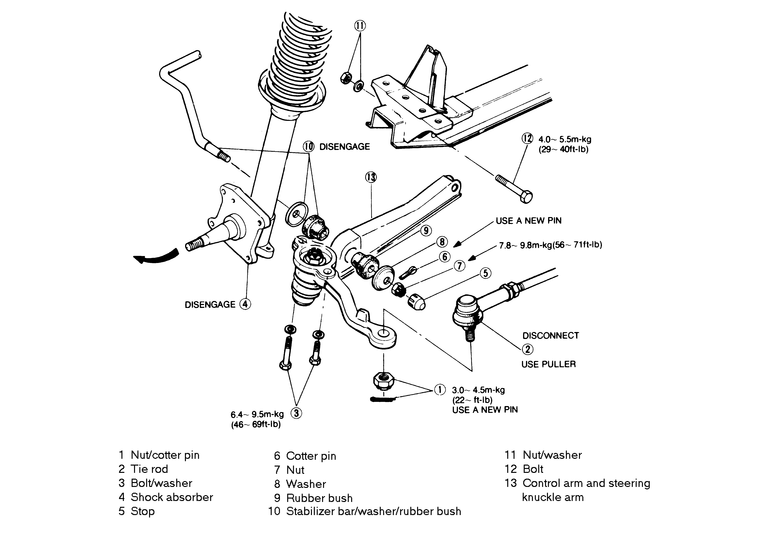
Remove the cotter pin and nut (which secure the tie-rod end) from the knuckle
arm, then use a puller to separate the tie-rod from the knuckle.
Unfasten the bolts which secure the lower end of the shock absorber to the
knuckle arm.
Remove the nut then withdraw the rubber bushing and washer which secure
the stabilizer bar to the control arm.
Fig. 1: Exploded view of the control arm mounting — GLC
rear wheel drive models
Unfasten the nut and bolt which secure the control arm to the frame member.
Push outward on the strut assembly while removing the end of the control
arm from the frame member.
Remove the control arm and steering knuckle arm as an assembly.
Install the assembly in a vise. Remove its cotter pin and unfasten the ball
joint nut; then separate the knuckle arm from the control arm with a puller.
Installation of the control arm is performed in the reverse order of its
removal. Torque the control arm-to-crossmember nut and bolt to 29–40
ft. lbs. (39–54 Nm).
Support the vehicle front end via the crossmember on axle stands.
Remove the two bolts which fasten the ball joint to the lower arm.
Now, remove the two bolts attaching the rear of the lower arm to the body,
and the three connecting the front of the lower arm to the body.
To install, reverse the removal procedure, torquing the front three bolts
mounting the unit to the body to 69–86 ft. lbs. (93–117 Nm), and
rear body bracket bolts to 43–54 ft. lbs. (58–73 Nm), and the
knuckle to arm bolts to 32–40 ft. lbs. (43–54 Nm).
Support the front of the vehicle via the crossmember on safety stands. Remove
the splash shield from the side on which you'll be working.
Remove the two locknuts, washers, bushings, bolt and spacer that link the
stabilizer bar to the lower arm. Keep the parts in order.
Remove the pinch bolt and nut, then remove the stem of the ball joint from
the strut.
Remove the nuts, washers, and bolts which fasten the inner two hinge joints
of the arm to the body, then remove the arm.
For installation, reverse the above procedures, but wait for final tightening
of the two hinge bolts linking the arm to the body until all parts are assembled,
the other parts are torqued, and the weight of the car can rest on the wheel.
Torque the hinge bolts fastening the arm to the body to 69–93 ft. lbs.
at this point. Torque the pinch bolt for the ball joint to 32–39 ft.
lbs. (1983–87) and 27–40 ft. lbs. (1988–89).
Loosen the front wheel lug nuts. Raise the front of the vehicle and support
safely. Remove the front wheels.
Remove the nut, retainer and rubber bushing from the lower control arm through-bolt
and lift the stabilizer bar from the bolt. Remove the bolt spacer and remove
the bolt from the lower control arm with the remaining bushings and retainers.
Keep all parts in order.
Remove the cotter pin and pinch bolt and nut, then separate the tie rod
end from the compression rod.
Disconnect and remove the compression rod from the lower control arm by
removing the three nuts and bolts.
Remove the pinch bolt and nut, then separate the ball joint from the knuckle
arm. Remove the lower control arm. Service the ball joint dust boot at this
time. Press the old rubber bushing from the arm and press a new bushing in
using special tools 49–HO34–202 and 49–HO34–201.
To install:
Maneuver the lower control arm into position, then install the retaining
bolt through the bushing and install the nut. Torque the bolt to 54–69
ft. lbs. (73–93 Nm).
Connect the knuckle arm to the ball joint and the steering knuckle. Torque
the ball joint pinch bolt to 69–91 ft. lbs.
Connect the compression rod to the lower control arm with the three nuts
and bolts. Connect the tie rod end to the compression rod and secure with
pinch nut. Torque the tie rod pinch nut to 69–91 ft. lbs.
From underneath the control arm insert the through-bolt with spacer, rubber
bushings and retainers in the proper order. Connect the stabilizer bar to
the end of the bolt and install the remaining rubber bushings and retainers.
Install and tighten the stabilizer bar nut.
Install the front wheels and lower the vehicle. Tighten the front wheel
lug nuts.
The lower control arm and ball joint are replaced as an assembly.
Jack the front of the vehicle and support it. Remove the front wheels.
Remove the two lower strut to steering knuckle bolts.
Disconnect the tie-rod end at the steering knuckle by removing its cotter
pin and castle nut, then breaking it free with either a puller or a ball joint
removal tool.
Disconnect the stabilizer bar and the tension rod from the control arm.
Remove the nut attaching the steering knuckle arm to the lower control arm
and disconnect the knuckle arm using a suitable puller.
Remove the control arm-to-crossmember attaching bolt and remove the control
arm.
Check the control arm and steering knuckle arm for deformities and cracks,
check the control arm bushings for damage. New bushings can be pressed into
the control arm.
If the ball joint dust covers are ripped, but the ball joint itself is still
good, remove the dust boot retaining ring with a drift and remove the dust
boot. Fill the new dust boot with lithium grease and install it on the ball
joint. Press the retaining ring into place using a large socket and a vise.
Install the control arm in the reverse order of removal, noting the following:
when installing the control arm to crossmember attaching bolt, tighten it
finger-tight until the whole assembly is installed, then lower the car and
jounce it a few times to settle the bushing, then tighten the bolt to 29–40
ft. lbs. (39–54 Nm). Tighten the ball joint-to-knuckle arm nut to 43–51
ft. lbs. (58–69 Nm), tighten the knuckle arm to strut bolts to 43–51
ft. lbs. (58–69 Nm) and tighten the tension rod to control arm fastener
to 40–50 ft. lbs.
Jack the front of the vehicle and support it safely. Remove the front wheels.
Disconnect the stabilizer bar from the control link by removing the nut
and bolt.
Remove the bolt that attaches the control link to the control arm. Disconnect
the control link from the control arm.
Remove the control arm-to-steering knuckle bolt. Remove the bolts that attach
the control arm to the frame. Remove the control bushing through-bolt.
Remove the lower control arm. Service the ball joint dust boot at this time.
If the ball joint is defective, replace the lower control arm.
To install, maneuver the lower control arm into position, then insert the
control bushing through-bolt and make the nut hand-tight. Install the frame,
steering knuckle and control link attaching bolts. Tighten all the bolts and
nuts properly.
Connect the stabilizer bar to the control link and tighten the bolt.