- Raise the vehicle's front end and support it on axle stands. Remove the
bolt which secures the universal joint in the steering shaft to the gearbox.
- Remove the cotter pin from the tie rod end ballstud and loosen the nut.
Press the ballstud out of the steering knuckle with a vice-like tool such
as MB991113 or equivalent, then remove the nut. Do the same on the other side.
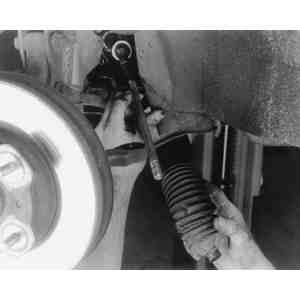
- Cut the band off the steering joint rubber boot.
| Fig. 1: Remove the boot band, then slide the rubber
boot off the tie rod
|
- Remove the left and right tie-rods from the gearbox housing, Remove the
bolts that secure the mounting bracket and rubber mountings, and pull the
gearbox out of the vehicle. Work slowly to keep the unit from being damaged.
- Installation is the reverse of the removal procedure. Be sure to position
the rubber sleeve in which the unit is mounted so that the tabs fit in the
notch away from the crossmember. Use a new band for the steering joint rubber
boot. Adjust the toe-in. Tighten the mounting bracket attaching bolts to 43–58
ft. lbs. (58–79 Nm), and the ballstud nut to 17 ft. lbs. (23 Nm). Tighten
the nut further, if necessary, to align the castellations with the cotter
pin hole and install a new cotter pin.
- Turn the steering wheel back and forth to test steering operation.
NOTE: The installation of the steering gear requires the use
of a dial indicator, a column shaft attachment (49–0180–510A or
equivalent) and a spring scale.
- Remove the steering wheel.
- Remove the column covers.
- Remove the combination switch assembly.
- Remove the steering lock and ignition switch assembly.
- Remove the steering column support bracket. Mark the relationship of the
hood hinges and remove the hood.
| Fig. 2: Manual steering gear and linkage assembly — 1979–85
RX-7

|
- Raise and support the vehicle safely.
- Remove the front wheel.
- Remove the cotter pin and nut, then disconnect the center link from the
Pitman arm using a ball joint puller.
- Unbolt the steering gear from the frame, taking note of the presence of
any shim for realigning the gear with the shaft.
- Remove the steering column dust cover, then remove the gear housing, column
jacket and aligning shim through the engine compartment.
To install:
- Bolt the steering gear assembly in place, then position the shim in its
original position for realignment. Do not connect the center link to the Pitman
arm at this time.
- Connect the Pitman arm to the selector shaft by aligning the matching serrations
on the arm with those on the shaft. Torque the Pitman arm to 108–130
ft. lbs. (146–176 Nm).
- Adjust the sector gear and rack backlash as follows:
- Grasp the sector shaft and move it side-to-side several times to make
sure that it turns freely without binding. Then, move the Pitman arm to
the center (neutral) position of its travel.
- Mount a dial indicator to the Pitman arm end and adjust the backlash
of the Pitman arm by turning the adjusting screw in or out until the reading
on the dial indicator is 0 (no backlash).
- Once the backlash is set, tighten the adjusting screw locknut to retain
the adjustment.
- Install the steering lock and combination switch assembly.
- Fit attachment 49–0180–510A or its equivalent to the end of
the column shaft and connect a spring scale to the attachment. Pull on the
spring scale to measure the worm shaft preload. The preload should be 1.32–2.65
lbs. Connect the Pitman arm to the center link.
- Install the steering column covers and the steering wheel. Fill the steering
gear housing with A.P.I GL4, SAE 90 lubricant, if the old fluid was drained.
Check the front end alignment.
- Disconnect the battery cables and remove the battery. Drain the cooling
system.
- Remove the radiator cooling fan, shroud and radiator.
- Raise and support the vehicle safely.
- Disconnect the front stabilizer bar from the steering rack assembly.
- Remove the cotter pin and tie rod end castle nut. Separate the tie rod from
the steering knuckle.
- Remove the pinch bolt at the steering column U-joint.
- Remove the steering rack mounting bolts.
- Remove the rack and separate the steering column U-joint.
To install:
- Maneuver the steering rack into position and support it by hand. Connect
the rack linkage to the U-joint and install the pinch bolt with a new lockwasher.
- Connect the tie rod end to the steering knuckle. Install and tighten the
tie rod end nut with a new cotter pin.
- Install the stabilizer bar.
- Install the radiator, shroud and fan assembly.
- Install the battery and connect the cables. Fill the cooling system to the
proper level.
- Check the front end alignment.