- Remove the wheel cover and loosen the lug nuts.
- Raise the back end of the car and support it with jackstands.
- Remove the lug nuts and the wheel.
- Support the rear axle housing with jackstands.
- Disconnect the lower part of the shock from the spring clamp. Unfasten the
nuts which secure the U-bolt. Withdraw the U-bolt seat, rubber pad, plate,
and the U-bolt itself.
- Unfasten the two bolts and the nut that secure the spring pin to the front
end of the rear spring.
- Pry the spring pin out with a large, flat pry bar inserted between the spring
pin and its body bracket.
- Remove the nuts and the bolts which attach the rear shackle to the car's
body.
- Withdraw the rear spring assembly, complete with its shackle.
- Remove the shackle assembly from the end of the spring.
- Pull the rubber bushings out from both ends of the spring.
- When installing the rubber bushings, do not lubricate them. Tighten the
U-bolt securing nuts to 30 ft. lbs., and both the spring pin and the shackle
pin to 14 ft. lbs.
Rear coil spring removal is performed as part of the shock absorber removal
operation. See the appropriate following section for the combined procedure.
- Raise the rear end of the vehicle and support it with jackstands. Place
the jackstands under the bracket on the front sides of the lower arms.
- Remove the rear wheel.
- Place a jack under the rear axle housing to support it.
- Remove the shock absorber lower attaching nut and disengage the shock absorber
form the rear axle housing.
- Remove the lateral rod from the right side of the axle housing.
- Remove the upper link attaching nut from the rear of the axle housing.
- Remove the lower arm attaching nut from the rear axle housing.
- Remove the control rod attaching nut and remove the bushings, spacer and
washers. Disengage the rear stabilizer bar from the control rod if so equipped.
- Slowly lower the jack to relieve the spring pressure on the lower arm, then
remove the spring.
- During installation of the coil spring, make sure the open end of the spring
faces the rear axle housing. Tighten all bolts temporarily then after the
vehicle is lowered to the ground torque to specifications. Upper link and
lower arm to axle housing, 66 ft. lbs., Lateral rod to axle housing, 66 ft.
lbs.
NOTE: Rear coil spring removal on 1986–89 RX-7 is performed
as part of the shock absorber removal operation. See the appropriate following
section for the combined procedure.
- Raise the rear of the vehicle and support it on jackstands. Remove the rear
wheel. Support the rear axle under the differential housing with a floor jack.
NOTE: Do not place the jackstands under the rear axle assembly.
See the end of Section 1 for proper placement.
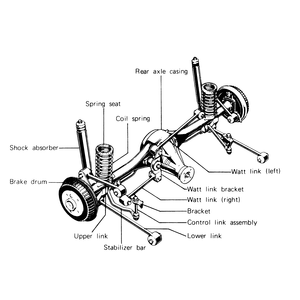
- Disconnect the lower shock absorber mounting bolt. Disconnect the upper
link and the lower link where they attach to the rear axle assembly.
- Disconnect the stabilizer bar front ends (if equipped with a stabilizer
bar).
- Disconnect the right and left watt links at the rear axle housing.
- Carefully lower the rear axle housing on the floor jack just enough to remove
the coil springs.
- Install the coil spring with the painted mark on the coils positioned closer
to the rear axle casing than to the upper spring mount.
| Fig. 1: Rear suspension components — 1979–85
RX-7

|
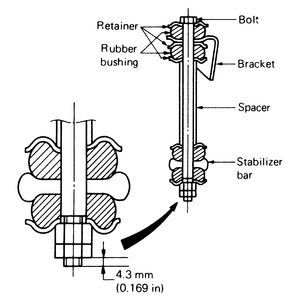
| Fig. 2: Install the stabilizer bar ends as shown — 1979–85
RX-7

|
- Connect the ends of the stabilizer bar and tighten the nuts until 0.17 in.
(4.3mm) of the bolt threads protrude from the nut.
- When installing the shock absorber on the left-hand side, install the lower
side attaching bolts with the bolt heads facing toward the inside. Install
the rear bolt for each upper link with the bolt heads facing toward the inside
of the car.
- When installing all components, temporarily tighten all fasteners, lower
the car and tighten all fasteners fully. Observe the following torques:
- Upper and lower links to bracket: 56–76 ft. lbs.
- Watt link-to-rear axle: 47–59 ft. lbs. (64–80 Nm)
- Rear shock absorber lower mount: 47–59 ft. lbs. (64–80 Nm)


