NOTE: For front wheel bearing removal, installation and preload
adjustment procedures on rear wheel drive cars, see Section 1. For front wheel
bearing removal, installation and preload adjustment procedures on front wheel
drive cars, see Section 8.
- Remove the caliper assembly, as detailed earlier in this section.
NOTE: It is unnecessary to completely remove the caliper
from the car. Leave the hydraulic line connected to it and wire the caliper
to the underbody of the car so that it is out of the way.
- Check the disc run-out, as detailed later in this section, before removing
it from the car.
- Withdraw the cotter pin, nut lock, adjusting nut, and washer from the spindle.
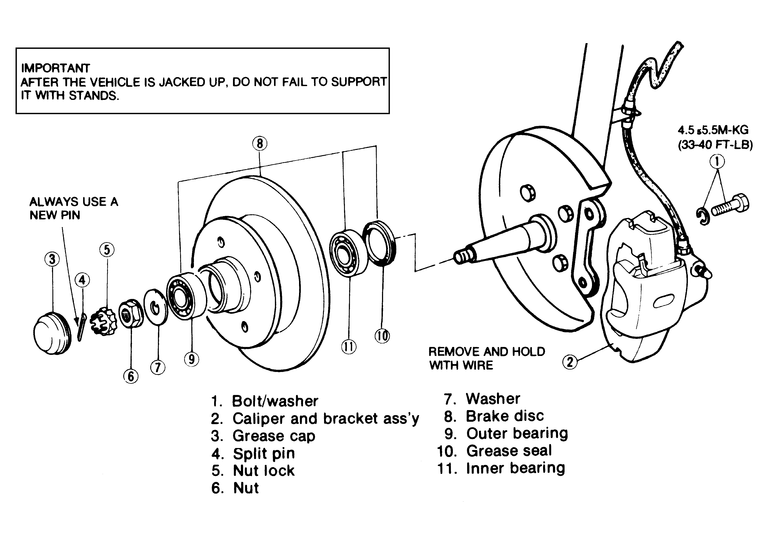
| Fig. 1: Brake disc, caliper and bearing assembly — RWD
GLC
|
- Remove the thrust washer and outer bearing from the hub.
- Pull the brake disc/wheel hub assembly off of the spindle.
- Unbolt and separate the brake disc from the hub, after matchmarking them
for proper installation.
CAUTION
Do not drive the disc off of the hub.
To install:
- Installation of the disc and hub is performed in the reverse order of removal.
Adjust the bearing preload.
- Loosen the lug nuts, raise the front of the car and safely support it on
jackstands. Remove the tire and wheel. Check the disc run-out, as detailed
later in this section, before removing it from the car.
- Raise the staked tab from the hub center nut, remove the nut from the axle.
Apply the brake to help hold the rotor while loosening the nut.
- Remove the brake caliper and support it properly off to the side.
- Pull the rotor from the hub.
- Install the rotor onto the hub. Install the caliper assembly.
- Always use a new axle locknut and tighten it to 116–174 ft. lbs. (157–236
Nm). Stake the locknut after tightening.
- Install the front wheels and lower the vehicle.
- Raise the vehicle and support it via the crossmember, using safety stands.
Inspect the rotor as described below. Check for wheel bearing play be grasping
the tires at the top and bottom, then attempting to rock them. There should
be not noticeable play. Make sure you don't confuse normal play in the ball
joint at the bottom of the strut with wheel bearing play. Also, spin the tire;
make sure it turns smoothly and that there is no bearing noise. If there is
looseness, the hub/knuckle should be disassembled and the bearing preload
adjusted, as described in Section 8.
- Remove the wheel and tire.
- Raise the claw of the clip fastening the brake line to the strut and separate
the line from the strut.
- Remove the caliper from the strut (see the appropriate procedure above)
and hang it up out of the way. The hydraulic line need not be disconnected.
- Pull the rotor from the hub with by rocking it back and forth.
To install:
- Install the rotor onto the hub.
- Install the caliper assembly and torque the caliper bolts to 41–48
ft. lbs. (56–65 Nm).
- Install a new driveshaft locknut, torque it to 116–174 ft. lbs. (157–236
Nm) and then stake it onto the groove in the end of the driveshaft with a
dull punch or similar device. Use a new cotter pin on the tie rod end locknut.
- Install the front wheels and lower the vehicle.
- Raise the vehicle and support it securely by the center crossmember using
axle stands. Inspect the disc brake rotor as described below. If the disc
requires replacement or machining, inspect the wheel bearing and then remove
it.
- Spin the tire to check for roughness in the bearing or unusual noise. Then,
remove the wheel and unfasten the brake caliper, as described above. Hang
the caliper out of the way without disconnecting the hydraulic line.
- Pull the rotor from the hub.
To install:
- Install the rotor onto the hub.
- Install the brake caliper and torque the upper bolt to 12–18 ft. lbs.
(16–24 Nm) and the lower bolt to 14–22 ft. lbs. (19–30 Nm)
on 1986–87 323s and 1983–87 626s. On 1988–89 323s, torque
both caliper bolts to 29–36 ft. lbs. (39–49 Nm), and on 1988–89
626s and MX-6s, torque both caliper bolts to 58–72 ft. lbs. (79–98
Nm).
- Install a new driveshaft locknut and torque it to 116–174 ft. lbs.
(157–236 Nm) on 323s and 1983–87 626s, or 174–235 ft. lbs.
(236–318 Nm) on 1988–89 626s and MX-6s. Crimp the nut into the
groove in the axle with a dull tool until at least a 0.06 in. (1.5mm) indentation
is produced.
- Install the wheel, then lower the vehicle.
- Raise the front of the car and support it on jack stands.
- Remove the front wheel. Check the disc run-out, as detailed later in this
section, before removing it from the car.
- Remove the brake caliper and its bracket. Do not disconnect the brake line
from the caliper, instead, hang the caliper, brake line still attached, out
of the way on a piece of wire.
NOTE: Never allow the caliper to hang by the brake line.
- Gently pry the grease cap from the rotor disc. Be careful not to bend the
cap.
- Using a small cold chisel, unstake the tab on the bearing locknut. Loosen
the locknut and remove it from the spindle shaft along with the washer. Discard
the locknut, as a new one must be used on assembly. Set the washer aside.
- Pull the rotor disc from the spindle shaft with a back and forth rocking
motion.
To install:
- Install the disc plate with the washer and the new locknut. Adjust the bearing
preload.
- Stake the locknut tab with a small cold chisel. The tab should have a 0.16
in. (4mm) clearance from the shaft groove.
- Install the caliper assembly and torque the retaining bolts to 65–87
ft. lbs. (88–118 Nm).
- Install the wheels and torque the lug nuts to 65–87 ft. lbs. (88–118
Nm).
- Lower the vehicle.
- Remove the brake caliper as previously described.
- Remove the anti-rattle spring, the brake pads and shims.
- Remove the caliper bracket.
- Remove the grease cap, split pin, nut lock and adjusting nut, then remove
the washer and outer wheel bearing.
- Remove the rotor disc from the spindle.
To install:
- Install the rotor onto the spindle. Pack the outer bearing with grease in
the same manner as the inner bearing, then install the outer bearing into
place in the hub.
- Apply a thin coat of grease to the washer and the threaded portion of the
spindle, then loosely install the washer and adjusting nut. Adjust the bearing
preload as described in Section 1 of this manual.
- Install the brake caliper.
- Install the front wheels and lower the vehicle.
- Raise the front of the car and support it on jack stands.
- Remove the front wheel.
- Remove the brake caliper and its bracket. Do not disconnect the brake line
from the caliper, instead, hang the caliper, brake line still attached, out
of the way on a piece of wire.
NOTE: Never allow the caliper to hang by the brake line.
- Remove the grease hub cap, cotter pin, the set cover and the locknut.
- Remove the wheel hub and the rotor disc carefully from the wheel spindle.
Remove the washer and the outer bearing.
To install:
- Install the wheel hub and rotor disc.
- Adjust the bearing preload as described in Section 1 of this manual.
- Install the caliper and torque the retaining bolts to 58–72 ft. lbs.
(79–98 Nm).
- Lower the vehicle.