NOTE: To install the brake pads, Mazda brake piston wrench
49–FA18–602 or equivalent is required to turn the piston into the
caliper to allow for the thicker new pads.
- Loosen the rear wheel lug nuts and release the parking brake. Raise the
rear of the vehicle and support safely. Remove the rear wheels.
NOTE: When removing and installing brake pads, work on
one side at a time so that, if necessary, you can refer to the undisturbed
assembly on the other side for reference.
- Reach behind the caliper with a box end wrench and disconnect the parking
brake cable from the cable mounting bracket, then from the operating lever.
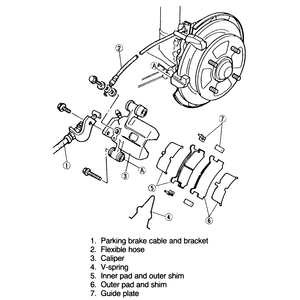
| Fig. 1: Rear disc brake components — 1988–89
323

|
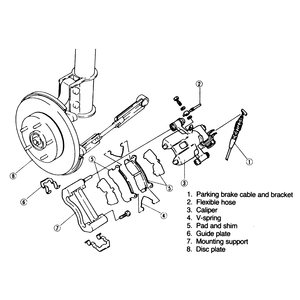
| Fig. 2: Rear disc brake components — 1988–89
626 and MX-6

|
- On 323s, remove the lower caliper mounting bolt and swing the caliper upward
to where the V-spring is accessible. Remove the V-spring, pads and shims.
On 626s and MX-6s, the V spring, pads and shims are removed in the same manner
except that the upper caliper bolt is removed and the caliper is moved downward
to expose the V spring. Support the caliper assembly with a piece of rope
or wire from the strut to prevent straining the brake hose.
To install:
- Coat the new pad shims with brake grease and attach them to the new pads.
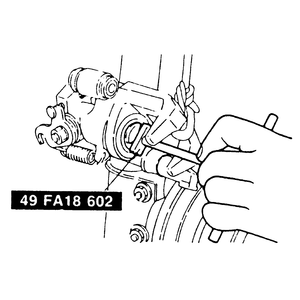
- Using the special tool, turn the piston fully into the caliper bore until
the groove in the piston is aligned with the inner pad alignment pin (see
illustration).
| Fig. 3: Before installing new brake pads, use the
special tool to push in and align the caliper piston

|
- Once the piston is aligned, install the new pads and pad shims onto the
mounting support. Install the pad clips.
- Lift or lower the caliper onto the mounting support and install the attaching
bolt. Torque the bolt to 12–17 ft. lbs. (16–23 Nm).
- Connect the end of the parking brake cable to the operating lever, then
tighten the locknut so that there is no clearance between the cable end and
the lever.
- Repeat Steps 2–8 for the other side of the vehicle.
- Install the rear wheels. Apply the brakes a few times, then rotate the wheels
to make sure that there is no excessive brake drag while the wheels are turning.
- Lower and road test the vehicle.
NOTE: To install the brake pads, Mazda brake piston wrench
49–0221–600C or equivalent is required to seat the piston into the
caliper to allow for the thicker new pads.
- Loosen the rear wheel lug nuts and release the parking brake. Raise the
rear of the vehicle and support safely. Remove the rear wheels.
NOTE: When removing and installing brake pads, work on
one side at a time so that, if necessary, you can refer to the undisturbed
assembly on the other side for reference.
- Remove the lower lock pin from the caliper, then lift the caliper up and
tie it off to the strut to relive the strain on the brake hose.
- Remove the guide clips from the mounting support.
- Remove the pads and shims from the mounting support.
To install:
- Coat the new shims with brake grease and install the shims and pads onto
the mounting support.
- Install the guide clips and push the caliper piston inward using a small
C-clamp or Mazda special piston expansion tool 49–0221–600C or
equivalent.
- Position the caliper onto the mounting support and install the lower lock
pin bolt. Torque the bolt to 12–17 ft. lbs. (16–23 Nm).
- Repeat Steps 2–7 for the other side of the vehicle.
- Install the rear wheels. Apply the brakes a few times, then rotate the wheels
to make sure that there is no excessive brake drag while the wheels are turning.
- Lower and road test the vehicle.
NOTE: To install the brake pads, Mazda brake piston wrench
49–FA18–602 or equivalent is required to seat the piston into the
caliper to allow for the thicker new pads.
- Raise the rear of the vehicle and remove the wheels.
NOTE: When removing and installing brake pads, work on
one side at a time so that, if necessary, you can refer to the undisturbed
assembly on the other side for reference.
- Disconnect the parking brake cable from the caliper, then remove the lower
caliper attaching bolt.
- Lift up the lower side of the caliper and remove the anti-rattle springs,
pads, and shims. Support the caliper with a piece of rope or wire to relieve
the stain on the brake hose.
To install:
- Use special tool 49–FA18–602 or equivalent to fully screw the
caliper piston into its bore. Turn the piston so that one of the stopper grooves
in it is pointing toward the pad inspection hole.
- Install the pads, shims and anti-rattle springs into the caliper, then position
the caliper. Tighten the caliper bolt to 22–30 ft. lbs. (30–41
Nm).
- Attach the parking brake cable.
- Repeat Steps 2–6 for the other side of the vehicle.
- Install the rear wheels. Apply the brakes a few times, then rotate the wheels
to make sure that there is no excessive brake drag while the wheels are turning.
- Lower and road test the vehicle. Adjust the play in the parking brake cable,
if necessary.


