- Raise and securely support the vehicle. Make sure the parking brake is fully
released.
- Loosen the anchor pin locknut, then hold the locknut and turn the anchor
pin in the indicated direction until the wheel locks.
NOTE: The anchor pins on each wheel are turned in opposite
directions. On the right side, the forward pin turns clockwise, and the
rear pin counterclockwise. On the left side, the forward pin turns counterclockwise,
and the rear pin clockwise.
| Fig. 1: Adjusting the rear drum brakes — 1978–80
models
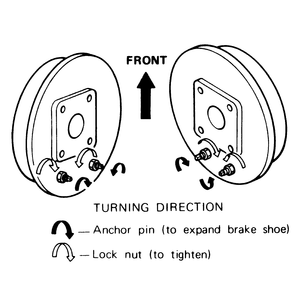
|
- Turn the anchor pin back just until the wheel turns freely. Hold the adjustment
and tighten the locknut.
- Repeat for the other brake shoe on the same wheel, then adjust both shoes
on the other rear wheel.
NOTE: These rear drum brakes are self-adjusting and normally
only require a manual adjustment after the brake shoes have been replaced, or
when the length of the adjusting rod has otherwise been altered.
- Block the front wheels, raise the car, and safely support it with jackstands.
- Release the parking brake completely.
- Remove the adjusting hole plugs from the backing plate.
- Insert a screwdriver into hole A. Engage the star wheel with
a screwdriver, then turn it in the direction of the arrow stamped on the backing
plate until the brake shoes are fully expanded and the wheel will not turn.
| Fig. 2: Drum brake adjustment is made through holes Aand Bof
the backing plate — 1981–85 RWD models
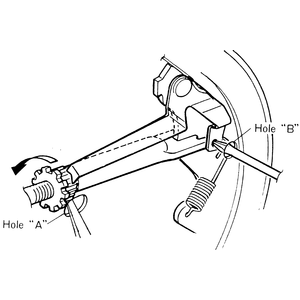
|
- Insert a screwdriver into hole B. Push the pawl lever of the
self-adjuster to turn the adjusting wheel in the reverse direction of the
arrow.
- Back off the star wheel about 3–4 notches. The wheel should rotate
freely, without dragging. If it does not, turn the adjuster an additional
notch.
- Fit the plugs into the adjusting hole, then repeat the adjusting procedure
for the other side rear brake shoes.
Front wheel drive models are equipped with self-adjusting drum brakes for which
no external adjustment is required.

