These models use a single piston caliper that slides on a mounting bracket
attached to the steering knuckle.
NOTE: Although it is advisable to disassemble only one side
at a time, be sure to replace brake pads on both sides of the vehicle.
- Loosen the wheel lugs, then raise the front of the car and safely support
it on jackstands. Remove the front wheels.
- Remove the locking clip and stopper plate which secure the caliper.
- Lift the caliper from the mounting bracket, then support the caliper with
a piece of wire so it is not hanging by the brake hose.
NOTE: Variations in pad retainers, anti-rattle and retaining
springs occur from year to year. Work on one side at a time, and note the
position of each spring, etc. for correct installation.
- Remove the anti-rattle spring.
| Fig. 1: Front disc brake components — RWD
GLC
|
- Slide the outboard and inboard pads from the mounting bracket. Note their
location, then remove any shims, if so equipped.
To install:
NOTE: Prior to the installation of new brake pads, remove
about 1⁄3 of
the brake fluid from the master cylinder reservoir. This allows room for
the displaced fluid when the caliper piston is pushed back into the caliper.
Discard the old fluid, then install the master cylinder reservoir cap.
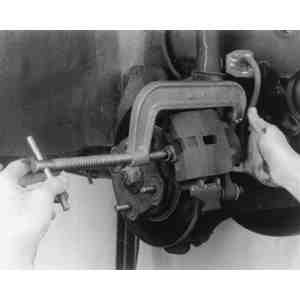
- Use a C-clamp to push the caliper piston back into the caliper.
- Install the new pads, shims (if applicable) and anti-rattle spring into
the mounting brackets.
- Position, then secure the caliper with the stopper plate and locking clip.
- Repeat Steps 2–8 for the other side of the vehicle.
- Install the wheels, then lower the vehicle and top off the master cylinder
with new brake fluid.
- Pump the brake pedal several times to take up clearance before road testing
the car.
NOTE: Although it is advisable to disassemble only one side
at a time, be sure to replace brake pads on both sides of the vehicle.
- Raise the front of the vehicle, support it with safety stands, and remove
the front wheels.
- Unclip the brake hose at the shock absorber by pressing the lower clip outward
with a screwdriver and then forcing the clip downward.
- Use a screwdriver to release the spring clip at the top of the caliper by
forcing it inward and then forward.
| Fig. 2: Front disc brake components — FWD
GLC
|
- Pull out the lower slide pin, then pivot the caliper upward and wire it
to the strut to hold it in this position.
NOTE: Do not disconnect the brake line from the caliper
or you will have to bleed the brakes.
- Turn the wheel hub until one of the four indentations lines up with the
pads. Remove the pad, shim and spring on either side. Remove the springs from
the pads.
To install:
NOTE: Prior to the installation of new brake pads, remove
about 1⁄3 of
the brake fluid from the master cylinder reservoir. This allows room for
the displaced fluid when the caliper piston is pushed back into the caliper.
Discard the old fluid, then install the master cylinder reservoir cap.
- Clean the exposed piston surface, then use a C-clamp to depress the caliper
piston back into the caliper. This will permit the new, thicker pad to be
installed.
- Install the parts in reverse order of their removal, making sure to transfer
the shim and spring to the new pad. If either is warped or fatigued, replace
it. Be sure to apply grease sparingly to the contact surface between the pad
mounting support and the caliper assembly, as well as to both surfaces of
the outer/inner shims, slide pin and bushing.
- Repeat Steps 2–7 for the other side of the vehicle.
- Install the wheels, then lower the vehicle and top off the master cylinder
with new brake fluid.
- Pump the brake pedal several times to take up clearance before road testing
the car.
These models use a caliper that floats on guide pins and bushings that are
threaded into a mounting bracket.
NOTE: Although it is advisable to disassemble only one side
at a time, be sure to replace brake pads on both sides of the vehicle.
- Loosen the wheel lugs, then raise the front of the car and safely support
it on jackstands. Remove the front wheels.
- Disconnect the horseshoe clip retaining the brake hose to the front strut.
Remove the caliper guide pins and anti-rattle springs or clips.
NOTE: Variations in pad retainers, anti-rattle and retaining
springs occur from year to year. Work on one side at a time, and note the
position of each spring, etc. for correct installation.
- On 1979–81 models, remove the mounting pins, then lift the caliper
up and away from the disc rotor. (On 1982 models, remove the lower pin bolt
which retains the caliper to the mount, then pivot the caliper upward.) Support
the caliper with wire; do not permit it to hang by the brake hose.
NOTE: Do not disconnect the brake line from the caliper
or you will have to bleed the brakes.
- Remove the anti-rattle spring, then slide the outboard pad from the mounting
bracket. Remove the inboard pad from the caliper or mounting bracket. Note
the location of any shims for reinstallation.
NOTE: Prior to the installation of new brake pads, remove
about 1⁄3 of
the brake fluid from the master cylinder reservoir. This allows room for
the displaced fluid when the caliper piston is pushed back into the caliper.
Discard the old fluid, then install the master cylinder reservoir cap.
- Use a C-clamp to push the caliper piston back into the caliper.
- Pad installation for all models is the reverse of removal. Apply grease
sparingly to the contact surface between the pad mounting support and the
caliper assembly, as well as to both surfaces of the outer/inner shims, the
slide pin and bushing.
- Repeat Steps 2–6 for the other side of the vehicle.
- Install the wheels, then lower the vehicle and top off the master cylinder
with new brake fluid.
- Pump the brake pedal several times to take up clearance before road testing
the car.
NOTE: Although it is advisable to disassemble only one side
at a time, be sure to replace brake pads on both sides of the vehicle.
- Raise the vehicle and safely support it on axle stands. Remove the front
wheels.
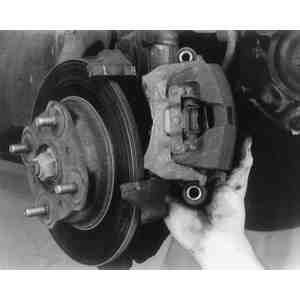
- Remove the two caliper installation bolts, then pull the caliper off the
disc. Suspend the caliper by a piece of wire or twine to prevent putting tension
on the brake hose.
NOTE: Do not disconnect the brake line from the caliper
or you will have to bleed the brakes.
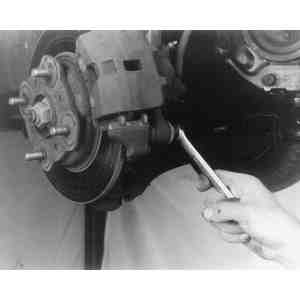
| Fig. 3: Use a socket wrench to loosen and remove
the caliper mounting bolts
|
| Fig. 4: Remove the caliper (with the pads attached)
from the rotor
|
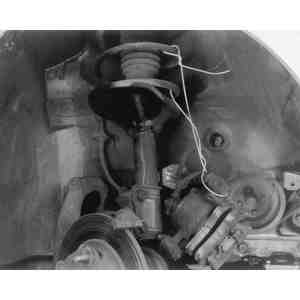
| Fig. 5: Suspend the caliper assembly from a piece
of wire or twine to avoid stretching the brake hose
|
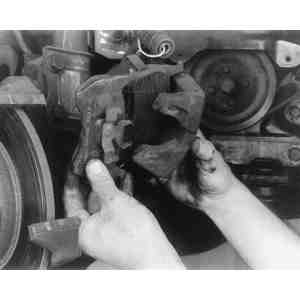
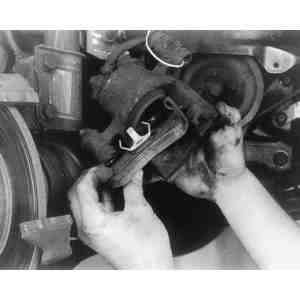
- Remove the outer pad by using a screwdriver to release the clip. Then, remove
the inner pad.
- Remove about one-third the brake fluid from the reservoir in the master
cylinder. Use a large C-clamp or Mazda's special tool to force the piston
back into the caliper.
| Fig. 6: Remove the outer brake pad from the caliper
|
| Fig. 7: Remove the inner brake pad from the caliper
|
| Fig. 8: Use a large C-clamp to retract the piston
into its bore, so that the new thicker pads will fit
|
| Fig. 9: Front disc brake components — 1986–89
323
|
| Fig. 10: Front disc brake components — 1983–87
626
|
| Fig. 11: Front disc brake components — 1988–89
626 and MX-6
|
To install:
- If either or both pads shows excessive wear, replace both pads. Before reattaching
the caliper, push the sleeve toward the outside of the caliper, so the sleeve
boot does not get pinned between the caliper and steering knuckle and possibly
tear.
- Lightly coat the new pad shims with brake grease and install them on the
pads.
- Make sure that the piston is pushed inward, then install the new pads and
shims onto the mounting support.
- Lower the caliper assembly onto the mounting support, then install the mounting
bolts. On 1983–87 626s and 323s, torque the upper installation bolt
to 12–18 ft. lbs. (16–24 Nm) and the lower installation bolt to
15–21 ft. lbs. (20–28 Nm). On 1988–89 323s, torque the upper
and lower caliper bolts to 29–36 ft. lbs (39–49 Nm). On 1988–89
626s and MX-6s, torque the upper and lower caliper bolts to 23–30 ft.
lbs. (31–41 Nm) .
- Repeat Steps 2–8 for the other side of the vehicle.
- Install the wheels, then lower the vehicle and top off the master cylinder
with new brake fluid.
- Pump the brake pedal several times to take up clearance before road testing
the car.
NOTE: Although it is advisable to disassemble only one side
at a time, be sure to replace brake pads on both sides of the vehicle.
- Raise and safely support the front end on jackstands.
- Remove the wheels.
- Remove the lower lock pin bolt from the caliper.
NOTE: Do not disconnect the brake line from the caliper
or you will have to bleed the brakes.
- Rotate the caliper upward, then remove the brake pads and shims.
To install:
- Open the master cylinder reservoir cap and remove about one-third of the
fluid from the reservoir.
- Using a large C-clamp, depress the caliper piston until it bottoms in its
bore.
- Install the shims and new pads.
- Reposition the caliper and install the lock pin bolt. Torque the bolt to
69 ft. lbs. (94 Nm).
- Repeat Steps 3–8 for the other side of the vehicle.
- Install the wheels, then lower the vehicle and top off the master cylinder
with new brake fluid.
- Pump the brake pedal several times to restore pressure before road testing
the car.
NOTE: Although it is advisable to disassemble only one side
at a time, be sure to replace brake pads on both sides of the vehicle.
- Raise the front of the car and safely support it on jackstands.
- Remove the front wheels.
- On 1979 models, remove the locking clips and pull the stopper plates out
of the caliper. When both stopper plates (wedges) are removed, the caliper
can be lifted off. Hang the caliper on a wire; do not allow it to hang by
its brake line.
NOTE: Do not disconnect the brake line from the caliper
or you will have to bleed the brakes.
- On 1980–85 models, remove the lower caliper attaching bolt and pivot
the caliper up to expose the pads.
| Fig. 12: Front disc brake components — 1980–85
RX-7
|
- Unfasten the anti-rattle spring, then remove the brake pads and their shims.
To install:
- Install new brake pads. Be sure to fit the shims in the proper positions
and attach the anti-rattle spring. Coat the caliper mounting pin and attaching
bolt with brake grease.
- Position and secure the caliper. If the piston in the caliper is out too
far to allow installation of the caliper with the new brake pads, remove the
master cylinder reservoir cap and remove about one-third of the brake fluid
from the reservoir, then press in the piston. If the piston will not press
in, bleed the caliper as follows: submerge one end of a piece of hose in a
container of brake fluid and attach the other end to the caliper bleeder valve,
then open the valve and push in the piston. When the piston is in far enough,
close the valve.
- Repeat Steps 3–7 for the other side of the vehicle.
- Install the wheels, then lower the vehicle and top off the master cylinder
with new brake fluid.
- Pump the brake pedal several times to take up clearance before road testing
the car.
NOTE: Although it is advisable to disassemble only one side
at a time, be sure to replace brake pads on both sides of the vehicle.
- Raise the front of the car and safely support it on jackstands.
- Remove the front wheels.
- Remove the lower caliper attaching bolt and pivot the caliper up to expose
the pads. Remove the anti-rattle spring. Hang the caliper on a wire; do not
allow it to hang by its brake line.
NOTE: Do not disconnect the brake line from the caliper
or you will have to bleed the brakes.
- Unfasten the anti-rattle spring, then remove the brake pads and their shims.
| Fig. 13: Front disc brake components — 1986–89
RX-7 with 14-inch wheels
|
- Push the caliper piston in with a C-clamp, or with Mazda expansion tool
49–0221–600C or equivalent.
To install:
- Install the new pads onto the mounting support, then attach the anti-rattle
spring.
- Lower the caliper onto the mounting support and install the attaching bolt.
Torque the bolt to 23–30 ft. lbs. (31–41 Nm).
- Repeat Steps 3–7 for the other side of the vehicle.
- Install the wheels, then lower the vehicle and top off the master cylinder
with new brake fluid.
- Pump the brake pedal several times to take up clearance before road testing
the car.
NOTE: Although it is advisable to disassemble only one side
at a time, be sure to replace brake pads on both sides of the vehicle.
- Raise the front of the car and safely support it on jackstands.
- Remove the front wheels.
NOTE: On these models, removal of the caliper is not required
to service the brake pads.
- Remove the clip, pad pins and pad spring. Remove the brake pads.
| Fig. 14: Front disc brake components — 1986–89
RX-7 except with 14-inch wheels

|
- Push the caliper piston in with a C-clamp, or with Mazda expansion tool
49–0221–600C or equivalent.
To install:
- Install the new brake pads, pad spring, pad pins and clip.
- Repeat Steps 3–5 for the other side of the vehicle.
- Install the wheels, then lower the vehicle and top off the master cylinder
with new brake fluid.
- Pump the brake pedal several times to take up clearance before road testing
the car.