Replacing the air cleaner element is a simple, routine maintenance operation.
You should be careful, however, to keep dust and dirt out of the air cleaner
housing, as they accelerate engine wear. If the outside of the air cleaner housing
is dusty, wipe it with a clean rag before beginning work.
| Fig. 1: Air cleaner and element — carburetor
equipped
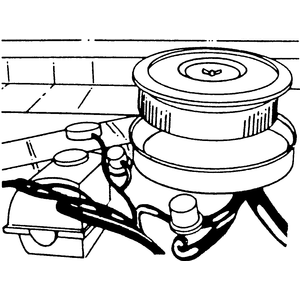
|
- Remove the wing nut at the center of the housing and then unclip the retaining
clips situated around the sides.
- Pull the top cover off and remove the air cleaner element.
- When installing the new element, make sure it seats squarely around the
bulge in the center of the lower air cleaner housing. Install the housing
top, turning it until the wing nut mounting stud lines up with the hole in
the top (it's usually off center). Note that the top cover should seat tightly
all around. Install the wing nut and reclip the clips.
- Loosen the clamp on the air intake hose and pull the hose off the housing.
- Disconnect the airflow sensor electrical connector.
- Unbolt and remove the housing. Note the direction in which the element is
installed and install the new element in the same way (it may be marked TOP).
Install the top of the housing and connect the other components.
| Fig. 2: Loosen the 5 air cleaner housing cover retaining
bolts
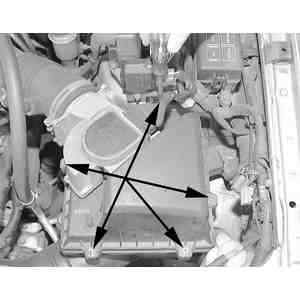
|
| Fig. 3: While holding the air cleaner housing cover
up, remove the filter element out of the housing
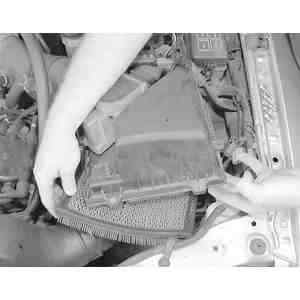
|
- Loosen the clamps that secure the hose assembly to the air cleaner.
- Remove the screws that attach the air cleaner to the bracket.
- Disconnect the hose and inlet tube from the air cleaner.
- Remove the screws attaching the air cleaner cover.
- Remove the air filter and tubes.
- Install the new element. Place the cover into position and install the retaining
screws. Connect the other components. Don't overtighten the hose clamps! A
torque of 12–15 inch lbs. is sufficient.

