Previous Next

REMOVAL & INSTALLATION

Carbureted Engines

To replace the filter, loosen the clamps at both ends of the filter and pull off the hoses. Pop the filter from its clamp.

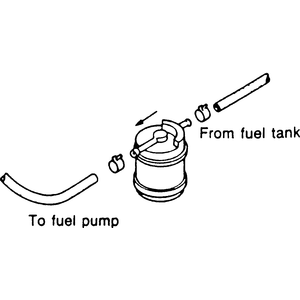
Fig. 1: Fuel filter used on carbureted trucks

Fuel Injected Engines
PICK-UPS AND MPV

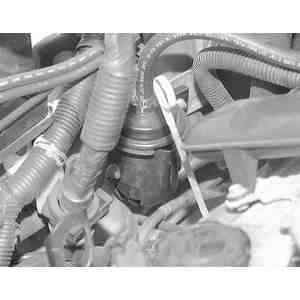
Fig. 2: Location of fuel filter on the right side engine compartment fender well — MPV shown

  1. Relieve the pressure from the fuel system.
  2. Disconnect the battery negative cable.
  3. Slide the fuel line clamps back off the connections on the filter. Then, slowly pull one connection off just until fuel begins to seep out. Place a small plastic container or stuff a couple of rags under the filter to absorb any excess fuel.
  4. Pull both fuel hoses off the connectors. Remove the filter from the clamp. On some models, it will be necessary to unbolt the fuel filter from the mounting bracket.
  5. Place the new filter in the clamp or attach to the bracket if so equipped.
  6. Connect the hoses to the filter connections and secure the hoses with the clamps.
  7. Connect the negative battery cable.
  8. Start the engine and check the fuel filter connections for leaks.
NAVAJO
  1. Relieve the fuel system pressure.
  2. Raise and support the vehicle safely.
  3. Remove the push connect fittings at both ends of fuel filter. Install new retainer clips in each push connect fitting.
  4. Remove the fuel filter bracket mounting nuts.
  5. Remove the filter from the bracket by loosening the filter retaining clamp enough to allow the filter to pass through.

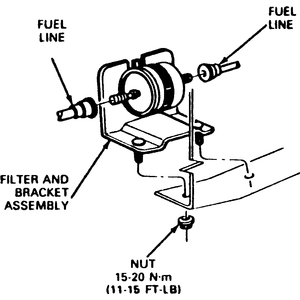
    Fig. 3: Fuel filter assembly — Navajo

    To install:

    NOTE: The flow arrow direction should be positioned as installed in the bracket to ensure proper flow of fuel through the replacement filter.

  6. Install the filter in the bracket, ensuring proper direction of flow as noted by arrow. Tighten clamp to 15–25 inch lbs. (2–3 Nm).
  7. Install the bracket and filter onto the vehicle. Tighten the mounting nuts to 11–15 ft. lbs. (15–20 Nm).
  8. Install the push connect fittings at both ends of the filter.
  9. Lower the vehicle.
  10. Start the engine and check for leaks.

    Clean all dirt and/or grease from the fuel filter fittings. The fuel filter uses a "hairpin'' clip retainer. Spread the two hairpin clip legs about 18 in. (3mm) each to disengage it from the fitting, then pull the clip outward. Use finger pressure only; do not use any tools. Push the quick connect fittings onto the filter ends. Mazda recommends that the retaining clips be replaced whenever removed. The fuel tubes used on these fuel systems are manufactured in 5/16 in. and 38 in. diameters. Each fuel tube takes a different size hairpin clip, so keep this in mind when purchasing new clips. A click will be heard when the hairpin clip snaps into its proper position. Pull on the lines with moderate pressure to ensure proper connection. Start the engine and check for fuel leaks. If the inertia switch (reset switch) was disconnected to relieve the fuel system pressure, cycle the ignition switch from the OFF to ON position several times to re-charge the fuel system before attempting to start the engine.

Previous Next