Previous Next

Distributor

REMOVAL & INSTALLATION

The Navajo has no distributor. Refer to Distributorless Ignition System, later in this section.

  1. Disconnect the negative battery cable.
  2. Remove the distributor cap from the distributor, leaving the spark plug wires attached. If spark plug wire removal is necessary to remove the distributor cap, tag the wires prior to removal so they can be reinstalled in the correct position.
  3. Disconnect the electrical connectors and vacuum hose(s), if equipped, from the distributor.
  4. Mark the position of the rotor in relation to the distributor housing and the position of the distributor housing on the cylinder head.
  5. Remove the distributor hold-down bolt(s) and remove the distributor.
  6. Check the distributor O-ring for cuts or other damage and replace, if necessary.

    To install:

TIMING NOT DISTURBED   

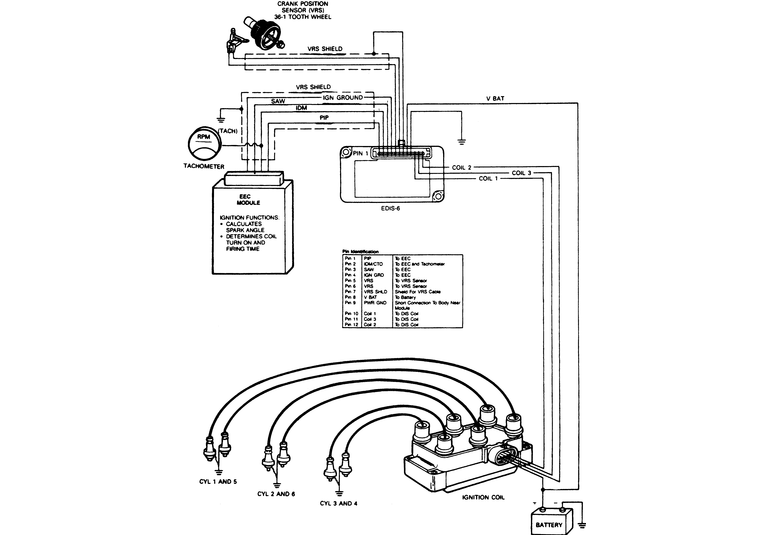
Fig. 1: Distributorless ignition system diagram

  1. Turn the ignition switch OFF, disconnect the battery, then detach the wiring harness connector from the ignition coil to be tested.
  2. Check for dirt, corrosion or damage on the terminals.
PRIMARY RESISTANCE
  1. Use an ohmmeter to measure the resistance between the following terminals on the ignition coil, and note the resistance:
    • B+ to Coil 1
    • B+ to Coil 2
    • B+ to Coil 3

    The resistance between all of these terminals should have been between 0.3–1.0 ohms. If the resistance was more or less than this value, the coil should be replaced with a new one.

SECONDARY RESISTANCE
  1. Measure, using the ohmmeter, and note the resistance between each corresponding coil terminal and the two spark plug wire towers on the ignition coil. The coil terminals and plug wires towers are grouped as follows:

    4.0L engine

    If the resistance for all of the readings was between 6,500–11,500 ohms, the ignition coils are OK. If any of the readings was less than 6,500 ohms or more than 11,500 ohms, replace the corresponding coil pack.

Previous Next