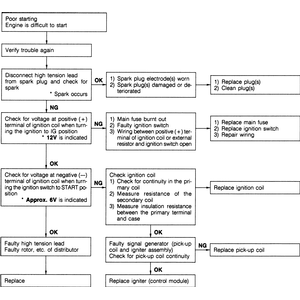
| Fig. 1: Basic electronic ignition troubleshooting

|
You will need an accurate ohmmeter, a jumper wire and a test light. Before
proceeding with troubleshooting, make sure that all connections are tight and
all wiring is intact.
- Check for spark at the coil high tension lead by removing the lead from
the distributor cap and holding it about 1/4 inch (6mm) from the engine block
or other good ground. Use a heavy rubber glove or non-conductive clamp, such
as a fuse puller or clothes pin, to hold the wire.Crank the engine and check
for spark. If a good spark is noted, check the cap and rotor; if the spark
is weak or nonexistent, replace the high tension lead, clean and tighten the
connections and retest. If a weak spark is still noted, proceed to Step 2.
- Check the coil primary and secondary resistance. Refer to those procedures
later in this section.
- Next, remove the distributor cap and rotor.Crank the engine until a spoke
on the rotor is aligned with the pickup coil contact. Use a flat feeler gauge
to check the gap. Gap should be 0.20–0.60mm. The gap is not adjustable
(procedure for 1987–88 B2600 air gap adjustment is covered later in
this section). On these models (except 1987–88 B2600), gap is corrected
by parts replacement.
- On B2200 carbureted models, check the pickup coil resistance. If resistance
is not correct, replace the pickup coil.
- Finally, test the ignition module. The only way to test the module is to
substitute a known good module in its place.


