The first step for any assembly job is to have a clean area in which to work.
Next, thoroughly clean all of the parts and components that are to be assembled.
Finally, place all of the components onto a suitable work space and, if necessary,
arrange the parts to their respective positions.
- Lightly lubricate the valve stems and insert all of the valves into the
cylinder head. If possible, maintain their original locations.
- If equipped, install any valve spring shims which were removed.
- If equipped, install the new valve seals, keeping the following in mind:
- If the valve seal presses over the guide, lightly lubricate the outer
guide surfaces.
- If the seal is an O-ring type, it is installed just after compressing
the spring but before the valve locks.
- Place the valve spring and retainer over the stem.
- Position the spring compressor tool and compress the spring.
- Assemble the valve locks to the stem.
- Relieve the spring pressure slowly and insure that neither valve lock becomes
dislodged by the retainer.
- Remove the spring compressor tool.
- Repeat Steps 2 through 8 until all of the springs have been installed.
To install the springs, retainers and valve locks on heads which have these
components recessed into the camshaft follower's bore, you will need a small
screwdriver-type tool, some clean white grease and a lot of patience. You will
also need the C-clamp style spring compressor and the OHC tool used to disassemble
the head.
- Lightly lubricate the valve stems and insert all of the valves into the
cylinder head. If possible, maintain their original locations.
- If equipped, install any valve spring shims which were removed.
- If equipped, install the new valve seals, keeping the following in mind:
- If the valve seal presses over the guide, lightly lubricate the outer
guide surfaces.
- If the seal is an O-ring type, it is installed just after compressing
the spring but before the valve locks.
- Place the valve spring and retainer over the stem.
- Position the spring compressor and the OHC tool, then compress the spring.
- Using a small screwdriver as a spatula, fill the valve stem side of the
lock with white grease. Use the excess grease on the screwdriver to fasten
the lock to the driver.
- Carefully install the valve lock, which is stuck to the end of the screwdriver,
to the valve stem then press on it with the screwdriver until the grease squeezes
out. The valve lock should now be stuck to the stem.
- Repeat Steps 6 and 7 for the remaining valve lock.
- Relieve the spring pressure slowly and insure that neither valve lock becomes
dislodged by the retainer.
- Remove the spring compressor tool.
- Repeat Steps 2 through 10 until all of the springs have been installed.
- Install the followers, camshaft(s) and any other components that were removed
for disassembly.
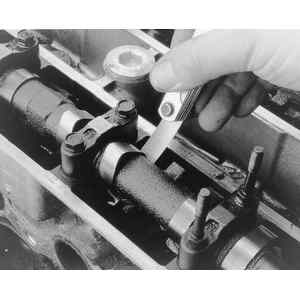
| Fig. 1: Once assembled, check the valve clearance
and correct as needed
|
- Lightly lubricate the valve stems and insert all of the valves into the
cylinder head. If possible, maintain their original locations.
- If equipped, install any valve spring shims which were removed.
- If equipped, install the new valve seals, keeping the following in mind:
- If the valve seal presses over the guide, lightly lubricate the outer
guide surfaces.
- If the seal is an O-ring type, it is installed just after compressing
the spring but before the valve locks.
- Place the valve spring and retainer over the stem.
- Position the spring compressor tool and compress the spring.
- Assemble the valve locks to the stem.
- Relieve the spring pressure slowly and insure that neither valve lock becomes
dislodged by the retainer.
- Remove the spring compressor tool.
- Repeat Steps 2 through 8 until all of the springs have been installed.
- Install the camshaft(s), rockers, shafts and any other components that were
removed for disassembly.

