Previous Next

Oil Pan

REMOVAL & INSTALLATION

2.2L Engine

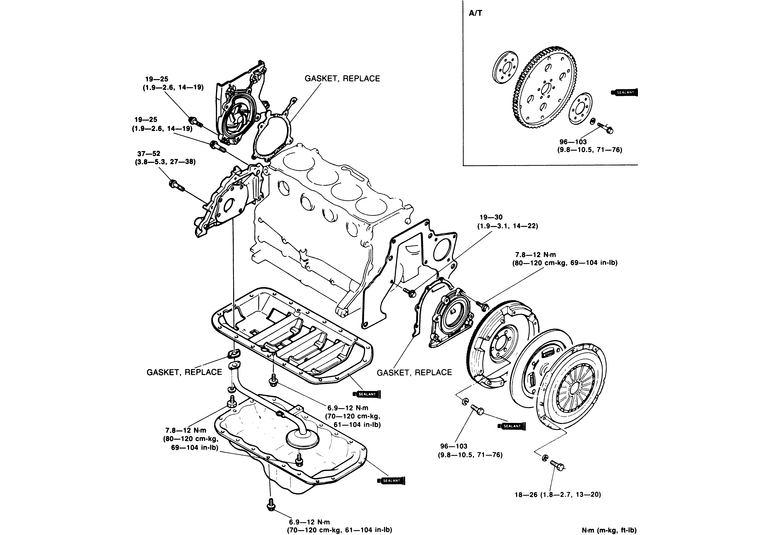
Fig. 1: Oil pan and components removal/installation

  1. Disconnect the battery ground cable.
  2. Raise and support the truck on jackstands. Drain the oil.

    CAUTION
    The EPA warns that prolonged contact with used engine oil may cause a number of skin disorders, including cancer! You should make every effort to minimize your exposure to used engine oil. Protective gloves should be worn when changing the oil. Wash your hands and any other exposed skin areas as soon as possible after exposure to used engine oil. Soap and water, or waterless hand cleaner should be used.

  3. Remove the skid plate.
  4. Place a floor jack under the front of the engine at the crankshaft pulley and take up the weight of the engine. Or use a shop crane to support the engine.
  5. Remove the crossmember.
  6. Remove the cotter pin and nut and, with a puller, disconnect the idler arm from the center link.
  7. Remove the engine mount gusset plates from the sides of the engine.
  8. Remove the bell housing front cover.
  9. Unbolt and remove the oil pan. A flat tipped screwdriver may be used to break the seal between the pan and block.
  10. Clean all the gasket surfaces. Straighten and portion of the pan rim that is bent.
  11. Clean the oil pan, oil pump pickup tube and oil pump screen.

    To install:

  12. If you are using a gasket, install a new oil pan gasket coated with oil resistant sealer. Place RTV silicone sealer at the points shown in the accompanying illustration. If you are using RTV silicone gasket material in place of a conventional gasket, run a 18 in. bead around the rim of the pan, going inboard of each bolt hole. Tighten the pan bolts within 30 minutes of application. Tighten the pan bolts to 61–104 inch lbs. (7–12 Nm).
  13. Install the bell housing front cover. Tighten the bell housing cover to 15–20 ft. lbs. (20–27 Nm).
  14. Install the engine mount gusset plates from the sides of the engine.
  15. Install the idler arm on the center link.
  16. Install the cotter pin and nut. Tighten the idler arm nut to 25–30 ft. lbs. (34–41 Nm).
  17. Install the crossmember.
  18. Remove the shop crane.
  19. Install the skid plate.
  20. Fill the engine with the proper amount of oil.
  21. Install the battery ground cable.
2.6L Engine
1987-88

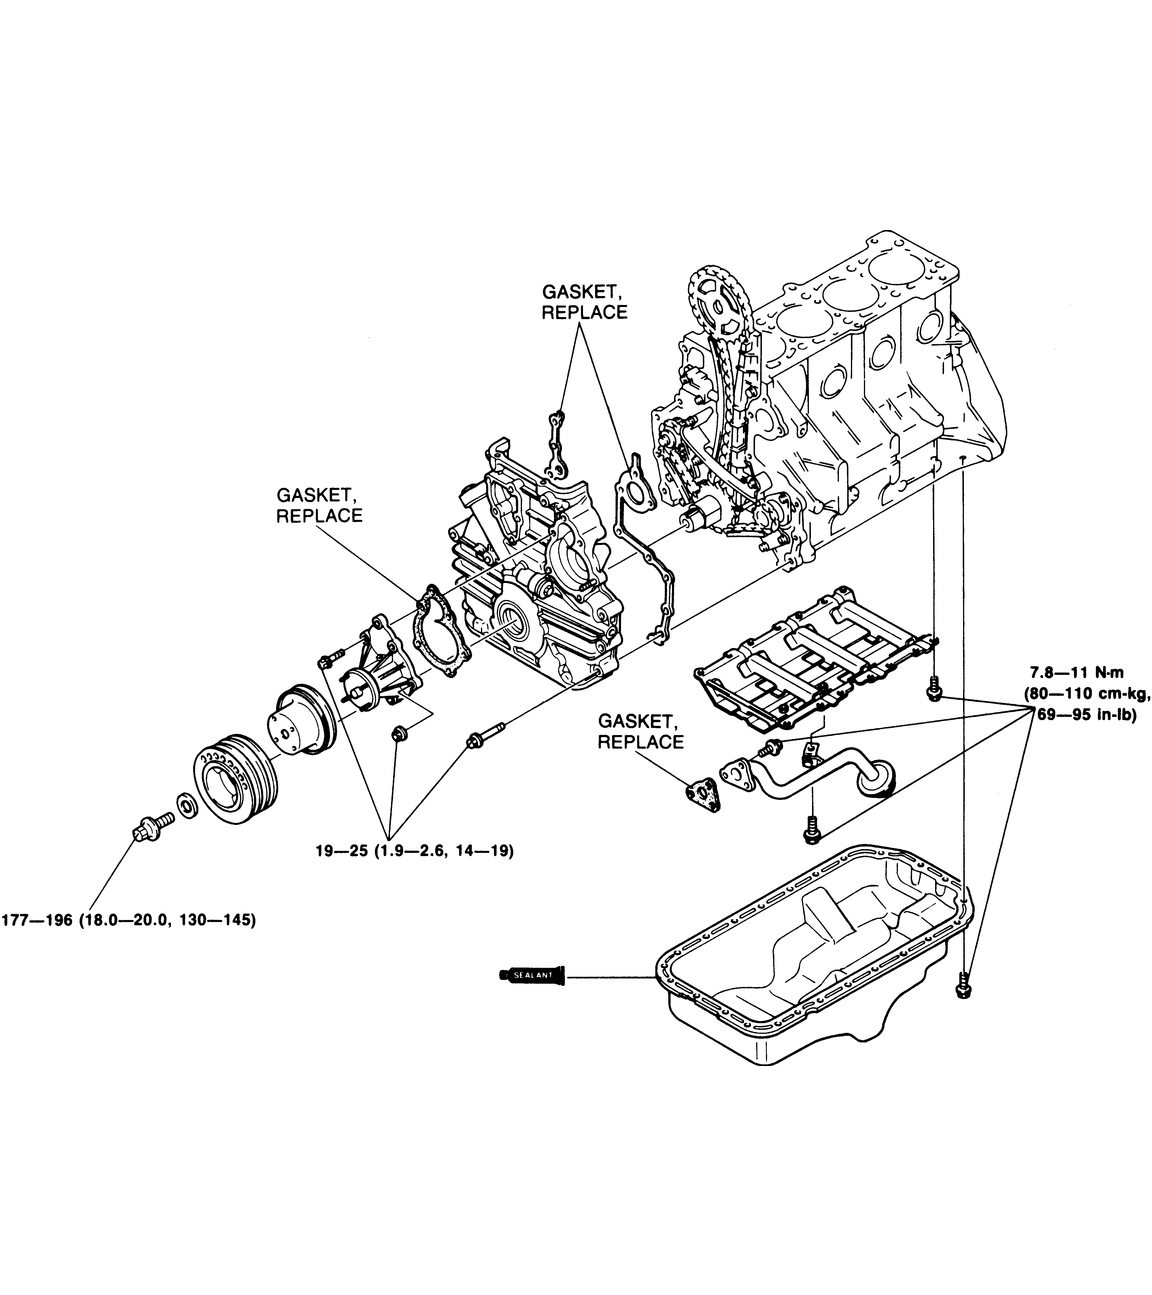
Fig. 2: Oil pan and components removal/installation

  1. Raise and safely support the vehicle on jackstands. Drain the oil pan.

    CAUTION
    The EPA warns that prolonged contact with used engine oil may cause a number of skin disorders, including cancer! You should make every effort to minimize your exposure to used engine oil. Protective gloves should be worn when changing the oil. Wash your hands and any other exposed skin areas as soon as possible after exposure to used engine oil. Soap and water, or waterless hand cleaner should be used.

  2. Remove the oil pan attaching bolts and remove oil pan.
  3. Clean oil pan and engine block gasket surfaces thoroughly.
  4. Install a new pan gasket.
  5. Install oil pan and tighten the bolts to 52–61 inch lbs. (6–7 Nm).
  6. Install all other parts in reverse order of removal.
1989-93
  1. Raise and support the front end on jackstands.
  2. Drain the oil.

    CAUTION
    The EPA warns that prolonged contact with used engine oil may cause a number of skin disorders, including cancer! You should make every effort to minimize your exposure to used engine oil. Protective gloves should be worn when changing the oil. Wash your hands and any other exposed skin areas as soon as possible after exposure to used engine oil. Soap and water, or waterless hand cleaner should be used.

  3. Remove the splash pan.
  4. Remove the engine braces.
  5. Remove the stabilizer bracket.
  6. Unbolt and remove the oil pan.
  7. Clean the oil pan and engine block gasket surfaces thoroughly.
  8. Install a new pan gasket.
  9. Install oil pan and tighten the bolts to 69–95 inch lbs. (8–11 Nm).
  10. Install all other parts in reverse order of removal.
3.0L Engine

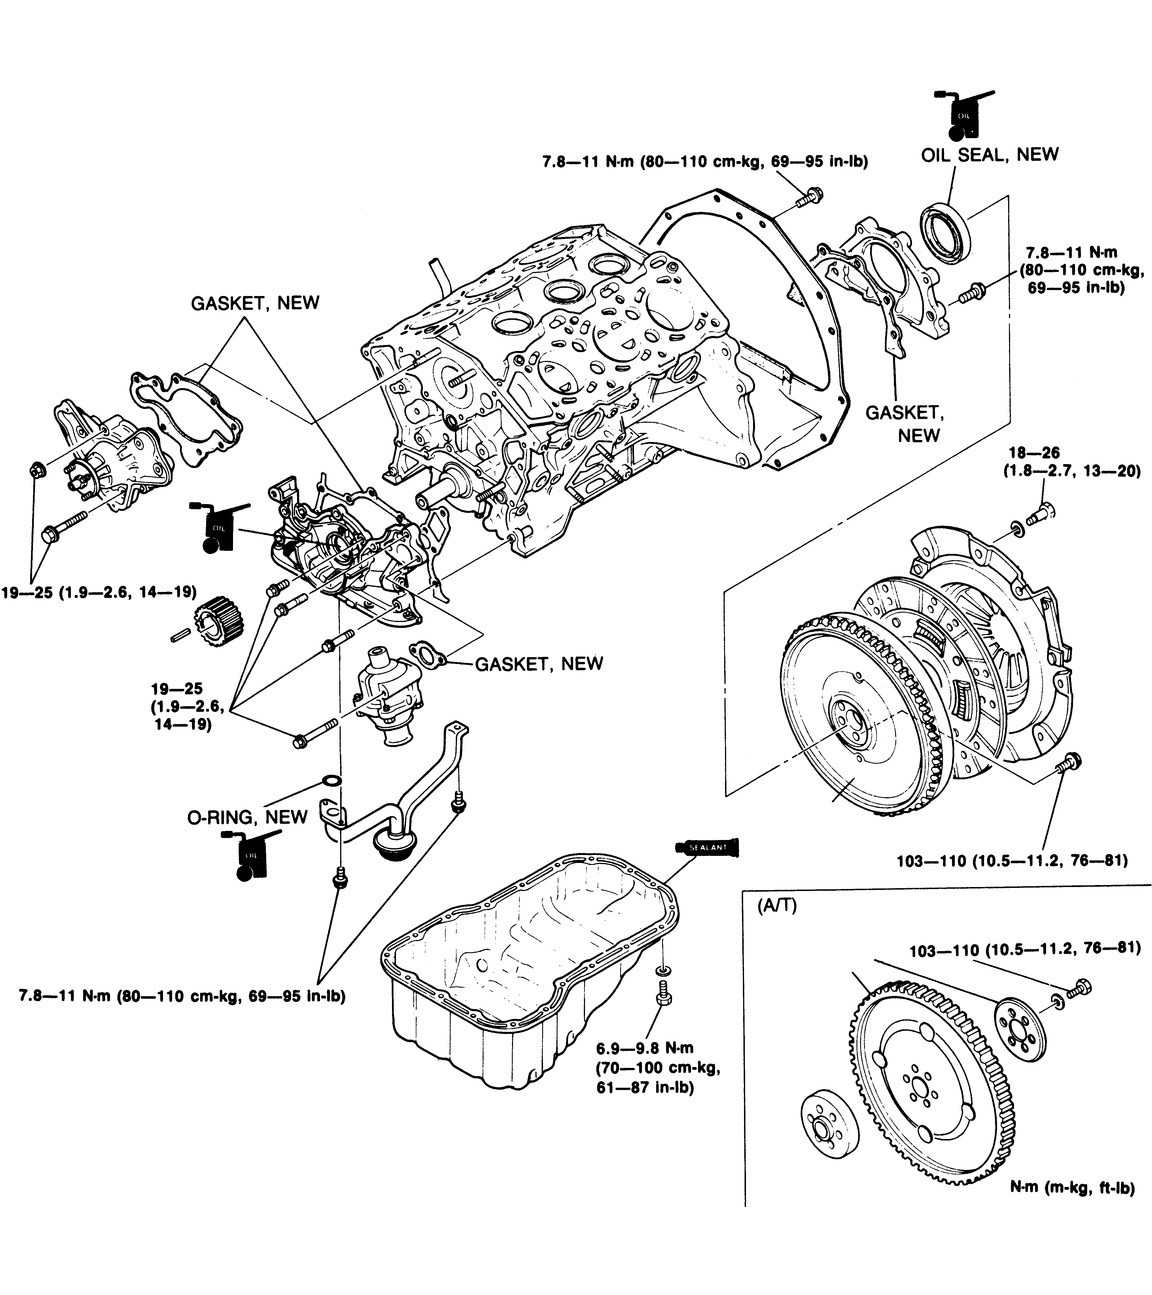
Fig. 3: Oil pan and components removal/installation

  1. Disconnect the negative battery cable. Raise and support the vehicle safely.
  2. Drain the engine oil.
  3. Remove the engine under cover.
  4. Remove the oil pan retaining bolts.
  5. With a scraper or suitable prying tool, separate the oil pan from the block and remove it. Some oil pans may or may not have a gasket.

    NOTE: Be careful not to bend the oil pan when separating it from the block.

  6. On oil pans with a gasket, apply sealer to the joints between the front cover and the block and the rear main seal housing and the block. On gasketless oil pans, apply a continuous bead of sealant to the oil pan flange around the inside of the bolt holes and overlap the ends.
  7. Raise the oil pan onto the block and install the retaining bolts. Torque the bolts to 61–87 inch lbs. (7–10 Nm).
  8. Install the engine undercover and lower the vehicle. Fill the crankcase to the proper level. Start the engine and check for leaks.
4.0L Engine

NOTE: Review the complete service procedure before starting this repair.

  1. Disconnect the negative battery cable. Remove the complete engine assembly from the vehicle. Refer to the necessary service procedures in this Chapter.
  2. Mount the engine on a suitable engine stan with oil pan facing up.
  3. Remove the oil pan attaching bolts (note location of 2 spacers) and remove the pan from the engine block.
  4. Remove the oil pan gasket and crankshaft rear main bearing cap wedge seal.
  5. Clean all gasket surfaces on the engine and oil pan. Remove all traces of old gasket and/or sealer.

    Fig. 4: Oil pan and components removal/assembly

    To install:

  6. Install a new crankshaft rear main bearing cap wedge seal. The seal should fit snugly into the sides of the rear main bearing cap.
  7. Position the oil pan gasket to the engine block and place the oil pan in correct position on the 4 locating studs.
  8. Torque the oil pan retaining bolts EVENLY to 5–7 ft. lbs. (7–10 Nm).

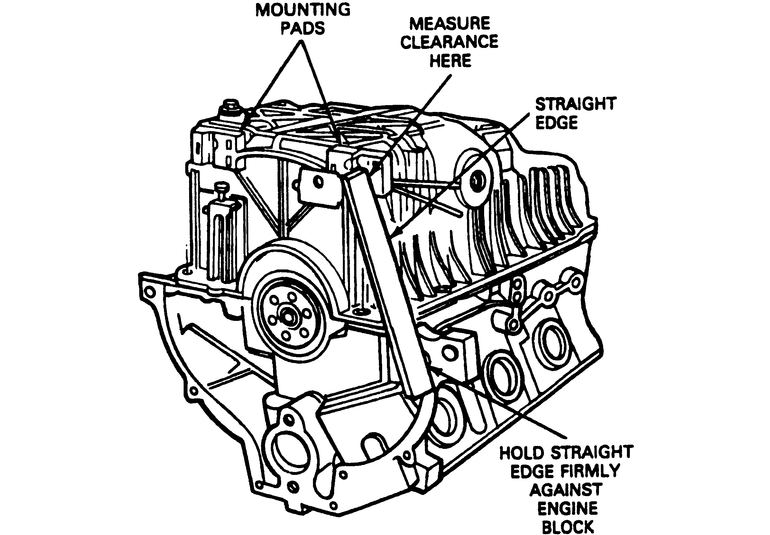
    Fig. 5: Measuring the correct oil pan-to-transmission clearance for proper oil pan installation

    NOTE: The transmission bolts to the engine and oil pan. There are 2 spacers on the rear of the oil pan to allow proper mating of the transmission and oil pan. If these spacers were lost, or the oil pan was replaced, you must determine the proper spacers to install. To do this:

    1. With the oil pan installed, place a straightedge across the machined mating surface of the rear of the block, extending over the oil pan-to-transmission mounting surface.
    2. Using a feeler gauge, measure the gap bewteen the oil pan mounting pad and the straightedge.
    3. Repeat the procedure for the other side.
    4. Select the spacers as follows: Gap = 0.011–0.020 in.; spacer = 0.010 in. Gap = 0.021–0.029 in.; spacer = 0.020 in. Gap = 0.030–0.039 in.; spacer = 0.030 in.
  9. Failure to use the correct spacers will result in damage to the oil pan and oil leakage.
  10. Install the selected spacers to the mounting pads on the rear of the oil pan before bolting the engine and transmission together. Install the engine assembly in the vehicle.
  11. Connect the negative battery cable. Start the engine and check for leaks.

Previous Next