Previous Next

Oil Pump

REMOVAL & INSTALLATION

2.2L Engine

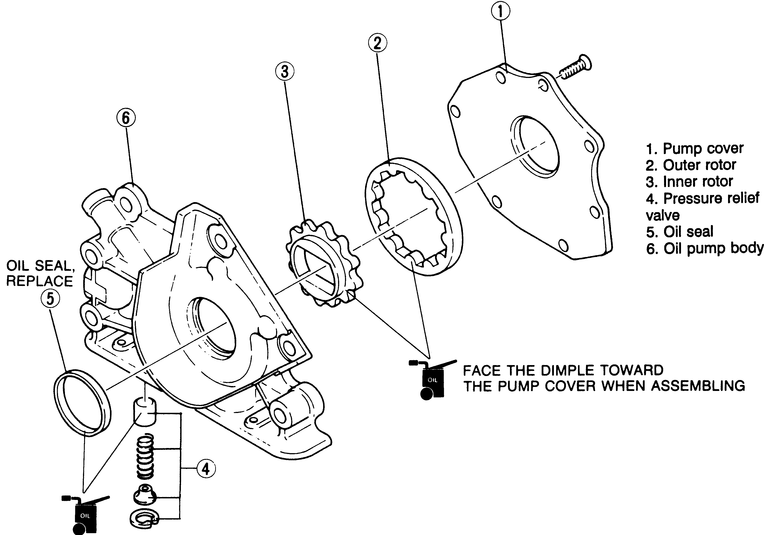
Fig. 1: Oil pump assembly removal/installation

  1. Disconnect the battery ground.
  2. Drain the cooling system.

    CAUTION
    When draining the coolant, keep in mind that cats and dogs are attracted by the ethelyne glycol antifreeze, and are quite likely to drink any that is left in an uncovered container or in puddles on the ground. This will prove fatal in sufficient quantity. Always drain the coolant into a sealable container. Coolant should be reused unless it is contaminated or several years old.

  3. Remove the distributor.
  4. Remove the fan shroud and fan.
  5. Remove the alternator.
  6. Disconnect the air injection pipes.
  7. Remove the fan pulley, hub and bracket.
  8. If so equipped, remove the air conditioning compressor drive belt.
  9. If so equipped, remove the power steering pump drive belt.
  10. Remove the crankshaft pulley and baffle plate.
  11. Remove the upper, then the lower, timing belt covers.
  12. Remove the timing belt.
  13. Unbolt and remove the crankshaft sprocket.
  14. Drain the oil.

    CAUTION
    The EPA warns that prolonged contact with used engine oil may cause a number of skin disorders, including cancer! You should make every effort to minimize your exposure to used engine oil. Protective gloves should be worn when changing the oil. Wash your hands and any other exposed skin areas as soon as possible after exposure to used engine oil. Soap and water, or waterless hand cleaner should be used.

  15. Remove the skid plate.
  16. Place a floor jack under the front of the engine at the crankshaft pulley and take up the weight of the engine. Or use a shop crane to support the engine.
  17. Remove the crossmember.
  18. Remove the cotter pin and nut and, with a puller, disconnect the idler arm from the center link.
  19. Remove the engine mount gusset plates from the sides of the engine.
  20. Remove the bell housing front cover.
  21. Unbolt and remove the oil pan. A flat tipped screwdriver may be used to break the seal between the pan and block.
  22. Remove the oil pick-up tube.
  23. Unbolt and remove the oil pump.

    To install:

  24. Apply a thin coating of grease to the O-ring and install it in its recess in the pump body.
  25. Apply a thin bead of RTV silicone sealer to the pump mounting surface.
  26. Coat the oil seal lip with clean engine oil and install the pump. Tighten the oil pump mounting bolts.
  27. Clean all the gasket surfaces. Straighten and portion of the pan rim that is bent.
  28. Clean the oil pan, oil pump pickup tube and oil pump screen.
  29. Install the oil pan.
  30. Install the bell housing front cover. Tighten the bolts to 20 ft. lbs. (27 Nm).
  31. Install the engine mount gusset plates on the sides of the engine. Tighten the bolts to 35 ft. lbs. (47 Nm).
  32. Install the idler arm on the center link. Tighten the nut to 30 ft. lbs. (41 Nm). Install a new cotter pin.
  33. Install the crossmember.
  34. Remove the floor jack or shop crane used to support the engine.
  35. Install the skid plate.
  36. Install the crankshaft sprocket.
  37. Install the timing belt.
  38. Install the upper, then the lower, belt covers.
  39. Install the crankshaft pulley and baffle plate.
  40. Install the power steering pump drive belt.
  41. Install the air conditioning compressor drive belt.
  42. Install the fan pulley, hub and bracket.
  43. Install the air injection pipes.
  44. Install the alternator.
  45. Install the fan shroud and fan.
  46. Install the distributor.
  47. Fill the engine with the proper amount of oil.
  48. Fill the cooling system.
  49. Install the battery ground cable.

    Install the drive belts.

2.6L Engine
1987-88

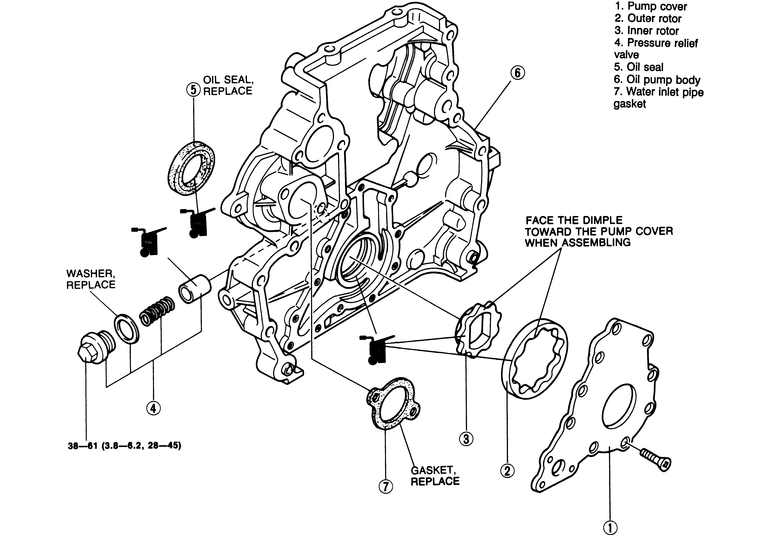
Fig. 2: Oil pump assembly removal/installation

  1. Disconnect the battery ground (negative) cable. Drain the coolant. Disconnect and remove the radiator hoses. Remove the radiator.

    CAUTION
    When draining the coolant, keep in mind that cats and dogs are attracted by the ethylene glycol antifreeze, and are quite likely to drink any that is left in an uncovered container or in puddles on the ground. This will prove fatal in sufficient quantity. Always drain the coolant into a sealable container. Coolant should be reused unless it is contaminated or several years old.

  2. Remove the alternator and accessory belts.
  3. Remove the distributor.
  4. Remove the crankshaft pulley.
  5. Remove the water pump assembly.
  6. Remove the cylinder head.

    NOTE: It may be possible to replace the timing chain without removing the cylinder head, however removing the head will make the job easier.

  7. Raise the front of the truck and support it safely on jackstands.
  8. Drain the engine oil and remove the oil pan and screen.

    CAUTION
    The EPA warns that prolonged contact with used engine oil may cause a number of skin disorders, including cancer! You should make every effort to minimize your exposure to used engine oil. Protective gloves should be worn when changing the oil. Wash your hands and any other exposed skin areas as soon as possible after exposure to used engine oil. Soap and water, or waterless hand cleaner should be used.

  9. Remove the timing case cover.
  10. Remove the chain guides, Side (A), Top (B), Bottom (C), from the B chain (outer).
  11. Remove the locking bolts from the B chain sprockets.
  12. Remove the crankshaft sprocket, counterbalance shaft sprocket and the outer chain.
  13. Remove the crankshaft and camshaft sprockets and the A (inner) chain.
  14. Remove the camshaft sprocket holder and the chain guides, both left and right. Remove the tensioner spring and sleeve from the oil pump.
  15. Remove the oil pump by first removing the bolt locking the oil pump driven gear and the right counterbalance shaft, and then remove the oil pump mounting bolts. Remove the counterbalance shaft from the engine block.

    NOTE: If the bolt locking the oil pump driven gear and the counterbalance shaft is hard to loosen, remove the oil pump and the shaft as a unit.

  16. Remove the gaskets and the oil pump backing plate.
  17. Clean the gasket mounting surfaces.

    To install:

  18. Install new gaskets/seals, align the mating marks of the oil pump gears, refill the pump with oil, and install the pump assembly.
  19. Install the oil pump silent shaft sprocket and sprocket bolt. Tighten the sprocket bolt to 34 Nm (25 ft. lbs.).
  20. Install a new O-ring on the thrust plate and install the unit into the engine block, using a pair of bolts without heads, as alignment guides.

    NOTE: If the thrust plate is turned to align the bolts holes, the O-ring may be damaged.

  21. Remove the guide bolts and install the regular bolts into the thrust plate and tighten securely.
  22. Rotate the crankshaft to bring No. 1 piston to TDC.
  23. Using a new head gasket install the cylinder head.
  24. Install the sprocket holder and the right and left chain guides.
  25. Install the tensioner spring and sleeve on the oil pump body.
  26. Install the camshaft and crankshaft sprockets on the timing chain, aligning the sprocket punch marks to the plate chain links.
  27. While holding the sprocket and chain as a unit, install the crankshaft sprocket over the crankshaft and align it with the keyway.
  28. Keeping the dowel pin hole on the camshaft in a vertical position, install the camshaft sprocket and chain on the camshaft.

    NOTE: The sprocket timing mark and the plated chain link should be at the 2 to 3 o'clock position when correctly installed. The chain must be aligned in the right and left chain guides with the tensioner pushing against the chain. The tension for the inner chain is predetermined by spring tension.

  29. Install the crankshaft sprocket for the outer or B chain.
  30. Install the two counterbalance shaft sprockets and align the punched mating marks with the plated linds of the chain.
  31. Holding the two shaft sprockets and chain, install the outer chain in alignment with the mark on the crankshaft sprocket. Install the shaft sprockets on the counterbalance shaft and the oil pump driver gear. Install the lock bolts and recheck the alignment of the punch marks and the plated links.
  32. Temporarily install the chain guides: Side (A), Top (B), and Bottom (C).
  33. Tighten Side (A), chain guide securely.
  34. Tighten Bottom (B) chain guide securely.
  35. Adjust the position of the Top (B) chain guide, after shaking the right and left sprockets to collect any chain slack, so that when the chain is moved toward the center, the clearance between the chain guide anmd the chain links will be approximately 3.5mm (0.13779 in.). Tighten the Top (B) chain guide bolts
  36. Install the timing chain cover using a new gasket. being careful not to damage the front seal.
  37. Install the oil screen and the oil pan, using a new gasket.
  38. Install the crankshaft pulley, alternator and accessory belts, and the distributor.
  39. Install the oil pressure switch, if removed, and install the battery ground cable.
  40. Install the fan blades, radiator, fill the system with coolant and start the engine.
1989-93
  1. Disconnect the battery ground.
  2. Drain the cooling system.

    CAUTION
    When draining the coolant, keep in mind that cats and dogs are attracted by the ethylene glycol antifreeze, and are quite likely to drink any that is left in an uncovered container or in puddles on the ground. This will prove fatal in sufficient quantity. Always drain the coolant into a sealable container. Coolant should be reused unless it is contaminated or several years old.

  3. Remove the accessory drive belts.
  4. Remove the fan and shroud.
  5. Remove the water pump pulley.
  6. Unbolt and remove the water pump.
  7. Remove the crankshaft pulley.
  8. Remove the oil pan.
  9. Remove the timing chain cover.

    NOTE: The pump is built into the cover

  10. Remove the oil pick-up tube.
  11. Remove the pump cover from the case.
  12. Remove the inner and outer rotors.
  13. Remove the pressure relief valve.
  14. Remove and discard the water inlet pipe gasket.

    To install:

  15. Install a new water inlet pipe gasket using adhesive sealer.
  16. Install the oil pick-up tube using a new gasket. Tighten the bolts to 95 inch lbs. (11 Nm).
  17. Install the pressure relief valve. Tighten the plug to 45 ft. lbs. (61 Nm).
  18. Install the inner and outer rotors.
  19. Install the pump cover.
  20. Using new gaskets coated with sealer, install the timing chain cover.
  21. Tighten the oil pick-up brace bolt to 95 inch lbs. (11 Nm).
  22. Install the oil pan.
  23. Install the crankshaft pulley.
  24. Install the water pump.
  25. Install the water pump pulley.
  26. Install the fan and shroud.
  27. Install the accessory drive belts.
  28. Fill the cooling system.
  29. Connect the battery ground.
3.0L Engine

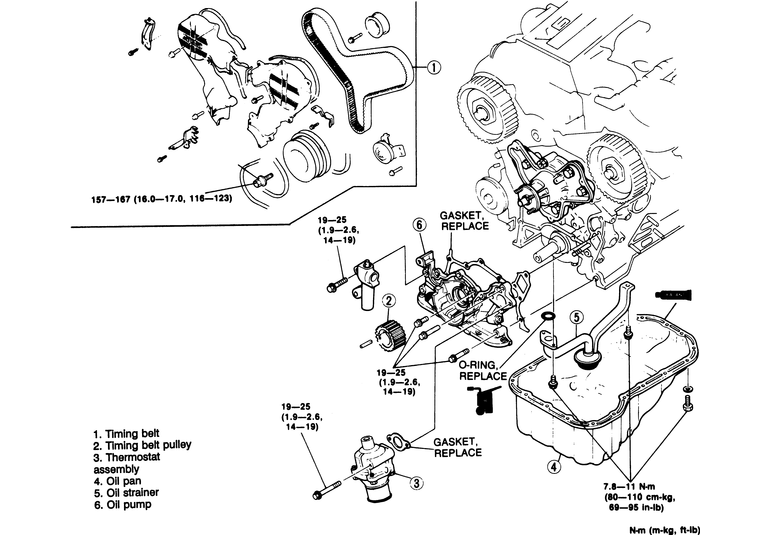
Fig. 3: Oil pump assembly removal/installation

  1. Disconnect the negative battery cable. Raise and support the vehicle safely.
  2. Drain the engine oil and the cooling system.
  3. Remove the timing belt and the timing belt pulley and key as decribed in this chapter. Remove the thermostat and gasket.
  4. Remove the oil pan, oil strainer and O-ring.
  5. Unbolt and remove the oil pump and gasket.
  6. To install, press in a new oil seal and coat the seal lip with clean engine oil. Use a new gasket, O-ring and sealant as required. Tighten the oil pump retaining bolts to 14–19 ft. lbs. (19–25 Nm).
4.0L Engine

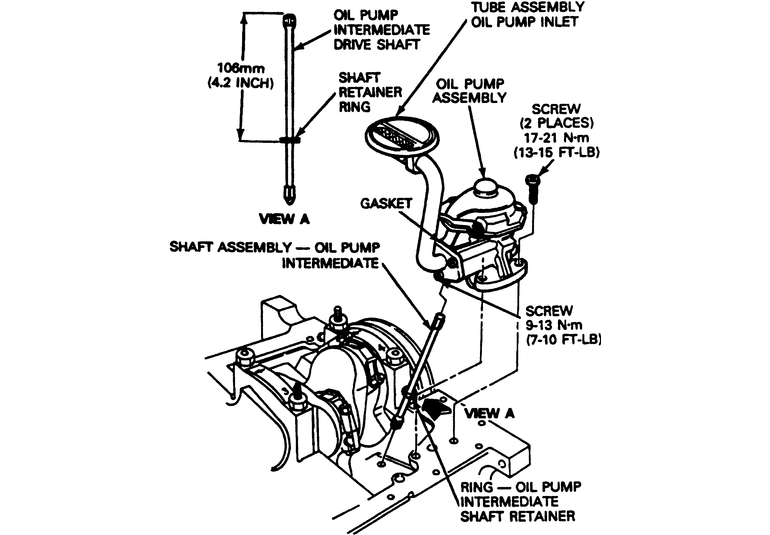
Fig. 4: Oil pump assembly removal/installation

NOTE: The oil pumps are not serviceable. If defective, they must be replaced.

  1. Follow the service procedures under Oil Pan Removal and remove the oil pan assembly.
  2. Remove the oil pick-up and tube assembly from the pump.
  3. Remove the oil pump retainer bolts and remove the oil pump.

    To install:

  4. Prime the oil pump with clean engine oil by filling either the inlet or outlet port with clean engine oil. Rotate the pump shaft to distribute the oil within the pump body.
  5. Install the pump and tighten the mounting bolts to 13–15 ft. lbs. (17–21 Nm).

    WARNING
    Do not force the oil pump if it does not seat readily. The oil pump driveshaft may be misaligned with the distributor or shaft assembly. If the pump is tightened down with the driveshaft misaligned, damage to the pump could occur. To align, rotate the intermediate driveshaft into a new position.

  6. Install the oil pick-up and tube assembly to the pump. If there is a gasket between the pump and the pick-up, use a new gasket when installing.
  7. Install the oil pan as previously described.

Previous Next