Previous Next

REMOVAL & INSTALLATION

2.6L Engine
1987-88

The following procedures are the recommended removal and installion procedures for the timing chain. Some modifications to the procedures may be necessary due to added accessories, sheetmetal parts, or emission control units and connecting hoses.

NOTE: The timing chain case is cast aluminum, so exercise caution when handling this part.

  1. Disconnect the battery ground (negative) cable. Drain the coolant. Disconnect and remove the radiator hoses. Remove the radiator.

    CAUTION
    When draining the coolant, keep in mind that cats and dogs are attracted by the ethylene glycol antifreeze, and are quite likely to drink any that is left in an uncovered container or in puddles on the ground. This will prove fatal in sufficient quantity. Always drain the coolant into a sealable container. Coolant should be reused unless it is contaminated or several years old.

  2. Remove the alternator and accessory belts.
  3. Rotate the crankshaft to bring No.1 piston to TDC, on the compression stroke.
  4. Mark and remove the distributor.
  5. Remove the crankshaft pulley.
  6. Remove the water pump assembly.
  7. Remove the cylinder head.

    NOTE: It may be possible to replace the timing chain without removing the cylinder head, however removing the head will make the job easier.

  8. Raise the front of the vehicle and support it safely on jackstands.
  9. Drain the engine oil and remove the oil pan and screen.

    CAUTION
    The EPA warns that prolonged contact with used engine oil may cause a number of skin disorders, including cancer! You should make every effort to minimize your exposure to used engine oil. Protective gloves should be worn when changing the oil. Wash your hands and any other exposed skin areas as soon as possible after exposure to used engine oil. Soap and water, or waterless hand cleaner should be used.

  10. Remove the timing case cover.
  11. Remove the balancer chain and sprockets.
  12. Remove the crankshaft and camshaft sprockets and the timing chain.
  13. Remove the camshaft sprocket holder and the chain guides, both left and right. Remove the tensioner spring and sleeve from the oil pump.
  14. Remove the oil pump assembly. Remove the balance shafts from the engine block.

    NOTE: If the bolt locking the oil pump driven gear and the balance shaft is hard to loosen, remove the oil pump and the shaft as a unit.

    NOTE: If the tensioner rubber nose, or chain guide show wear, they should be replaced.

    To install:

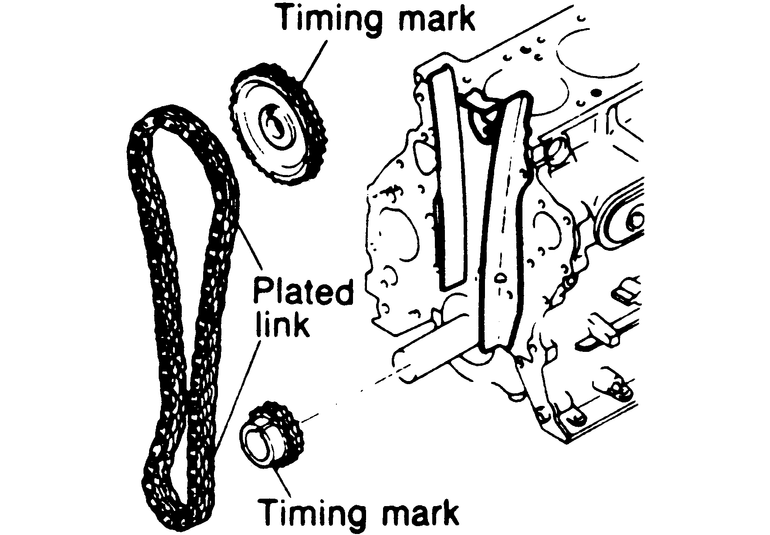
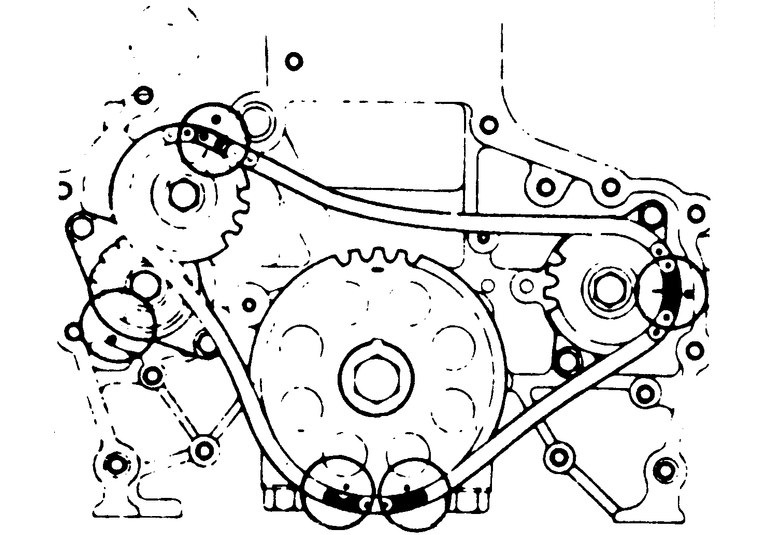
    Fig. 1: Timing chain and sprocket alignment

    Fig. 2: Balancer chain and and sprocket alignment

  15. Install the right counterbalance shaft into the engine block.
  16. Install the oil pump assembly if removed. Do not lose the woodruff key from the end of the counterbalance shaft.
  17. If they have been removed, tighten the counterbalance shaft and the oil pump driven gear mounting bolts.

    NOTE: The counterbalance shaft and the oil pump can be installed as a unit, if necessary.

  18. Install the left counterbalance shaft into the engine block if removed.
  19. Install a new O-ring on the thrust plate and install the unit into the engine block, using a pair of bolts without heads, as alignment guides.

    NOTE: If the thrust plate is turned to align the bolts holes, the O-ring may be damaged.

  20. Remove the guide bolts and install the regular bolts into the thrust plate and tighten securely.
  21. Rotate the crankshaft to bring No. 1 piston to TDC.
  22. Using a new head gasket install the cylinder head.
  23. Install the sprocket holder and the right and left chain guides.
  24. Install the tensioner spring and sleeve on the oil pump body.
  25. Install the camshaft and crankshaft sprockets on the timing chain, aligning the sprocket punch marks to the plate chain links.
  26. While holding the sprocket and chain as a unit, install the crankshaft sprocket over the crankshaft and align it with the keyway.
  27. Keeping the dowel pin hole on the camshaft in a vertical position, install the camshaft sprocket and chain on the camshaft.

    NOTE: The sprocket timing mark and the plated chain link should be at the 2–3 o'clock position when correctly installed. The chain must be aligned in the right and left chain guides with the tensioner pushing against the chain. The tension for the inner chain is predetermined by spring tension.

  28. Install the crankshaft sprocket for the outer or B chain.
  29. Install the two counterbalance shaft sprockets and align the punched mating marks with the plated linds of the chain.
  30. Holding the two shaft sprockets and chain, install the outer chain in alignment with the mark on the crankshaft sprocket. Install the shaft sprockets on the counterbalance shaft and the oil pump driver gear. Install the lock bolts and recheck the alignment of the punch marks and the plated links.
  31. Temporarily install the chain guides: Side (A), Top (B), and Bottom (C).
  32. Tighten Side (A), chain guide securely.
  33. Tighten Bottom (B) chain guide securely.
  34. Adjust the position of the Top (B) chain guide, after shaking the right and left sprockets to collect any chain slack, so that when the chain is moved toward the center, the clearance between the chain guide anmd the chain links will be approximately 3.5mm (0.13779 inch). Tighten the Top (B) chain guide bolts.
  35. Install the timing chain cover using a new gasket. being careful not to damage the front seal.
  36. Install the oil screen and the oil pan.
  37. Install the crankshaft pulley, alternator and accessory belts, and the distributor.
  38. Install the oil pressure switch, if removed, and install the battery ground cable.
  39. Install the fan blades, radiator, fill the system with coolant and start the engine.
1989-93

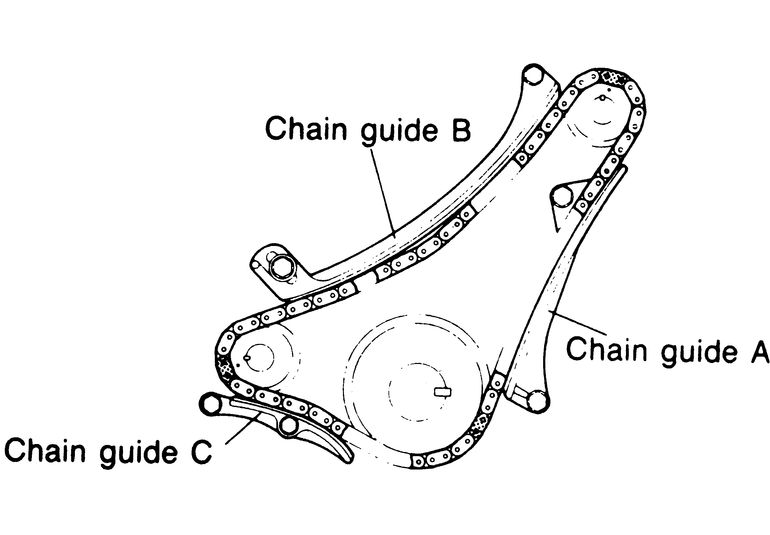
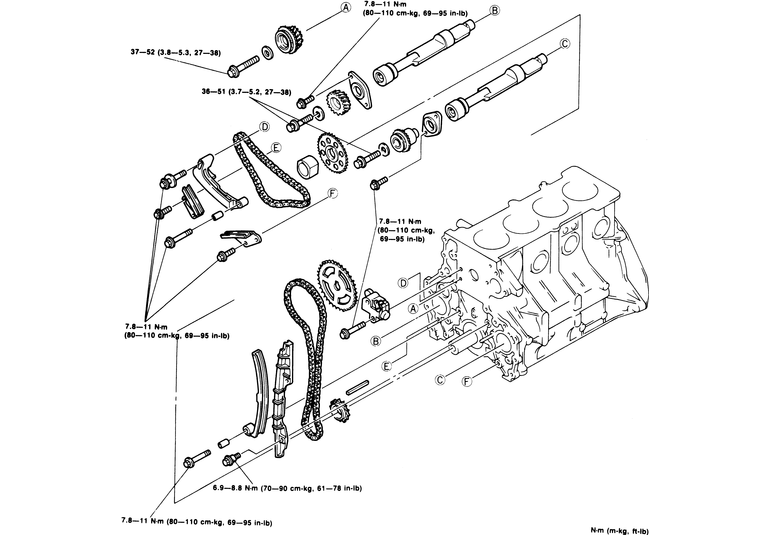
Fig. 3: Exploded view of the balancer chain and timing chain assemblies

  1. Disconnect the battery ground.
  2. Drain the cooling system.

    CAUTION
    When draining the coolant, keep in mind that cats and dogs are attracted by the ethylene glycol antifreeze, and are quite likely to drink any that is left in an uncovered container or in puddles on the ground. This will prove fatal in sufficient quantity. Always drain the coolant into a sealable container. Coolant should be reused unless it is contaminated or several years old.

  3. Remove the accessory drive belts.
  4. Remove the fan and shroud.
  5. Remove the water pump pulley.
  6. Unbolt and remove the water pump.
  7. Remove the crankshaft pulley.
  8. Remove the oil pan.
  9. Remove the timing chain cover.
  10. Remove the oil pick-up tube.
  11. Remove and discard the water inlet pipe gasket.
  12. Remove the crankshaft sprocket spacer.
  13. Remove the idler sprocket lockbolt.
  14. Remove chain guide A.
  15. Remove chain guide B.
  16. Remove chain guide C.
  17. Remove the idler sprocket and crankshaft sprocket bolts and pull off the sprockets along with the balancer chain.
  18. Remove the left balance shaft.
  19. Remove the right balance shaft.
  20. Remove the crankshaft timing gear bolt.
  21. Remove the timing chain tensioner.
  22. Pull the timing chain and sprockets off.
  23. Remove the chain guide and lever.

    To install:

  24. Install the chain guide and lever. Tighten the chain guide and lever bolts to 69–95 inch lbs. (8–11 Nm). Make sure that the lever moves smoothly.

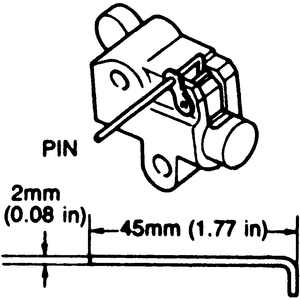
    Fig. 4: Retaining the timing chain adjuster

  25. Install the chain adjuster. Tighten the bolts to 69–95 inch lbs. (8–11 Nm). Move the adjuster sleeve towards the left and install a pin to hold it in place.
  26. Install the timing gear sprocket and chain. With the timing mark on the sprocket at the 6 o'clock position, the white links on the chain should be on either side of the mark.

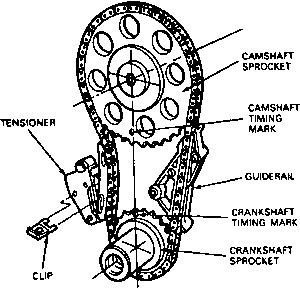
    Fig. 5: Timing chain and camshaft sprocket alignment

    Fig. 6: Timing chain and crankshaft sprocket alignment

  27. Install the camshaft sprocket on the camshaft with the timing mark at the 3 o'clock position. The white link should align with the mark. Temporarily secure the chain to the sprocket with a piece of wire.
  28. Install the balance shafts.
  29. Install the crankshaft sprocket.
  30. Install the idler shaft and sprocket.
  31. Set the balance chain on the balance shaft sprocket aligns with the brown link on the chain.

    Fig. 7: Balancer chain and shaft sprocket alignment

  32. Install the balancer chain, aligning all the marks as shown.
  33. Install chain guides A and B. Tighten the bolts to 69–95 inch lbs. (8–11 Nm).
  34. Install chain guide C. Tighten the bolt to 69–95 inch lbs. (8–11 Nm).
  35. Torque the idler sprocket lockbolt to 38 ft. lbs. (52 Nm).
  36. Install the spacer.
  37. Loosen chain guide C adjusting bolt.
  38. Push chain guide C with a force of about 10 lb., downward, against the chain, then, pull it back 3.5mm (0.13779 in.) and tighten the bolt to 95 in. lbs. When properly adjusted, there should be about 3mm (0.1181 in.) of slack in the chain at the mid-point of the guide.

    NOTE: If, when applying the downward force on the chain guide, it bottoms against the adjusting bolt, you should replace the balancer chain.

  39. Remove the tensioner adjuster retaining pin.
  40. Install a new water inlet pipe gasket using adhesive sealer.
  41. Install the oil pick-up tube using a new gasket. Tighten the bolts to 95 in. lbs. (11 Nm).
  42. Install the timing chain cover.
  43. Install the camshaft sprocket service cover.
  44. Remove the wire from the camshaft sprocket.
  45. Tighten the oil pick-up brace bolt to 95 inch lbs. (11 Nm).
  46. Install the oil pan.
  47. Install the crankshaft pulley.
  48. Install the water pump.
  49. Install the water pump pulley.
  50. Install the fan and shroud.
  51. Install the accessory drive belts.
  52. Fill the cooling system.
  53. Connect the battery ground.
4.0L Engine

NOTE: Review the complete service procedure before starting this repair. Refer to the necessary service procedures in this Chapter.

  1. Disconnect the negative battery cable. Remove the oil pan.
  2. Drain the cooling system.

    CAUTION
    When draining the coolant, keep in mind that cats and dogs are attracted by the ethylene glycol antifreeze, and are quite likely to drink any that is left in an uncovered container or in puddles on the ground. This will prove fatal in sufficient quantity. Always drain the coolant into a sealable container. Coolant should be reused unless it is contaminated or several years old.

  3. Remove the air conditioning compressor and position it out of the way. DO NOT disconnect the refrigerant lines!
  4. Remove the power steering pump and position it out of the way. DO NOT disconnect the hoses!
  5. Remove the alternator.
  6. Remove the fan.
  7. Remove the water pump.
  8. Remove the drive pulley/damper from the crankshaft.
  9. Remove the crankshaft position sensor.
  10. Remove the front cover attaching bolts. It may be necessary to tap the cover loose with a plastic mallet.
  11. Remove the radiator.
  12. Rotate the engine by hand until the No.1 cylinder is at TDC compression, and the timing marks are aligned.
  13. Remove the camshaft sprocket bolt and sprocket retaining key.
  14. Remove the camshaft and crankshaft sprockets with the timing chain.

    Fig. 8: Timing chain and sprocket alignment

  15. If necessary, remove the tensioner and guide.

    To install:

  16. Install the timing chain guide. Make sure the pin of the guide is in the hole in the block. Tighten the bolts to 84–96 inch lbs (9–11 Nm).
  17. Align the timing marks on the crankshaft and camshaft sprockets and install the sprockets and chain.
  18. Install the camshaft sprocket bolt and sprocket retaining key. Make sure that the timing marks are still aligned.
  19. Install the tensioner with the clip in place to keep it retracted.
  20. Install the crankshaft key. Make sure the timing marks are still aligned.
  21. Make sure the tensioner side of the chain is held inward and the other side is straight and tight.
  22. Install the camshaft sprocket bolt and tighten it to 50 ft. lbs. (68 Nm).
  23. Remove the tensioner clip.
  24. Check camshaft endplay.
  25. Install the front cover and attaching bolts.
  26. Install the radiator.
  27. Install the crankshaft position sensor.
  28. Install the drive pulley/damper.
  29. Install the water pump.
  30. Install the fan.
  31. Install the alternator.
  32. Install the power steering pump.
  33. Install the air conditioning compressor.
  34. Fill the cooling system.
  35. Install the oil pan.
  36. Fill the crankcase to the proper level. Connect the negative battery cable. Start engine check for leaks and roadtest the vehicle for proper operation.

Previous Next