- Disconnect the negative battery cable. Raise and support the vehicle safely.
Remove the transmission.
- If equipped with a manual transmission, remove the pressure plate, the clutch
disc and the flywheel. If equipped with an automatic transmission, remove
the drive plate from the crankshaft.
- Remove the rear oil pan-to-seal housing bolts.
- Remove the rear main seal housing bolts and the housing from the engine.
- Remove the oil seal from the rear main housing.
- Clean the gasket mounting surfaces.
- To install, use a new seal, coat the seal and the housing with oil. Drive
the seal into the housing, using a seal driver.
- To complete the installation, use new gaskets, apply sealant to the oil
pan mounting surface and reverse the removal procedure. Torque the rear seal
housing to 6–8 ft. lbs. (8–11 Nm) on the 2.2L engine and 95 in.
lbs. (11 Nm) on the 2.6L engine.
The rear main seal is located in a housing on the rear of the block. To replace
the seal, it is necessary to remove the transmission and perform the work from
underneath the truck or remove the engine and perform the work on an engine
stand or work bench.
- Unscrew the retaining bolts and remove the housing from the block.
- Remove the separator from the housing.
- Using a small pry bar, pry out the old seal.
- Clean the housing and the separator.
- Lightly oil the replacement seal. Tap the seal into housing using a canister
top or other circular piece of metal. The oil seal should be installed so
that the seal plate fits into the inner contact surface of the seal case.
- Install the separator into the housing so that the oil hole faces down.
- Oil the lips of the seal and install the housing on the rear of the engine
block.
- Raise and support the vehicle safely. Remove the transmission from the vehicle.
- If equipped with manual transmission, remove the clutch pressure plate and
flywheel.
- If equipped with automatic transmission, remove the flywheel assembly.
- Drain the engine oil. Remove the engine oil pan.
- Remove the rear main seal cover retaining bolts. Remove the rear main seal
cover. Remove the seal from the rear cover.
- Installation is the reverse of the removal procedure. Apply clean engine
oil to the seal before pressing it into the cover.
- After installing the rear cover cut away the portion of the gasket that
projects out toward the oil pan side.
If the crankshaft rear oil seal replacement is the only operation being performed,
it can be done in the vehicle as detailed in the following procedure. If the
oil seal is being replaced in conjunction with a rear main bearing replacement,
the engine must be removed from the vehicle and installed on a work stand.
- Remove the starter.
- Remove the transmission from the vehicle, following the procedures in Chapter
7.
- On a manual shift transmission, remove the pressure plate and cover assembly
and the clutch disc following the procedure in Chapter 7.
- Remove the flywheel attaching bolts and remove the flywheel and engine rear
cover plate.
- Use an awl to punch two holes in the crankshaft rear oil seal. Punch the
holes on opposite sides of the crankshaft and just above the bearing cap to
cylinder block split line. Install a sheet metal screw in each hole. Use two
large screwdrivers or small pry bars and pry against both screws at the same
time to remove the crankshaft rear oil seal. It may be necessary to place
small blocks of wood against the cylinder block to provide a fulcrum point
for the pry bars. Use caution throughout this procedure to avoid scratching
or otherwise damaging the crankshaft oil seal surface.
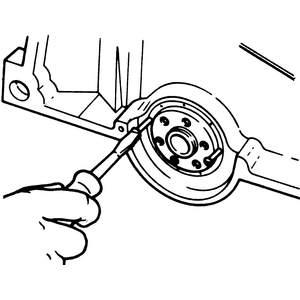
| Fig. 1: Remove the rear seal using a small prying
tool

|
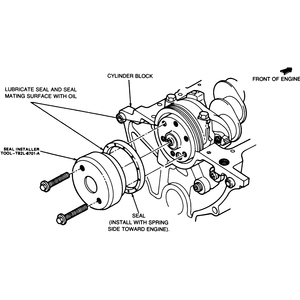
| Fig. 2: Using a seal driver tool to install the rear
main oil seal

|
To install:
- Clean the oil seal recess in the cylinder block and main bearing cap.
- Clean, inspect and polish the rear oil seal rubbing surface on the crankshaft.
Coat a new oil seal and the crankshaft with a light film of engine oil. Start
the seal in the recess with the seal lip facing forward and install it with
a seal driver. Keep the tool, T72C–6165, straight with the centerline
of the crankshaft and install the seal until the tool contacts the cylinder
block surface. Remove the tool and inspect the seal to be sure it was not
damaged during installation.
- Install the engine rear cover plate. Position the flywheel on the crankshaft
flange. Coat the threads of the flywheel attaching bolts with oil-resistant
sealer and install the bolts. Tighten the bolts in sequence across from each
other to the specifications listed in the Torque chart at the beginning of
this Chapter.
- On a manual shift transmission, install the clutch disc and the pressure
plate assembly following the procedure in Chapter 7.
- Install the transmission, following the procedure in Chapter 7.


