CAUTION
On fuel injected models, fuel in the system remains under high pressure, even
when the engine is not running. Before disconnecting any fuel line, release
the pressure from the fuel system to reduce the possibility of injury or fire.
- If so equipped, disconnect the choke cable and the air bypass valve cable.
- On carbureted models, remove the air cleaner. On fuel injected models, loosen
the clamps and remove the air intake crossover.
- Disconnect the PCV valve at the cover.
- Remove the retaining bolts and remove the cam cover.
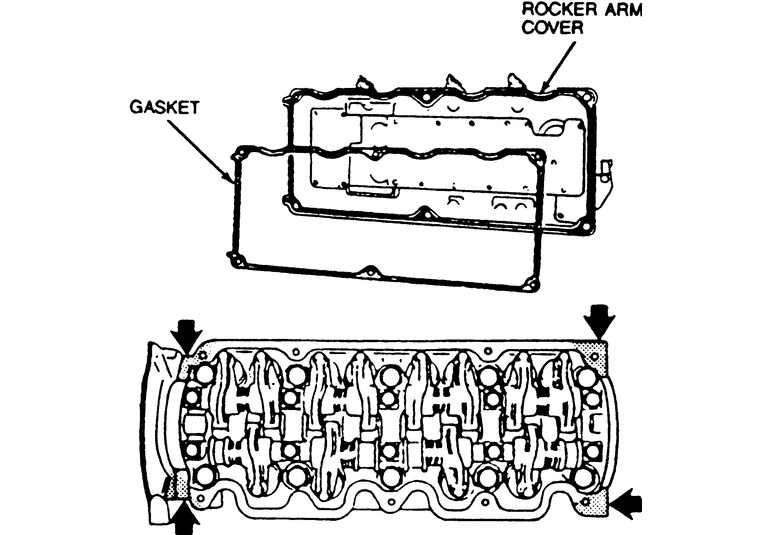
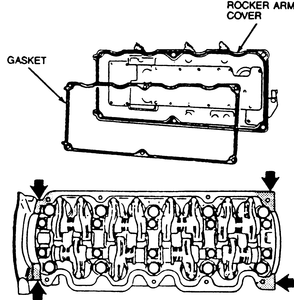
- Clean all gasket mounting surfaces. To install the cover, first install
new gaskets.
| Fig. 1: Install the cam cover with a new gasket
|
- Place the cover in position and tighten the bolts in several stages, going
back and forth across the cover, tighten to 26–35 inch lbs. (3–4
Nm).
- Once all the associated components are installed, start the engine and allow
it to reach normal operating temperature. Retighten the bolts. Check for leaks.
- Disconnect the negative battery cable.
- Remove the air cleaner assembly. Remove or relocate any hoses or cables
that will interfere with rocker cover removal.
- Disconnect the hoses to the PCV tube.
- Remove the cover mounting bolts and remove the rocker cover from the cylinder
head. The water pump pulley belt shield is attached at rear of rocker cover.
- Clean the cover and head mounting surfaces.
- Apply RTV sealant to the top of the rubber cam seal and install the rocker
cover.
- With rocker cover installed, apply RTV sealant to top of semi-circular packing.
- Tighten screws to 55 inch lbs. (6 Nm).
- Install the vacuum hoses and spark plug wires.
- Install the air cleaner assembly.
- Connect the battery cable.
- Disconnect the battery ground cable.
- Disconnect the accelerator cable.
- Remove the air intake pipe and resonance chamber.
- Tag and disconnect any wires and hoses in the way.
- Unbolt and remove the cover.
- Thoroughly clean all mating surfaces of old gasket material and/or sealer.
The cover may use a gasket or RTV gasket sealer. If a gasket is used, coat
the new gasket with sealer and position it on the head. If RTV material is
used, squeeze a 1⁄8 inch
bead on the head sealing surface.
- Install the rocker cover. Tighten the bolts to 52–78 inch lbs. (6–9
Nm).
- Disconnect the air bypass valve cable.
- Loosen the clamps and remove the air intake crossover.
- Disconnect the PCV valve at the cover.
- Remove the retaining bolts and remove the cam cover.
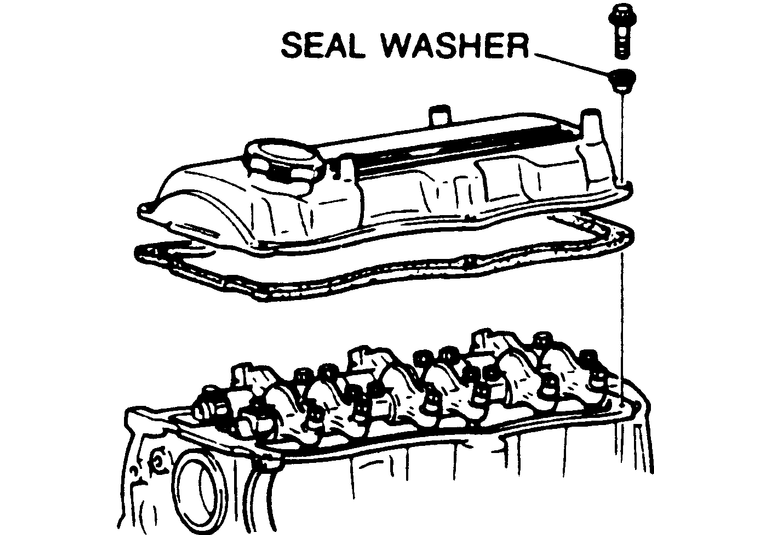
| Fig. 2: Install the cam cover with new gaskets and
seal washers for the bolts
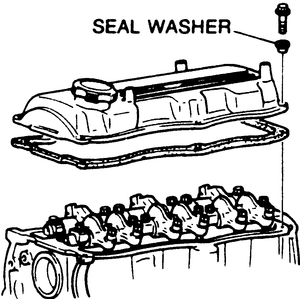
|
- To install the cover, first supply new gaskets and seal washers for the
bolts.
- Tighten the bolts in several stages, going back and forth across the cover
to 30–40 inch lbs. (4–5 Nm).
- Once all the associated components are installed, start the engine and allow
it to reach normal operating temperature. Check for oil leaks.
NOTE: Failure to install new rocker cover gaskets and rocker
cover reinforcement pieces will result in oil leaks.
- Disconnect the negative battery cable. Tag and remove the spark plug wires.
- Relieve fuel system pressure. Disconnect and remove the fuel supply and
return lines.
- For left rocker cover removal, remove the upper intake manifold.
- For right rocker cover removal, remove air inlet duct and hose to oil fill
tube, drive belt from alternator, alternator. Drain cooling system remove
the upper radiator hose from the engine. Remove the EDIS ignition coil and
bracket assembly. Remove the A/C low pressure hose bracket if so equipped.
Remove the PCV valve hose and breather.
CAUTION
When draining the coolant, keep in mind that cats and dogs are attracted
by the ethylene glycol antifreeze, and are quite likely to drink any that
is left in an uncovered container or in puddles on the ground. This will
prove fatal in sufficient quantity. Always drain the coolant into a sealable
container. Coolant should be reused unless it is contaminated or several
years old.
- Remove the rocker cover bolts and load distribution pieces. The washers
must be installed in their original positions, so keep track of them.
- Remove the rocker cover. It will probably be necessary to tap the cover
loose with a plastic or rubber mallet.
- Remove the rocker covers.
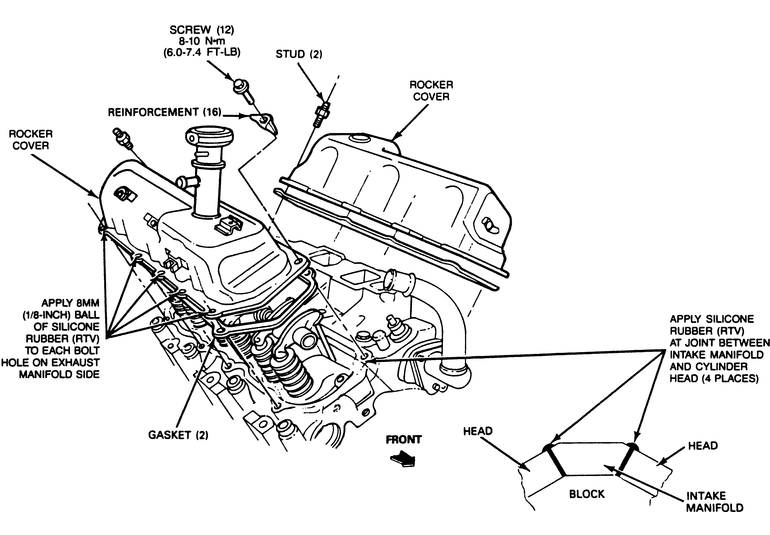
| Fig. 3: Rocker arm cover installation
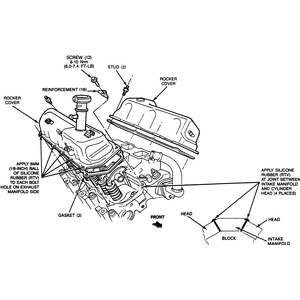
|
- Clean all gasket material from the cover and head.
- Installation is the reverse of removal. Always use a new gasket coated with
sealer. If any of the RTV silicone gasket material was removed from the mating
area of the head(s) and intake manifold, replace it. Tighten the bolts to
3–5 ft. lbs. (4–7 Nm).
- Reconnect the negative battery cable. Start the engine and run to normal
operating temperature and check for oil and fuel leaks.