Previous Next

Fuel Injectors

REMOVAL & INSTALLATION

4-Cylinder Engines

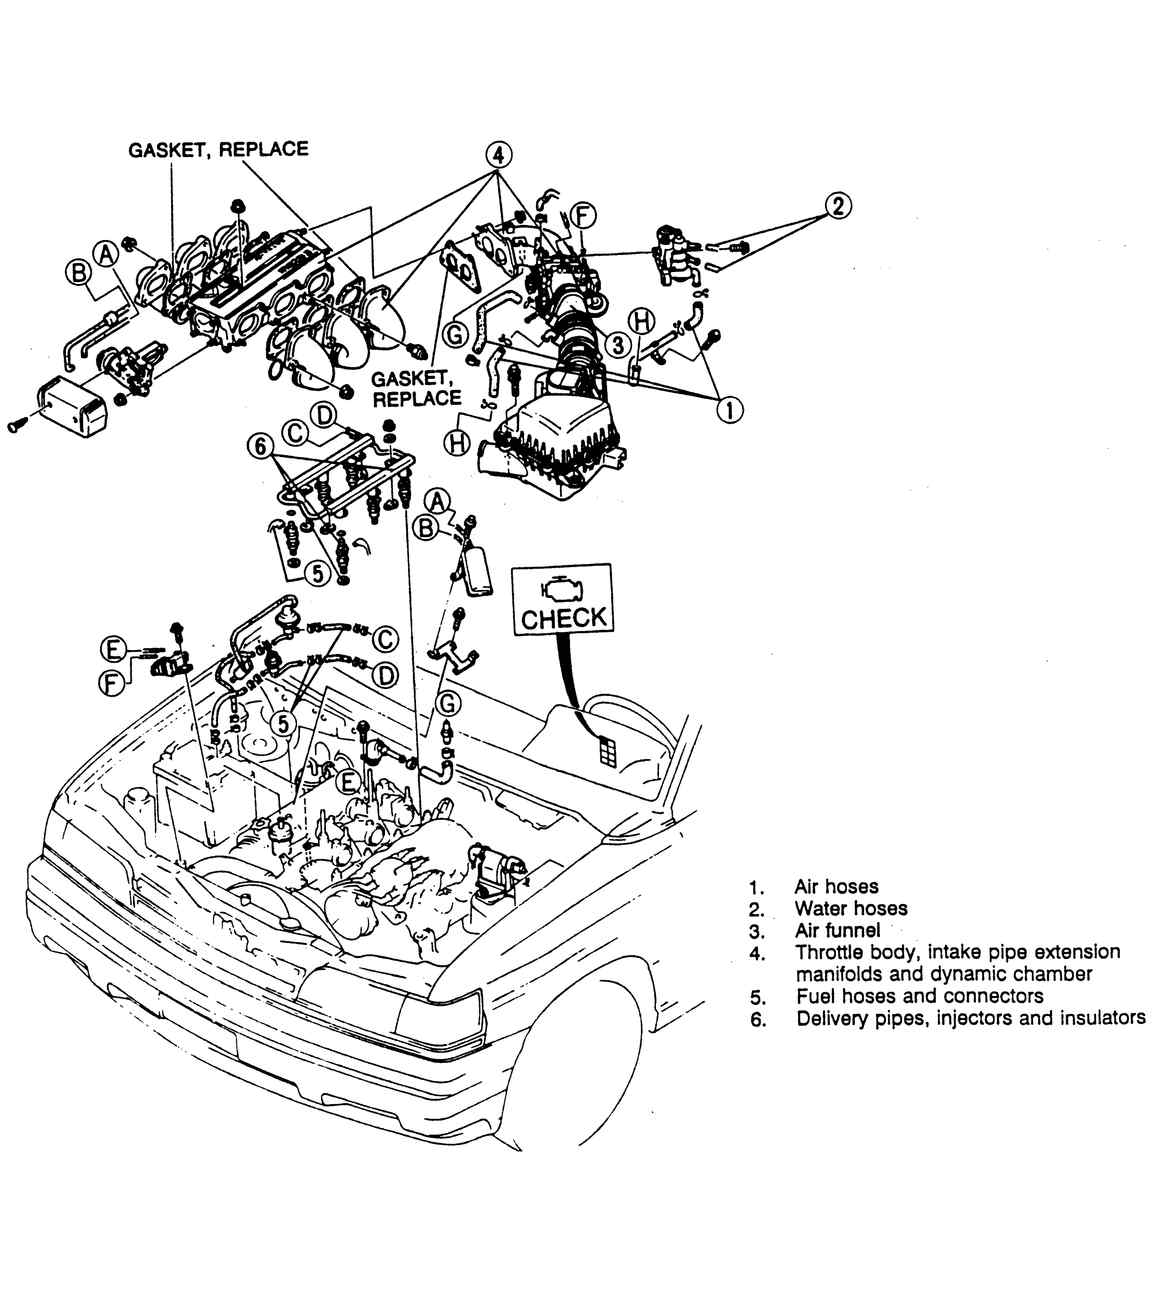
Fig. 1: Common fuel system components

  1. Relieve the fuel system pressure.
  2. Remove the air chamber.
  3. Disconnect the vacuum hose.
  4. Disconnect the fuel lines.
  5. Remove the pressure regulator and fuel rail assembly.
  6. Disconnect the injector wiring.
  7. Pull off the injectors. Discard the grommets and O-rings.
  8. Installation is the reverse of removal. Tighten the fuel rail bolts to 15 ft. lbs. (20 Nm). Always use new O-rings coated with clean engine oil.
3.0L Engine

Fig. 2: Fuel system components

Fig. 3: Remove the grommets, fuel injectors and insulators (O-rings) from the fuel rail assembly

Removal of the injectors requires removal of the fuel injector rail assembly. Refer to Fuel Charging Assembly removal procedure in this section.

  1. Disconnect injector harness from injectors.
  2. Invert the fuel charginging (fuel rail) assembly.
  3. Remove lock rings securing injectors to fuel rail receiver cups. Pull injectors upward from receiver cups.
  4. If injectors are to be reused, place a protective cap on injector nozzle to prevent dirt or other damage.
  5. Lubricate the new O-ring of each injectors with a clean drop of engine oil prior to installation.
  6. Assemble each injectors into fuel rail receiver cups. Be careful not to damage O-rings.
  7. Install lock ring between receiver cup ridge and injector slot.
4.0L Engine
  1. Disconnect the negative battery cable and relieve the fuel system pressure.
  2. Remove the upper intake manifold and throttle body assembly.

    Fig. 4: Fuel supply manifold assembly

  3. Remove the fuel supply manifold as outlined in the Fuel Charging Assembly procedure later in this section.
  4. Remove the injector retaining clips and remove the injectors from the manifold by grasping the injector body and pulling up while rocking the injector from side-to-side.
  5. Remove and discard the injector O-rings.
  6. Inspect the injector plastic pintle protection cap and washer for signs of deterioration. Replace the complete injector as required. If the plastic pintle protection cap is missing, look for it in the intake manifold.

    NOTE: The plastic pintle protection cap is not available as a separate part.

    To install:

    Fig. 5: Fuel injector installation

  7. Lubricate new O-rings with clean light grade oil and install 2 on each injector.

    NOTE: Never use silicone grease at it will clog the injectors.

  8. Install the injectors, using a light, twisting, pushing motion.
  9. Install the fuel supply manifold, pushing down to make sure all the fuel injector O-rings are fully seated in the fuel supply manifold cups and intake manifold.
  10. Install the upper intake manifold and throttle body assembly.
  11. After the upper intake manifold has been installed and before the fuel injector wire connectors have been connected, connect the negative battery cable and turn the ignition switch ON. This will cause the fuel pump to run for 2–3 seconds and pressurize the system.
  12. Check for fuel leaks where the fuel injector is installed into the fuel supply manifold.
  13. Turn the ignition switch OFF and disconnect the negative battery cable.
  14. Connect the injector wire connectors and the vacuum line to the regulator.
  15. Install the air inlet tube from the throttle body to the air cleaner.
  16. Connect the negative battery cable, start the engine and let it idle for 2 minutes.
  17. Turn the engine OFF and check for fuel leaks.

Previous Next