Previous Next

Fuel Pump

REMOVAL & INSTALLATION

NOTE: The fuel pump is located inside the fuel tank, attached to the tank sending unit assembly.

Pickup
  1. Relieve the fuel system pressure and disconnect the negative battery cable.
  2. Remove the fuel tank.

    CAUTION
    Observe all applicable safety precautions when working around fuel. Whenever servicing the fuel system, always work in a well ventilated area. Do not allow fuel spray or vapors to come in contact with a spark or open flame. Keep a dry chemical fire extinguisher near the work area. Always keep fuel in a container specifically designed for fuel storage; also, always properly seal fuel containers to avoid the possibility of fire or explosion.

  3. Remove any dirt that has accumulated around the sending unit/fuel pump assembly so it will not enter the fuel tank during removal and installation.
  4. Remove the attaching screws and remove the sending unit/fuel pump assembly.

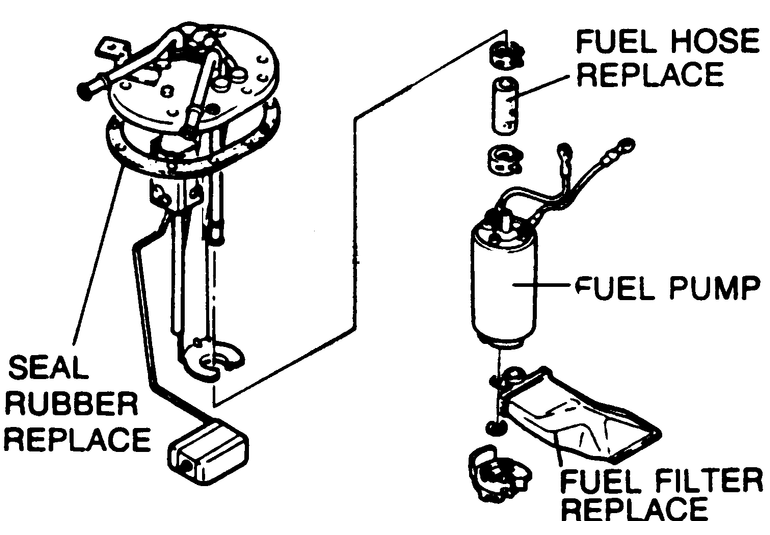
    Fig. 1: Exploded view of the fuel pump/sending unit assembly

  5. If necessary, disconnect the electrical connectors and the fuel hose and remove the pump from the sending unit assembly.
  6. Installation is the reverse of the removal procedure. Be sure to install a new seal rubber gasket.
MPV
  1. Relieve the fuel system pressure and disconnect the negative battery cable.

    CAUTION
    Observe all applicable safety precautions when working around fuel. Whenever servicing the fuel system, always work in a well ventilated area. Do not allow fuel spray or vapors to come in contact with a spark or open flame. Keep a dry chemical fire extinguisher near the work area. Always keep fuel in a container specifically designed for fuel storage; also, always properly seal fuel containers to avoid the possibility of fire or explosion.

  2. Remove the rear seat and lift up the rear floormat. Remove the fuel pump cover.
  3. Disconnect the sending unit/fuel pump assembly electrical connector and the fuel lines.
  4. Remove any dirt that has accumulated around the sending unit/fuel pump assembly so it will not enter the fuel tank during removal and installation.

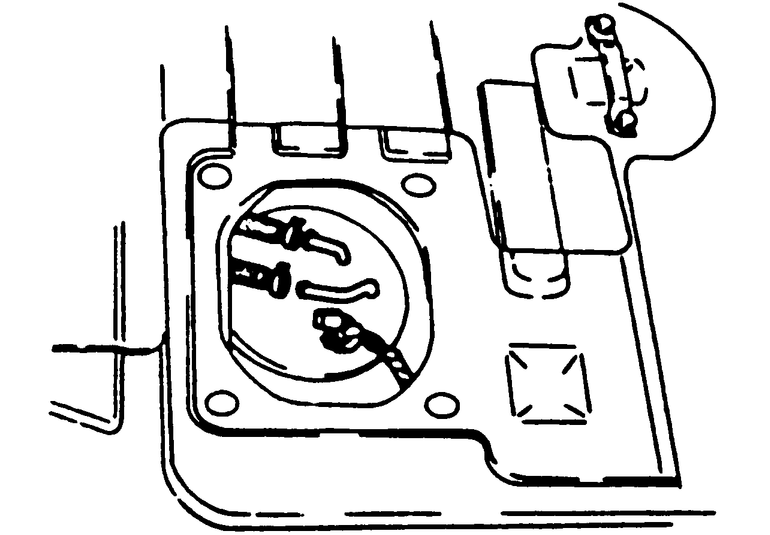
    Fig. 2: Remove the rear seat and floormat to service the fuel pump

  5. Remove the attaching screws and remove the sending unit/fuel pump assembly.
  6. If necessary, disconnect the electrical connectors and the fuel hose and remove the pump from the sending unit assembly.
  7. Installation is the reverse of the removal procedure. Be sure to install a new seal rubber gasket.
Navajo
  1. Disconnect the negative battery cable and relieve the fuel system pressure.
  2. Raise and safely support the vehicle.

    CAUTION
    Observe all applicable safety precautions when working around fuel. Whenever servicing the fuel system, always work in a well ventilated area. Do not allow fuel spray or vapors to come in contact with a spark or open flame. Keep a dry chemical fire extinguisher near the work area. Always keep fuel in a container specifically designed for fuel storage; also, always properly seal fuel containers to avoid the possibility of fire or explosion.

  3. Remove the fuel tank.
  4. Remove any dirt that has accumulated around the fuel pump attaching flange so it will not enter the fuel tank during removal and installation.

    CAUTION
    If utilizing a hammer and drift (punch) tool to loosen or tighten a fuel pump lock ring, be sure that it is a brass drift. A metal, non-brass drift will most likely produce a spark when struck with or against metal, which can result a fire or explosion.

  5. Turn the fuel pump locking ring counterclockwise using a hammer and brass drift or a spanner tool and ratchet. Remove the locking ring.
  6. Remove the fuel pump and discard the seal ring. Separate the fuel pump from the sending unit, if required.

    To install:

  7. Clean the fuel pump mounting flange and tank mounting surface and seal ring groove.
  8. Apply a light coating of Molybdenum grease on a new seal ring and install it in the groove.
  9. Install the fuel pump to the sending unit, if removed. Install the fuel pump assembly in the tank, making sure the locating keys are in the keyways and the seal ring is in place.
  10. Hold the fuel pump assembly and the seal ring in place and install the locking ring. Rotate the ring clockwise using a suitable tool. If using a hammer and brass drift, carefully tap the ring until it has achieved a tight seal. If using an adjustable spanner tool, attach a torque wrench to the spanner and tighten the locking ring to 40–45 ft. lbs. (54–61 Nm).
  11. Install the fuel tank in the vehicle.
  12. Lower the vehicle and fill the fuel tank with at least 10 gallons of fuel. Connect the negative battery cable. Turn the ignition key to RUN for 3 seconds repeatedly, 5–10 times, to pressurize the system. Check for leaks.
  13. Start the engine and check for leaks.

Previous Next