Previous Next

INSTRUMENTS AND SWITCHES

Instrument Cluster

REMOVAL & INSTALLATION

Pickup

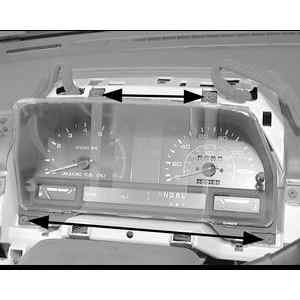
Fig. 1: Instrument cluster assembly removal/installation

  1. Disconnect the battery ground cable.
  2. Reach behind the cluster and disconnect the speedometer cable.
  3. Remove the screws attaching the cluster hood and carefully lift the hood off.
  4. Remove the screw attaching the cluster pod to the dash panel and pull the pod out toward you, gradually. Reach behind the pod and disconnect the wiring connectors.
  5. Remove the trip meter knob, and, on clusters w/tachometer, the clock adjust knob.
  6. Remove the screws retaining the lens cover and lift off the cover.
  7. Remove the screws retaining the cluster bezel and lift off the bezel.
  8. Lift out the warning light plate.
  9. On clusters wo/tachometer, remove, in order:
  10. On cluster w/tachometer, remove, in order:
  11. Installation is the reverse of removal.
MPV

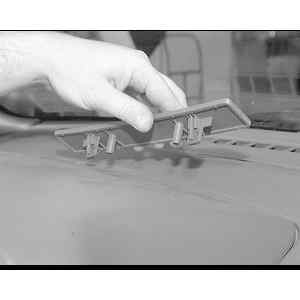
Fig. 2: Lift up the trim panel from the front edge of the instrument cluster hood assembly to access and remove the three mounting screws

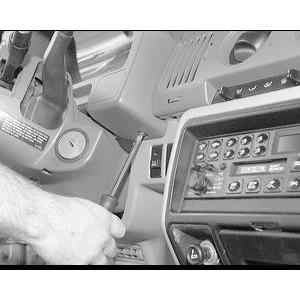
Fig. 3: Remove the lower instrument cluster hood mounting screws

  1. Disconnect the negative battery cable.
  2. Using a small prying tool, remove the trim panel at the front edge of the instrument cluster hood, near the bottom edge of the windshield.
  3. Remove the three instrument cluster hood mounting screws underneath the trim panel.
  4. Remove the two instrument cluster hood mounting screws located under the bootom edge of the hood assembly.
  5. Carefully pull the instrument cluster hood assembly away from the dashboard far enough to unplug the wiring harness connectors from behind the switches on each side.

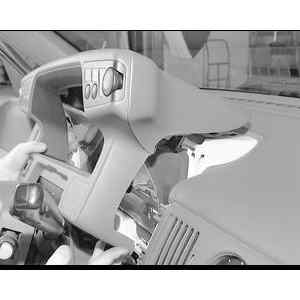
    Fig. 4: Carefully pull the instrument cluster hood assembly away from the dashboard . . .

    Fig. 5: . . . then unplug the wiring connectors from behind the switches on the instrument cluster hood assembly

    Fig. 6: Remove the four instrument cluster assembly mounting screws

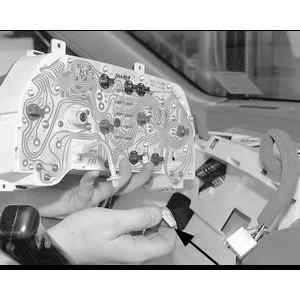
    Fig. 7: When removing the instrument cluster, disconnect the transmission selector cable from the steering column

  6. Remove the 4 cluster assembly retaining screws and pull the cluster towards you slowly and carefully, until you can reach behind it and unplug the electrical connectors, speedometer cable and unhook the transmission range indicator wire from the steering column.
  7. Remove the cluster.

    To install:

  8. Hold the instrument cluster close to the dashboard and route the transmission range indicator wire through the dashboard.
  9. Connect the speedometer cable to the back of the cluster assembly and plug in the electrical connectors.
  10. Place the cluster into correct position, then install and tighten the four cluster retaining screws. Attach the transmission range indicator wire from the steering column.
  11. Hold the instrument cluster hood assembly close to the dashboard and plug in wiring harness connectors.
  12. Place the instrument cluster hood assembly onto the dashboard. Install and tighten the five mounting screws.
  13. Install the trim panel cover.
  14. Connect the negative battery cable. Check the operation of the instrument cluster gauges.
Navajo

Fig. 8: Exploded view of the instrument cluster and trim panel assemblies

  1. Disconnect the battery ground cable.
  2. Remove the two steering column shroud-to-panel retaining screws and remove the shroud.
  3. Remove the lower instrument panel trim.
  4. Remove the cluster trim cover from the instrument panel by removing the eight screws.
  5. Remove the four instrument cluster to panel retaining screws.
  6. Position the cluster slightly away from the panel for access to the back of the cluster to disconnect the speedometer.

    NOTE: If there is not sufficient access to disengage the speedometer cable from the speedometer, it may be necessary to remove the speedometer cable at the transmission and pull cable through cowl, to allow room to reach the speedometer quick disconnect.

  7. Disconnect the wiring harness connector from the printed circuit, and any bulb-and-socket assemblies from the wiring harness to the cluster assembly and remove the cluster assembly from the instrument panel.

    To install:

  8. Apply approximately 18 inch diameter ball of D7AZ-19A331–A Silicone Dielectric compound or equivalent in the drive hole of the speedometer head.
  9. Position the cluster near its opening in the instrument panel.
  10. Connect the wiring harness connector to the printed circuit, and any bulb-and-socket assemblies from the wiring harness to the cluster assembly.
  11. Position the cluster to the instrument panel and install the four cluster to panel retaining screws.
  12. Install the panel trim covers and the steering column shroud.
  13. Connect the battery ground cable.
  14. Check operation of all gauges, lamps and signals.

Previous Next