CAUTION
On models using a halogen bulb: The halogen bulb contains gas under pressure.
The bulb may shatter if the glass envelope is scratched or if the bulb is
dropped. Handle the bulb carefully. Grasp the bulb only by its plastic base.
Avoid touching the glass envelope. Keep the bulb out of the reach of children.
Energize the bulb only when installed in the headlamp.
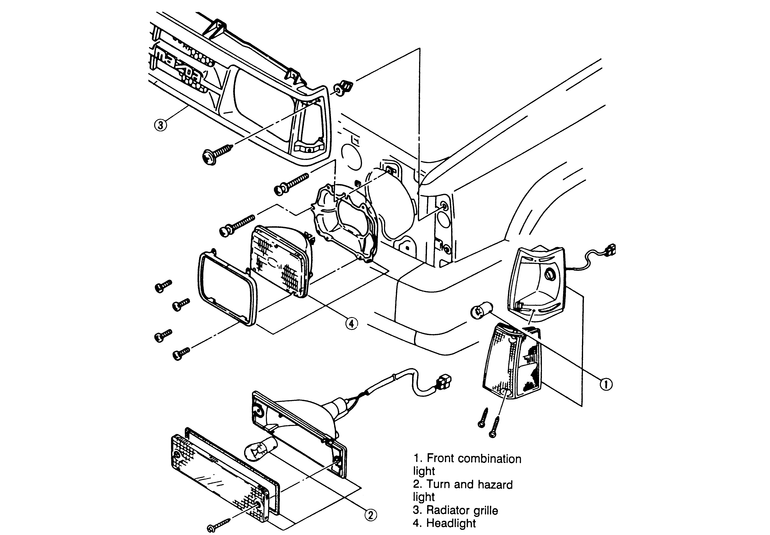
| Fig. 1: Front light assemblies
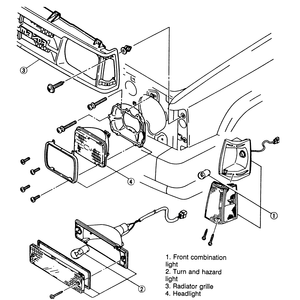
|
- Remove the radiator grille attaching screws and remove the grille.
- Remove the headlight bulb trim ring, by removing the three screws and
rotating the ring clockwise. Support the headlight bulb and remove the trim
ring.
NOTE: Do not disturb the headlight aiming screws, which
are installed in the housing next to the retaining screws.
- Pull the plug connector from the rear of the bulb and remove the bulb.
- Connect the plug connector to the rear of a new headlight.
- Install the headlight in the housing, and locate the bulb tabs in the
slots and the housing.
- Position the trim ring over the bulb and loosely install the retaining
screws. Rotate the ring counterclockwise to lock it in position. Tighten
the three attaching screws. Check the headlight operation.
- Install the grille.
- Have the headlight aim checked.
- Make sure that the headlight switch is turned OFF.
- Disconnect the negative battery cable.
- Open the vehicle's hood and secure it in an upright position.
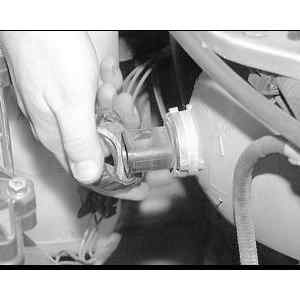
| Fig. 2: Push down the upper retaining tab on the
headlight bulb connector plug and pull straight off of the bulb
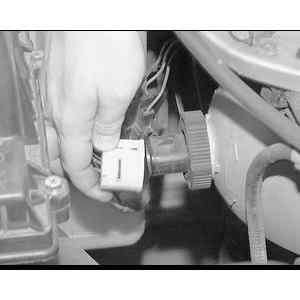
|
- Unfasten the locking ring which secures the bulb and wire harness plug
assembly, then withdraw the assembly rearward.
- Disconnect the electrical wire harness plug from the bulb and remove the
locking ring as well.
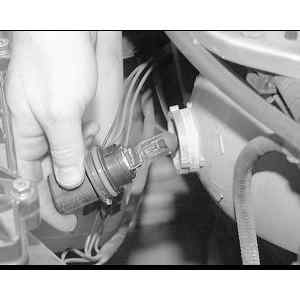
| Fig. 3: Turn the headlight bulb retaining ring
counterclockwise and pull off of the back of the bulb
|
| Fig. 4: Pull the headlight bulb straight out of
the headlight housing. Under any circumstance, never touch the glass
of the light bulb with your fingers
|
To install:
- Before connecting a light bulb to the wire harness plug, ensure that all
electrical contact surfaces are free of corrosion or dirt.
- Install the locking ring onto the bulb, then line up the replacement headlight
bulb with the harness plug. Firmly push the bulb onto the plug until the
spring clip latches over the bulb's projection.
WARNING
Do not touch the glass bulb with your fingers. Oil from your fingers can
severely shorten the life of the bulb. If necessary, wipe off any dirt
or oil from the bulb with rubbing alcohol before completing installation.
- Position the headlight bulb and secure it with the locking ring.
- Connect the negative battery cable.
- To ensure that the replacement bulb functions properly, activate the applicable
switch to illuminate the bulb which was just replaced. (If this is a combination
low and high beam bulb, be sure to check both intensities.) If the replacement
light bulb does not illuminate, either it too is faulty or there is a problem
in the bulb circuit or switch. Correct if necessary.
- Close the vehicle's hood.
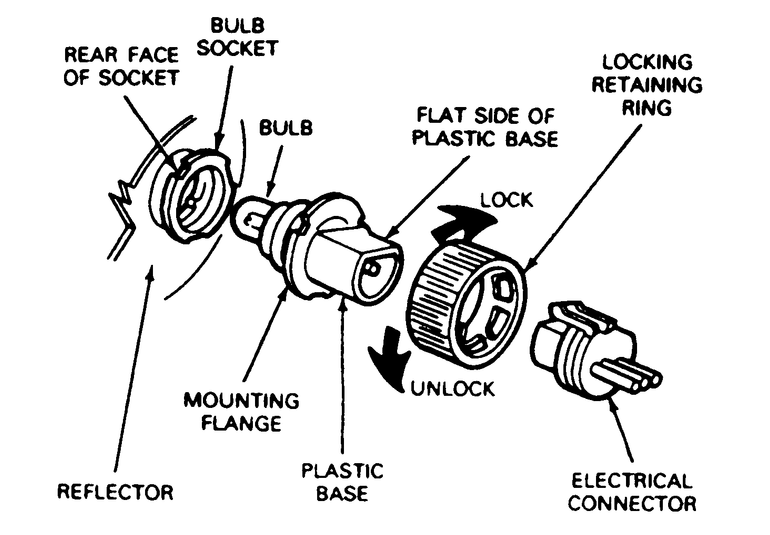
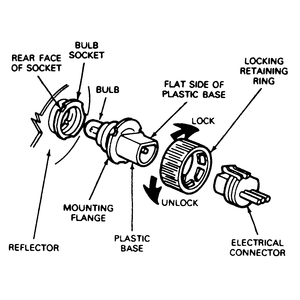
| Fig. 5: Halogen lamp replacement
|
Two aerodynamically styled headlamps are used. Each lamp uses a dual filament
halogen bulb. A burned out bulb may be replaced without removing the headlamp.
- Check that the headlamp switch is turned OFF. Lift the hood and locate
the bulb installed in the rear of the headlamp body.
- Remove the electrical connector from the bulb by squeezing the connector
tabs firmly and snapping the connector rearward.
- Remove the bulb retaining ring by rotating counterclockwise. Slide the
ring off the plastic base. Keep the ring for reinstallation.
- Carefully remove the headlamp bulb from the socket by gently pulling straight
backward out of the socket. Do not rotate the bulb during removal.
- With the flat side of the bulb facing upward, insert the glass envelope
of the bulb into the socket. Turn the base slightly, if necessary, to align
the grooves in the forward part of the plastic base with the corresponding
locating tabs inside the socket. When the grooves are aligned, push the
bulb into the socket until the mounting flange contacts the rear face of
the socket.
- Install the plastic lock ring and connect the wiring. Turn the headlamps
on and check for proper operation.
NOTE: A properly aimed headlamp need not be reaimed after
installation of the bulb.
- To remove the headlamp assembly: Disconnect the headlamp bulb connector.
Remove the screw retaining the side marker assembly to the vehicle and remove
the assembly.
- Remove the fasteners retaining the grille to the grille reinforcement
and remove the grille. Remove the spring clips retaining the headlamp assembly
to the grille reinforcement and remove the assembly. Install in reverse
order.