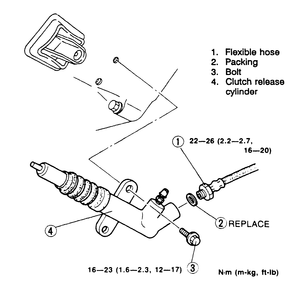
| Fig. 1: Clutch slave cylinder mounting

|
- Raise and support the front end on jackstands.
- Back off the flare nut on the fluid pipe to free the slave cylinder hose.
- Pull off the hose-to-bracket retaining clip and pull the hose from the bracket.
Cap the pipe to prevent fluid loss.
- Unbolt and remove the slave cylinder.
- Installation is the reverse of removal. Tighten the bolt to 12–17
ft. lbs. (16–23 Nm).
NOTE: Before performing any service that requires removal of
the slave cylinder, the master cylinder and pushrod must be disconnected from
the clutch pedal. If not disconnected, permanent damage to the master cylinder
assembly will occur if the clutch pedal is depressed while the slave cylinder
is disconnected.
- Disconnect the negative battery cable.
- Disconnect the coupling at the transmission, using the clutch coupling removal
tool T88T–70522–A or equivalent. Slide the white plastic sleeve
toward the slave cylinder while applying a slight tug on the tube.
- Remove the transmission assembly.
- Remove the slave cylinder-to-transmission retaining bolts.
- Remove the slave cylinder from the transmission input shaft.
To install:
- Fit the slave cylinder over the transmission input shaft with the bleed
screws and coupling facing the left side of the transmission.
- Install the slave cylinder retaining bolts. Torque to 13–19 ft. lbs.
(18–26Nm).
- Install the remaining components in the reverse of removal.

