Previous Next

Spindle, Shaft and Joint Assembly

REMOVAL & INSTALLATION

Navajo

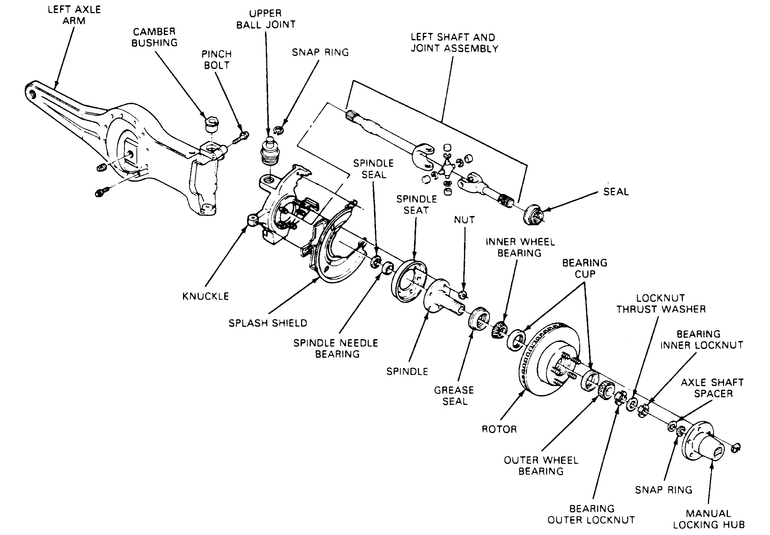
Fig. 1: Exploded view of the left-hand axle shaft assembly and related components

  1. Loosen the front wheel lug nuts.
  2. Raise and support the vehicle safely. Remove the wheel and tire assembly.
  3. Remove the disc brake calipers and support the caliper on the vehicle's frame rail.
  4. Remove the hub locks and locknuts.
  5. Remove the hub and rotor.
  6. Remove the nuts retaining the spindle to the steering knuckle. Tap the spindle with a plastic or rawhide hammer to jar the spindle from the knuckle.
  7. Remove the front disc brake rotor shield.

    NOTE: The left-hand axle shaft is engaged inside of the front carrier assembly. Depending on how the truck is sitting (especially if it is not level), some fluid may leak out of the front carrier assembly. A small drip pan should can be placed underneath the front carrier as a precautionary measure.

  8. Remove the left-hand side axle shaft by pulling the assembly out of the carrier and through the hole in the steering knuckle (spindle mount).
  9. Remove the right-hand axle shaft by performing the following:
    1. Remove and discard the right front axle joint boot clamp from the outer axle assembly.
    2. Pull the right-hand axle shaft out of the axle joint boot and stub shaft and through the hole in the steering knuckle (spindle mount).
  10. Inspect the seals on the outer axle shaft ends, and replace them if necessary. Replace the seals as follows:
    1. Remove the old seal from the axle shaft by driving them off with a hammer.
    2. Thoroughly clean the axle seal area of the shaft.
    3. Place the shaft in a press and install the new seal using the Spindle/Axle Seal Installer Tool T83T-3132-A, or equivalent.

      To install:

  11. Install the right-hand axle shaft as follows:
    1. Ensure that the rubber boot is properly installed on the carrier stub shaft. Slide a new outer axle shaft boot clamp onto the rubber boot.

      NOTE: The model 35 front axle does not use blind, or master, splines. Therefore, special attention should be made to ensure that the yoke ears are in line (in phase) during assembly.

    2. Slide the right axle shaft assemble through the hole in the steering knuckle, into the rubber boot and engage the splines of the stub shaft. Ensure the splines are fully engaged.
    3. Position the rubber boot and clamp onto the outer axle shaft and crimp the clamp securely on the rubber boot using Keystone Clamp Pliers T63P-9171-A.
  12. Install the left-hand axle shaft by sliding it through the hole in the steering knuckle and engaging it into the carrier. Ensure that the shaft is fully seated into the carrier and engage to the splines inside.
  13. Install the remaining components in the reverse of removal.

Previous Next