Fig. 1: Rack and pinion mounting, exploded view — 2WD
Place the front wheels in the straight ahead position. Raise and safely
support the vehicle.
Remove the wheel and tire assemblies. Remove the splash shield.
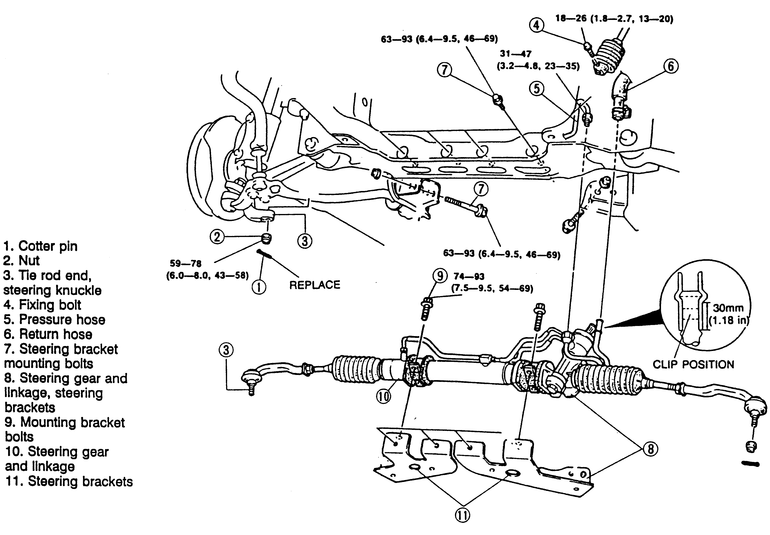
Remove the cotter pins and nuts from both tie rod end studs. Use separator
tool 49 0727 575 or equivalent, to separate the tie rod ends from the knuckles.
Remove the pinch bolt from the intermediate shaft-to-pinion shaft coupling.
Disconnect and plug the pressure line from the rack and pinion assembly.
Loosen the clamp and disconnect the return line from the rack and pinion assembly.
Plug the line.
If equipped with automatic transmission, remove the change counter assembly
to remove the protector plate mounting bolt.
Remove the steering bracket mounting bolts and remove the rack and pinion
assembly and brackets.
If necessary, remove the brackets.
To install:
If removed, install the brackets and tighten the mounting bolts, in sequence,
to 54–69 ft. lbs. (74–93 Nm).
Install the rack and pinion assembly and brackets in the vehicle. Tighten
the bracket-to-chassis bolts to 46–69 ft. lbs. (63–93 Nm).
If equipped with automatic transmission, install the change counter assembly.
Connect the return line and tighten the clamp. Connect the pressure line
and tighten the nut to 23–35 ft. lbs. (31–47 Nm).
Install the pinch bolt in the intermediate shaft-to-pinion shaft coupling
and tighten to 13–20 ft. lbs. (18–26 Nm).
Position the tie rod end studs in the knuckles and install the nuts. Tighten
the nuts to 43–58 ft. lbs. (59–78 Nm) and install new cotter pins.
Install the splash shield and the wheel and tire assemblies. Lower the vehicle
and bleed the power steering system.
Place the front wheels in the straight ahead position. Raise and safely
support the vehicle.
Remove the wheel and tire assemblies. Remove the splash shield.
Remove the cotter pins and nuts from both tie rod end studs. Use separator
tool 49 0727 575 or equivalent, to separate the tie rod ends from the knuckles.
Disconnect and plug the pressure and return hoses at the pressure and return
lines.
Remove the pressure and return lines from the rack and pinion assembly.
Remove the pinch bolt from the intermediate shaft-to-pinion shaft coupling.
Working inside the vehicle, remove the lower panel and column cover from
under the steering column. Remove the steering column mounting bolts and nuts
and pull the column and intermediate shaft rearward to separate the intermediate
shaft from the pinion shaft.
Mark the position of the front driveshaft on the axle flange and remove
the front driveshaft.
Remove the rack and pinion assembly mounting bracket bolts and the front
differential/joint shaft assembly mounting bolts.
Slide the differential/joint shaft assembly rearward. Slide the rack and
pinion assembly rearward and turn it 90 degrees, then remove it from the left
side of the vehicle.
To install:
Install the rack and pinion assembly from the left side of the vehicle,
turn it 90 degrees and move it forward into position. Install the mounting
bolts and tighten, in sequence, to 54–69 ft. lbs. (74–93 Nm).
Move the differential/joint shaft assembly forward, install the mounting
bolts and tighten to 49–72 ft. lbs. (67–97 Nm).
Install the driveshaft, aligning the marks made during removal.
Working inside the vehicle, move the steering column and intermediate shaft
forward to engage the intermediate shaft with the pinion shaft. Install and
tighten the steering column nuts and bolts to 12–17 ft. lbs. (16–23
Nm). Install the lower panel and column cover.
Install the pinch bolt in the intermediate shaft-to-pinion shaft coupling
and tighten to 13–20 ft. lbs. (18–26 Nm).
Install the pressure and return lines on the rack and pinion assembly. Connect
the pressure and return hoses to the lines.
Position the tie rod end studs in the knuckles and install the nuts. Tighten
the nuts to 43–58 ft. lbs. (59–78 Nm) and install new cotter pins.
Install the splash shield and the wheel and tire assemblies. Lower the vehicle
and bleed the power steering system.