- Raise and safely support the vehicle. Remove the wheel and tire assembly.
- Support the lower control arm with a jack.
- On 2WD vehicles, remove the bolts attaching the tension rod to the lower
control arm.
- Remove the cotter pin and nut from the lower ball joint stud. Separate the
ball joint from the knuckle using tool 49 0727 575 or equivalent.
- Remove the bolts/nuts attaching the lower ball joint to the lower control
arm and remove the lower ball joint.
- Position the ball joint assembly to the lower control arm and secure it
with the mounting hardware. Tighten the lower ball joint-to-lower control
arm bolts/nuts to 32–40 ft. lbs. (43–54 Nm) on 2WD vehicles or
41–50 ft. lbs. (55–68 Nm) on 4WD vehicles. Tighten the lower ball
joint stud nut to 87–116 ft. lbs. (118–157 Nm) and install a new
cotter pin.
- Check the front end alignment.
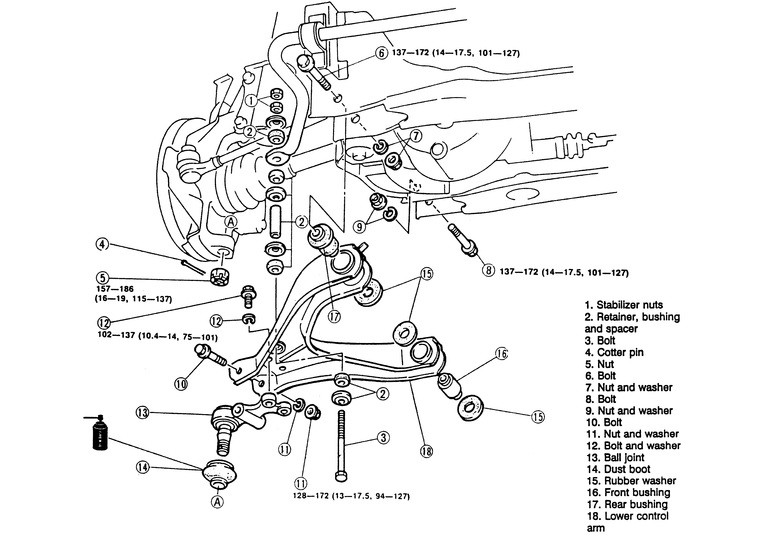
| Fig. 1: Ball joint and lower control arm assembly, exploded
view — 4WD
|
On 2WD models, the lower ball joints are pressed into the lower control arm.
The ball joints cannot be removed from the lower control arms and in the event
of the defective ball joint, the lower control arm and ball joint must be replaced
as an assembly. Defective ball joints are determined by checking the rotational
torque with a special preload attachment and spring scale. Ripped ball joint
dust boots can be replaced. Replacement of the ball joint dust boot is accomplished
by removing the lower control arm from the vehicle and chiseling the off old
boot. Coat the inside of the new dust boot with lithium grease and press it
into the ball joint using the proper tool. Check the ball joint stud threads
for damage and repair as necessary. Check the ball joint preload and install
the lower control arm by reversing the removal procedure.
- On 4WD models, raise and safely support the vehicle. Remove the wheel and
tire assembly.
- Disconnect the stabilizer bar from the lower control arm.
- Remove the cotter pin and nut from the lower ball joint stud. Separate the
ball joint from the knuckle using tool 49 0727 575 or equivalent.
- Install tool 49 0180 510B or equivalent to the ball joint stud and attach
a suitable pull scale to the stud.
- After rocking the ball joint stud back and forth 3–4 times, measure
the pull scale reading while the ball joint stud is rotating. The pull scale
reading should be 4.4–7.7 lbs.
- If the pull scale reading is not as specified, replace the lower ball joint.
The ball joint assembly is bolted onto the lower control arm. Remove the two
upper and one through bolt and remove the ball joint. Install in the reverse
order.
- Raise and safely support the vehicle. Remove the wheel and tire assembly.
- Remove the brake caliper and support it aside with mechanics wire. Do not
let the caliper hang by the brake hose.
- Remove the dust cap, cotter pin, nut retainer, washer and outer bearing
and remove the brake rotor from the spindle. Remove the brake dust shield.
- Disconnect the steering linkage from the spindle and spindle arm by removing
the cotter pin and nut. Remove the tie rod end from the spindle arm.
- Remove the cotter pin and nut from the lower ball joint stud. Remove the
axle clamp bolt from the axle.
- Remove the camber adjuster from the upper ball joint stud and axle beam.
- Strike the inside area of the axle to pop the lower ball joint loose from
the axle beam. Remove the spindle and ball joint assembly from the axle.
NOTE: Do not use a pickle fork to separate the ball joint
from the axle as this will damage the seal and ball joint socket.
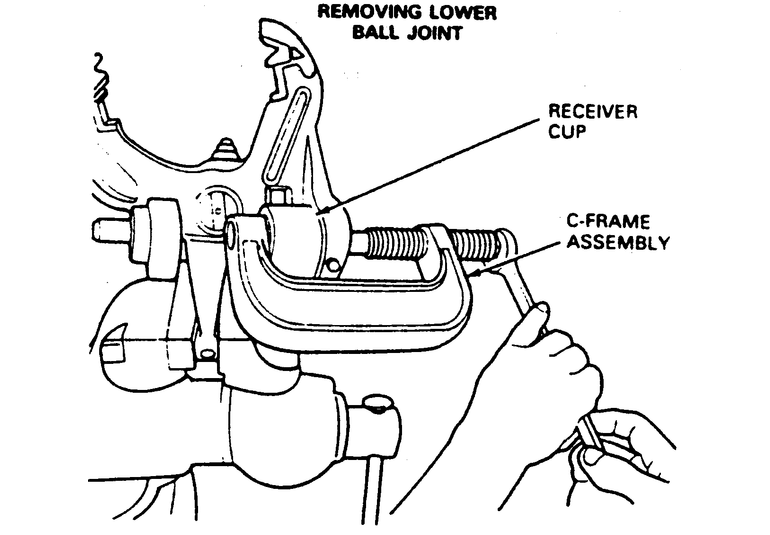
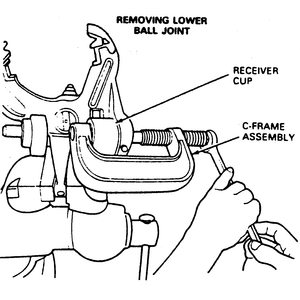
- Install the spindle assembly in a vise and remove the snapring from the
lower ball joint. Remove the lower ball joint from the spindle using C-frame
T74P–4635–C or equivalent and a suitable receiver cup to press
the ball joint from the spindle.
NOTE: Do not heat the ball joint or the spindle to aid
in removal.
| Fig. 2: Lower ball joint removal
|
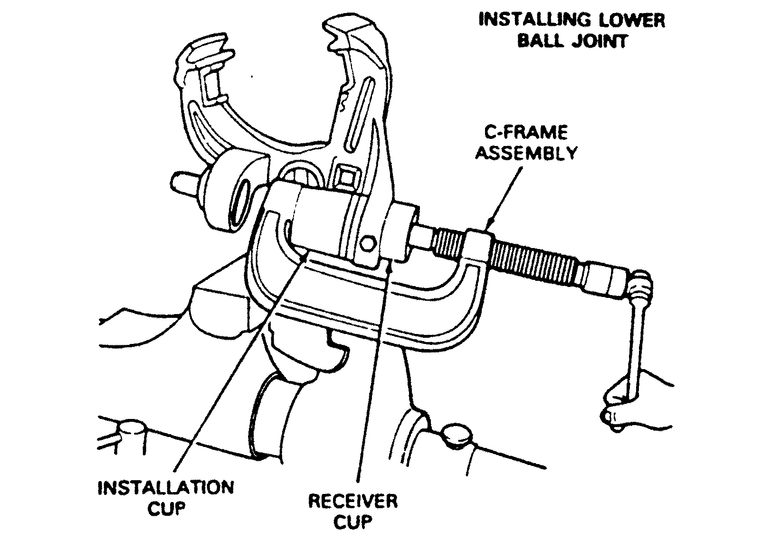
| Fig. 3: Lower ball joint installation
|
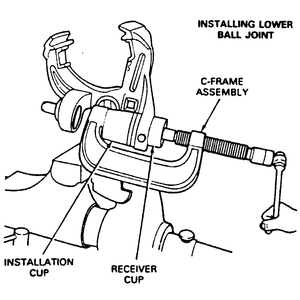
To install:
- Assemble the C-frame and receiver cup and press in the lower ball joint.
NOTE: Do not heat the ball joint or axle to aid in installation.
- Install the snapring onto the ball joint.
- Place the spindle and ball joints into the axle. Install the camber adjuster
in the upper spindle over the ball joint stud making sure it is properly aligned.
- Tighten the lower ball joint stud nut to 104–146 ft. lbs. (141–198
Nm). Continue tightening the castellated nut until it lines up with the hole
in the stud, then install the cotter pin.
- Install the clamp bolt into the axle boss and tighten to 48–65 ft.
lbs. (65–88 Nm).
- Install the remaining components.