Remove the "Lights-Hazard'' Indicator and the steering column shroud.
Unplug the electrical multiple connectors at the base of the steering column.
Pull the headlight knob from its shaft.
Remove the snapring, which retains the switch, from the steering shaft.
Pull the turn indicator canceling cam from the shaft.
Remove the single retaining bolt near the bottom of the switch. Remove the
complete switch from the column.
Place the switch in position and secure it. Install the turn indicator cam
and snapring. Install the remaining components. Check the operation of the
switch before installing the steering wheel.
Fig. 1: Exploded view of the combination switch mounting
and steering column components
Disconnect the battery. Remove the horn cover cap.
Remove the steering wheel attaching nut, and pull off the wheel with a puller.
Remove the attaching screws, and remove the right and left steering column
covers.
Disconnect the connector for the combination switch or, if the ignition
switch is being replaced, disconnect connectors for both that and the combination
switch.
Remove the retaining ring from the steering column.
Remove the combination retaining screw, and remove the switch.
To install:
Install the combination switch and secure with the retaining screw.
Install the steering column retaining ring (if so equipped).
Connect all combination or ignition switch connectors at this time.
Install the steering column covers with retaining screws.
Install the steering wheel and horn cap. Connect the negative battery cable
and check all the functions of the combination switch for proper operation.
Fig. 2: Exploded view of the combination switch mounting
and column related wire harness connectors
Disconnect the negative battery cable. Remove the steering wheel.
On vehicles equipped with tilt wheel, remove the tilt lever.
On vehicles equipped with tilt wheel, remove the steering column collar
by pressing on the collar from the top and bottom while removing the collar.
Remove the instrument panel trim cover retaining screws. Remove the trim
cover.
Remove the 2 screws from the bottom of the steering column shroud. Remove
the bottom half of the shroud by pulling the shroud down and toward the rear
of the vehicle.
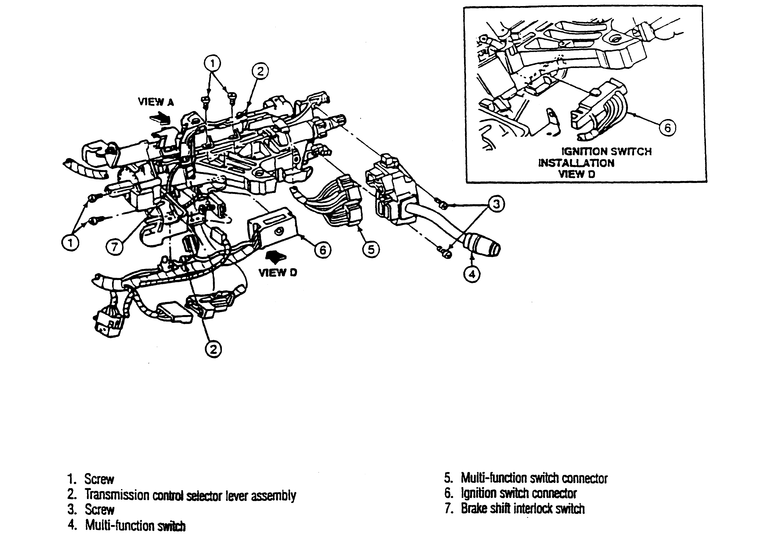
If the vehicle is equipped with automatic transmission, move the shift lever
as required to aid in removal of the shroud. Lift the top half of the shroud
from the column.
If the vehicle is equipped with automatic transmission, disconnect the selector
indicator actuation cable by removing the screw from the column casting and
the plastic plug at the end of the cable.
To remove the plastic plug from the shift lever socket casting push on the
nose of the plug until the head clears the casting and pull the plug from
the casting.
Remove the plastic clip that retains the combination switch wiring to the
steering column bracket.
Remove the 2 self taping screws that retain the combination switch to the
steering column casting. Disengage the switch from the casting.
Disconnect the 3 electrical connectors, using caution not to damage the
locking tabs. Be sure not to damage the PNDRL cable.
Installation is the reverse of the removal procedure. Torque the combination
switch retaining screws to 18–27 inch lbs. (2–3 Nm).