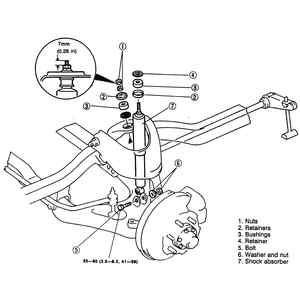
| Fig. 1: Front shock absorber removal/installation
|
- Raise and safely support the vehicle. Remove the wheel and tire assembly.
- Remove the upper shock absorber nuts, retainer and bushing.
- Remove the lower shock absorber-to-lower control arm mounting bolt, nut
and washer.
- Slightly compress the shock absorber and remove it from the vehicle. Remove
the remaining retainers and bushing from the upper shock absorber stud.
To install:
- Install the shock absorber and install the mounting bolts, nuts, washers
and bushings. Do not tighten at this time.
- Install the wheel and tire assembly and lower the vehicle.
- With the vehicle unladen, tighten the upper shock absorber mounting nuts
until the stud protrudes 0.28 inch (7mm) above the upper nut. Tighten the
lower mounting bolt and nut to 41–59 ft. lbs. (55–80 Nm).
- Check the front end alignment.
NOTE: Low pressure gas shocks are charged with Nitrogen gas.
Do not attempt to open, puncture or apply heat to them. Prior to installing
a new shock absorber, hold it upright and extend it fully. Invert it and fully
compress and extend it at least 3 times. This will bleed trapped air.
- Raise the vehicle, as required to provide additional access and remove the
bolt and nut attaching the shock absorber to the lower bracket on the radius
arm.
- Remove the nut, washer and insulator from the shock absorber at the frame
bracket and remove the shock absorber.
- Position the washer and insulator on the shock absorber rod and position
the shock absorber to the frame bracket.
- Position the insulator and washer on the shock absorber rod and install
the attaching nut loosely.
- Position the shock absorber to the lower bracket and install the attaching
bolt and nut loosely.
- Tighten the lower mounting nut to 39-53 ft. lbs. (53-72 Nm) and the upper
to 25-35 ft. lbs. (34-48 Nm).
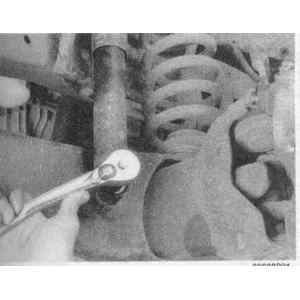
| Fig. 2: To remove the front shock absorber, remove the
lower radius arm shock retaining nut . . .
|
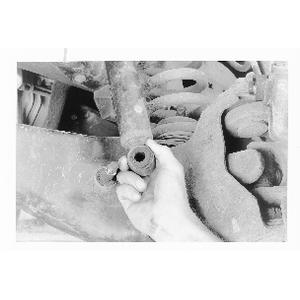
| Fig. 3: . . . then pull the lower shock mount from the
stud
|
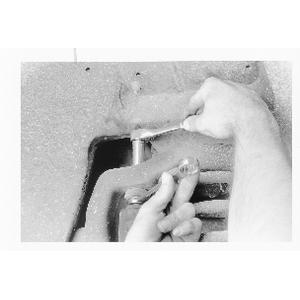
| Fig. 4: Next, unbolt the upper shock mount using a second
wrench on the mount stud to keep it from spinning . . .
|
| Fig. 5: . . . then pull the shock assembly from the upper
spring mount

|
NOTE: Low pressure gas shocks are charged with Nitrogen gas.
Do not attempt to open, puncture or apply heat to them. Prior to installing
a new shock absorber, hold it upright and extend it fully. Invert it and fully
compress and extend it at least 3 times. This will bleed trapped air.
- Raise the vehicle, as required to provide additional access and remove the
bolt and nut attaching the shock absorber to the radius arm.
- Remove the nut, washer and insulator from the shock absorber at the frame
bracket and remove the shock absorber.
To install:
- Position the washer and insulator on the shock absorber rod and position
the shock absorber to the frame bracket.
- Position the insulator and washer on the shock absorber rod and install
the attaching nut loosely.
- Position the shock absorber to the lower bracket and install the attaching
bolt and nut loosely.
- Tighten the lower attaching bolts to 39–53 ft. lbs., and the upper
attaching bolts to 25–35 ft. lbs.


