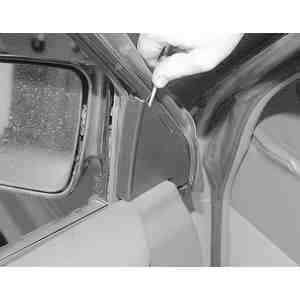
| Fig. 1: Using a small prying tool, pry off the interior
sideview mirror trim panel . . .
|
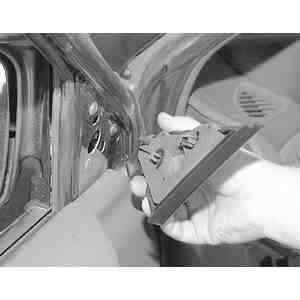
| Fig. 2: . . . then pull away the trim panel from the
door
|
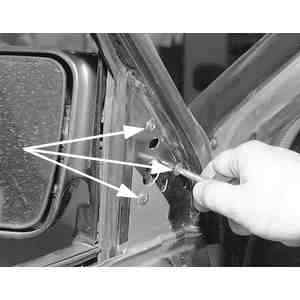
| Fig. 3: Remove the 3 sideview mirror mounting screws
using a phillips head screwdriver . . .
|
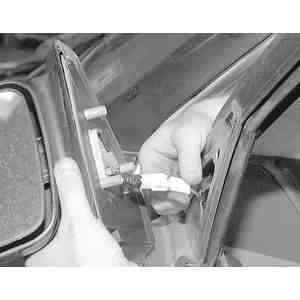
| Fig. 4: . . . then pull the sideview mirror away and
disengage the power mirror wiring connector
|
The mirrors can be removed from the door without disassembling the door liner
or other components except on Navajo models. The mirrors may be manual, manual
remote, or electric remote. If the mirror glass is broken, replacements may
be available through your dealer or a glass shop. If the housing is cracked
or damaged, the entire mirror must be replaced. To remove the mirror:
- If the mirror is manual remote, check to see if the adjusting handle is
retained by a hidden screw, usually under the endcap on the lever. Or if it
is retained by a threaded trim nut. If so, remove the screw, nut or other
remote assembly retainer.
- Remove the plastic delta cover from the door window corner where the mirror
is mounted. It can be removed with a blunt plastic or wooden tool. Don't use
a screwdriver, the plastic will be marred.
- Depending on the model and style mirror, there may be concealed plugs or
other minor parts under the delta cover. If electrical connectors are present,
disconnect them.
- Installation is the reverse of removal.
- The door panel must first be removed to gain access to the mounting nuts.
Disconnect the harness connector if equipped with power mirrors.
- Remove the mounting screws or nuts and lift off the mirror. Remove and discard
the gasket.
- When installing, make sure the gasket is properly positioned before tightening
the screws.

