NOTE: Always refer to the Vehicle Emission Information Label
in the engine compartment to verify the timing adjustment procedure.
- Place automatic transmission in PARK or manual transmission
in NEUTRAL. The air conditioning and heater controls and all accessories
should be in the OFF position.
- Connect an inductive timing light and tachometer to the engine, according
to the manufacturer's instructions.
- Disconnect the single wire in-line spout connector or remove the shorting
bar from the double wire spout connector.
- Start the engine and bring to normal operating temperature.
NOTE: To set timing correctly, a remote starter should
not be used. Use the ignition key only to start the vehicle. Disconnecting
the start wire at the starter relay will cause the TFI module to revert
to start mode timing after the vehicle is started. Reconnecting the start
wire after the vehicle is running will not correct the timing.
- Check the idle speed, and adjust if needed.
- Check the initial timing by aiming the timing light at the timing marks
and pointer. Refer to the underhood emission label for specifications.
- If the marks do not align, shut off the engine and loosen the distributor
hold-down bolt. Start the engine, aim the timing light and turn the distributor
until the timing marks align. Shut off the engine and tighten the distributor
hold-down bolt.
- Reconnect the single wire in-line spout connector or reinstall the shorting
bar on the double wire spout connector. Check the timing advance to verify
the distributor is advancing beyond the initial setting.
- Remove the timing light and tachometer.
| Fig. 2: Connect a jumper wire to the Data Link Connector — 1994–95
2.6L and 3.0L engines
|
| Fig. 3: Location of timing marks above the crankshaft
pulley
|
- Apply the parking brake and place the gearshift lever in P.
- Start the engine and bring to normal operating temperature. Make sure all
electrical loads and the A/C switch are OFF.
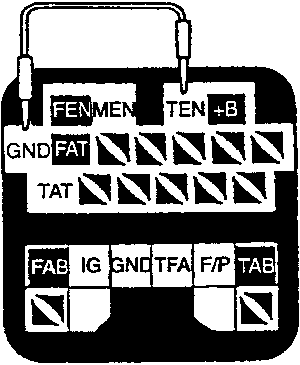
- Connect a timing light and connect a tachometer to the IG terminal
of the diagnostic connector.
- Connect a jumper wire between the TEN and GND terminals
of the diagnostic connector.
- Check the idle speed and adjust, if necessary. The idle speed should be
780–820 rpm.
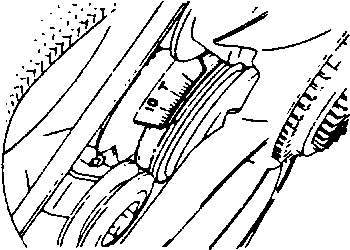
- Aim the timing light at the timing scale on the timing belt cover and the
timing mark on the crankshaft pulley. The timing should be 4–6 degrees
BTDC.
- If the timing is not as specified, loosen the distributor mounting bolt
and turn the distributor to adjust. After adjustment, tighten the bolt to
19 ft. lbs. (25 Nm) and recheck the timing.
- Remove the jumper wire and all test equipment.
- Apply the parking brake and place the gearshift lever in P.
- Start the engine and bring to normal operating temperature. Make sure all
electrical loads and the A/C switch are OFF.
- Connect a timing light and connect a tachometer to the IG terminal
of the diagnostic connector.
- Connect a jumper wire between the TEN and GND terminals
of the diagnostic connector.
- Check the idle speed and adjust, if necessary. The idle speed should be
780–820 rpm.
- Aim the timing light at the timing scale on the timing belt cover and the
timing mark on the crankshaft pulley. The timing should be 4–6 degrees
BTDC.
- If the timing is not as specified, loosen the distributor mounting bolt
and turn the distributor to adjust. After adjustment, tighten the bolt to
19 ft. lbs. (25 Nm) and recheck the timing.
- Remove the jumper wire and all test equipment.
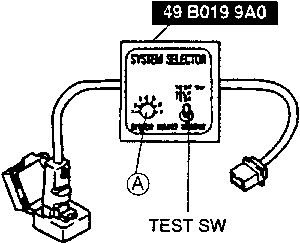
| Fig. 4: SST 49 B019 9A0 system selector — 1996–98
3.0L engine
|
- Apply the parking brake and place the gearshift lever in P.
- Start the engine and bring to normal operating temperature. Make sure all
electrical loads and the A/C switch are OFF.
- Connect a timing light to the high-tension lead No. 1.
- Connect the SST 49 B019 9A0 (system selector) to the data link connector.
- Set the switch A to position No. 1 and set the test switch to SELF TEST.
Verify that the idle speed is within specifications. If not, adjust it. Specification
is 500–900 rpm.
- Verify that the timing mark (yellow) is within the specification. Specification
is BTDC 10–12°.
- If not as specified, loosen the distributor lock bolts and turn the distributor
to make the adjustment.
- Tighten the distributor lock bolts to 14–18 ft. lbs. (19–25
Nm).
- Disconnect the SST (system selector) and verify that the timing mark (yellow)
is within specification. Specification is ATDC 2–BTDC 34°.
- Stop the engine and disconnect the timing light.
These engines utilize a Distributorless Ignition System (DIS). On this system,
ignition coil packs fire the spark plugs directly through the spark plug wires.
All spark timing and advance is determined by the ignition control module and
engine control computer. No ignition timing adjustments are necessary or possible.

