Previous Next

Auxiliary Shaft

REMOVAL & INSTALLATION

2.3L Engines (1994 only)

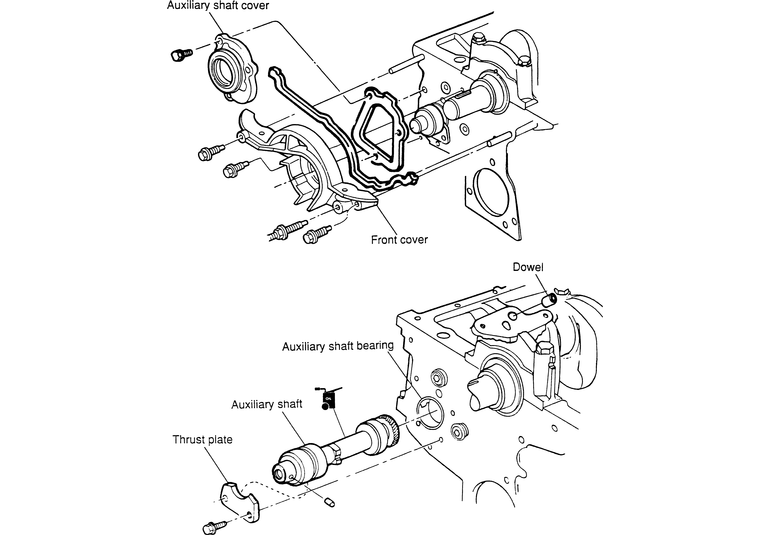
Fig. 1: Auxiliary shaft installation — 2.3L engines

  1. Remove the timing belt cover.
  2. Remove the timing belt. Remove the auxiliary shaft sprocket. A puller may be necessary to remove the sprocket.
  3. Remove the inner timing belt cover.
  4. Loosen the mounting bolts, then remove the auxiliary shaft cover and mounting gasket.
  5. Loosen the mounting bolts and remove the auxiliary shaft thrust plate.

    NOTE: Even though the 2.3L engine is equipped with a distributorless ignition system and an electronic fuel pump, the auxiliary shaft is still manufactured with a gear and eccentric to drive these components. The distributor drive gear and fuel pump eccentric on the auxiliary shaft must not be allowed to touch the auxiliary shaft bearings during removal and installation. Completely coat the shaft with oil before sliding it into place.

  6. Carefully withdraw the auxiliary shaft from the block.

    To install:

  7. Slide the auxiliary shaft into the housing and insert the thrust plate to hold the shaft. Tighten the thrust plate mounting bolts to 6–8 ft. lbs. (8–12 Nm).
  8. Install a new gasket and auxiliary shaft cover. Tighten the cover mounting bolts to 6–8 ft. lbs. (8–12 Nm).

    NOTE: The auxiliary shaft cover and cylinder front cover share a gasket. Cut off the old gasket around the cylinder cover and use half of the new gasket on the auxiliary shaft cover.

  9. Install the inner timing belt cover.
  10. Install the auxiliary shaft sprocket.
  11. Align the timing marks and install the timing belt.
  12. Install the timing belt cover.
  13. Check the ignition timing.
2.6L Engines
  1. Disconnect the battery ground.
  2. Drain the cooling system.

    CAUTION
    When draining the coolant, keep in mind that cats and dogs are attracted by the ethylene glycol antifreeze, and are quite likely to drink any that is left in an uncovered container or in puddles on the ground. This will prove fatal in sufficient quantity. Always drain the coolant into a sealable container. Coolant should be reused unless it is contaminated or several years old.

  3. Remove the accessory drive belts.
  4. Remove the fan and shroud.
  5. Remove the water pump pulley.
  6. Unbolt and remove the water pump.
  7. Remove the crankshaft pulley.
  8. Remove the oil pan.
  9. Remove the timing chain cover.
  10. Remove the oil pick-up tube.
  11. Remove and discard the water inlet pipe gasket.
  12. Remove the crankshaft sprocket spacer.
  13. Remove the idler sprocket lockbolt.
  14. Remove chain guides and mark them for correct assembly.
  15. Remove the idler sprocket and crankshaft sprocket bolts and pull off the sprockets along with the balancer chain.

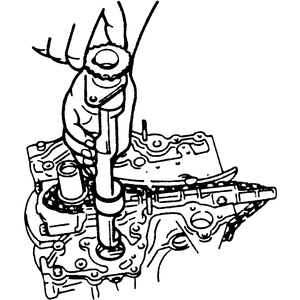
    Fig. 2: Pull the balance shafts out of the engine block

  16. Remove the left balance shaft.
  17. Remove the right balance shaft. Mark each balance shaft for correct assembly.
  18. Remove the crankshaft timing gear bolt.
  19. Remove the timing chain tensioner.
  20. Pull the timing chain and sprockets off.
  21. Remove the chain guide and lever.

    To install:

  22. Install the chain guide and lever. Torque the chain guide bolts to 78 in. lbs. (9 Nm); the lever bolts to 95 in. lbs. (11 Nm). Make sure that the lever moves smoothly.
  23. Install the chain adjuster. Torque the bolts to 95 in. lbs. (11 Nm). Move the adjuster sleeve towards the left and install a pin to hold it in place.
  24. Install the timing chain and sprocket.
  25. Install the camshaft sprocket.
  26. Install the balance shafts. Torque the thust plate bolts to 95 in. lbs. (11 Nm).
  27. Install the crankshaft sprocket.
  28. Install the idler shaft and sprocket.

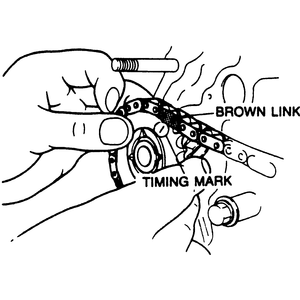
    Fig. 3: When setting the balance chain onto the shaft sprocket, align the timing mark to the brown link on the chain

  29. Set the balance chain on the balance shaft sprocket so that it aligns with the brown link on the chain.
  30. Install the balancer chain, aligning all the marks as shown.

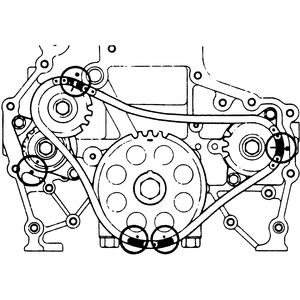
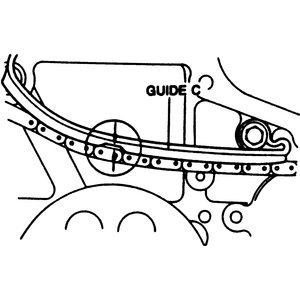
    Fig. 4: When installing the balance shaft chain, be sure to match up the chain, sprocket and engine block alignment marks


    Fig. 5: Install the balance shaft chain guides Aand B

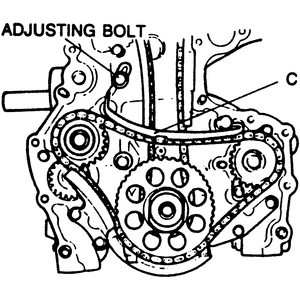
    Fig. 6: Install balance shaft chain guide Cand hand tighten the adjusting bolt

  31. Install chain guides A and B. Torque the bolts to 95 in. lbs. (11 Nm).
  32. Install chain guide C. Tighten the bolt to 95 in. lbs. (11 Nm).
  33. Torque the idler sprocket lockbolt to 38 ft. lbs. (52 Nm).
  34. Install the spacer.
  35. Loosen chain guide C adjusting bolt.

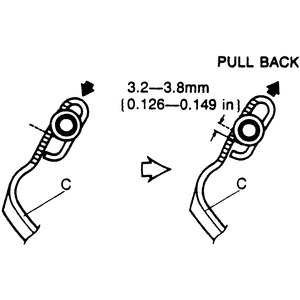
    Fig. 7: Adjustment of balancer chain tension

    Fig. 8: When properly adjusted, there should be about 3mm (0.12 in.) of slack in the chain at the mid-point of the guide

  36. Push chain guide C with a force of about 10 lb., downward, against the chain, then, pull it back 3.2–3.8mm (0.126–0.149 in.) and tighten the bolt to 95 in. lbs. (11 Nm). When properly adjusted, there should be about 3mm (0.12 in.) of slack in the chain at the mid-point of the guide.

    NOTE: If, when applying the downward force on the chain guide, it bottoms against the adjusting bolt, you should replace the balancer chain.

  37. Remove the tensioner adjuster retaining pin.
  38. Install a new water inlet pipe gasket using adhesive sealer.
  39. Install the oil pick-up tube using a new gasket. Torque the bolts to 95 in. lbs. (11 Nm).
  40. Using new gaskets coated with sealer, install the timing chain cover. Torque the bolts to 19 ft. lbs. (26 Nm).
  41. Install the camshaft sprocket service cover.
  42. Remove the wire from the camshaft sprocket.
  43. Tighten the oil pick-up brace bolt to 95 in. lbs. (11 Nm).
  44. Install the oil pan.
  45. Install the crankshaft pulley.
  46. Install the water pump.
  47. Install the water pump pulley.
  48. Install the fan and shroud.
  49. Install the accessory drive belts.
  50. Fill the cooling system.
  51. Connect the battery ground.

Previous Next