NOTE: Refer to exploded view illustration before starting this
service procedure.
WARNING
The following procedures for removing the fan clutch gives the factory recommended
loosening and tightening directions for the fan hub nut. However, it has been
our experience that certain aftermarket parts manufacturers have changed this
to enable use of universal fit parts. We recommend trying the factory direction
first, then, if the nut doesn't seem to be moving, reverse the direction. Placing
too much load on the water pump snout will break it.
| Fig. 1: Remove the four fan assembly-to-water pump pulley
mounting nuts
|
| Fig. 2: After the fan mounting nuts have been removed,
slide the fan assembly forward and place inside the radiator shroud

|
- Disconnect the negative battery cable.
- Loosen and remove the drive belts.
- Remove the bolts that retain the fan shroud to the radiator support. Remove
(if there is enough room between the fan blades and radiator) or position
the shroud back over the water pump and fan assembly, if necessary to gain
working room.
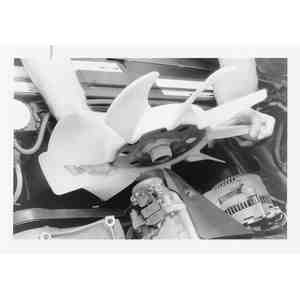
- Loosen and remove the fan to water pump mounting nuts and remove the fan
assembly. Don't lay the fan, if equipped with a fan clutch, on its side. Fluid
could be lost and the fan clutch might require replacement. Inspect the condition
of the fan blades, if any are cracked or damaged, replace the fan.
- Install the fan assembly in position on the water pump and pulley. Secure
the fan assembly with the mounting nuts. Tighten the nuts to 70–95 inch
lbs. (8–11 Nm). Install the shroud and drive belts. Adjust the drive
belts to the proper tension.
- Connect the negative battery cable.
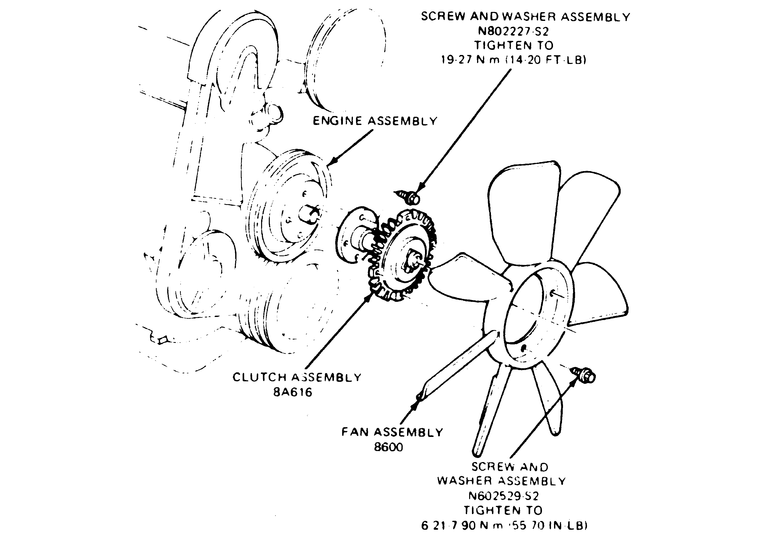
| Fig. 3: Exploded view of the engine fan for the 2.3L
engine
|
NOTE: The 2.3L engine does not use a fan hub nut. It is retained
by four bolts which also secure the pump pulley to the water pump.
- If not equipped with A/C, disconnect the overflow tube from the fan guard,
then unbolt and remove the guard.
- If equipped with A/C, disconnect the overflow tube from the shroud, remove
the mounting screws and lift the shroud off the brackets. Place the shroud
behind the fan.
- Remove the 4 clutch/fan assembly-to-pulley screws and remove the clutch/fan
assembly. Vehicles equipped with A/C should remove the clutch/fan and shroud
together.
- If necessary, remove the fan-to-clutch bolts to separate the fan from the
clutch.
- Installation is the reverse of removal. Torque the fan-to-clutch screws
to 55–70 inch lbs. (6–8 Nm); the fan/clutch assembly-to-pulley
bolts to 12–18 ft. lbs. (16–24 Nm).
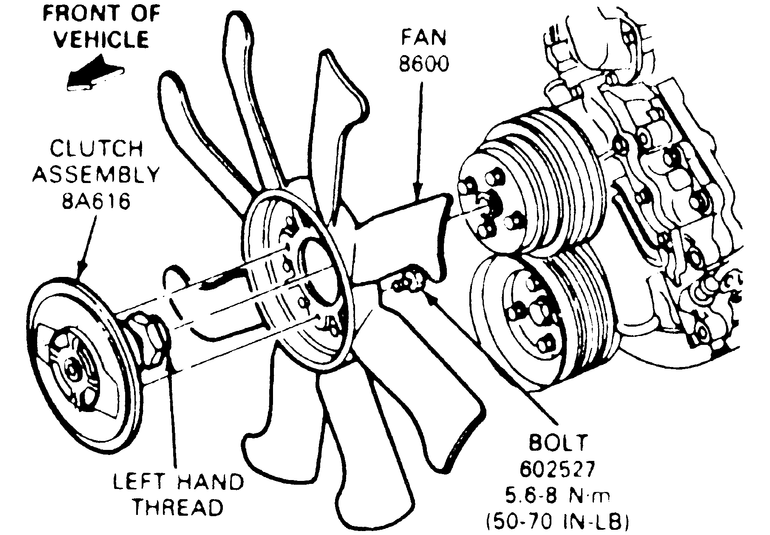
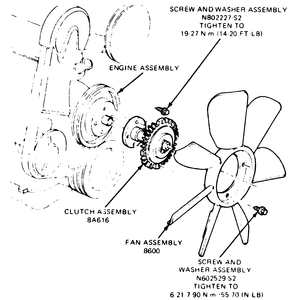
| Fig. 4: Exploded view of the engine fan for the 2.9L
and 3.0L engines
|
- If necessary, remove the air cleaner outlet tube.
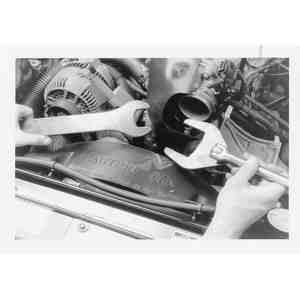
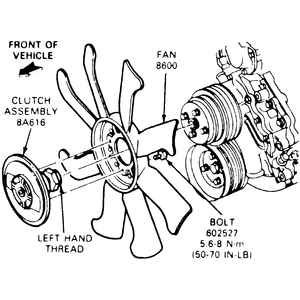
- Using Strap Wrench D79L-6731-A and Fan Clutch Nut Wrench T83T-6312-B, or
their equivalents, loosen the large nut attaching the clutch to the water
pump hub.
NOTE: According to the manufacturer, the nut uses LH threads
and is loosened clockwise.
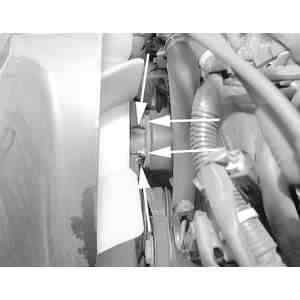
- Remove the two upper fan shroud retaining bolts. If the overflow hose is
routed through the fan shroud, remove it from the shroud.
- Lift up on the fan shroud to disengage the lower mounting clips.
- Remove the fan/clutch assembly and the fan shroud together.
- If necessary, remove the fan-to-clutch bolts to separate the fan from the
clutch.
To install:
- Installation is the reverse of removal. Torque the fan-to-clutch bolts to
55–70 inch lbs. (6–8 Nm); the hub nut to 30–100 ft. lbs.
(41–135 Nm) for 1991–95 models and 34–46 ft. lbs. (46–63
Nm) for 1996–97 models. Don't forget, the nut uses LH threads and is
tightened counterclockwise.
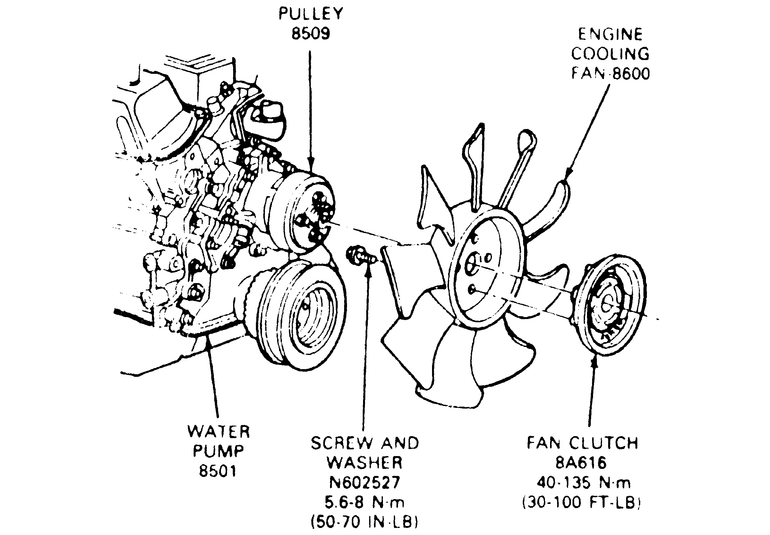
| Fig. 5: Exploded view of the engine fan for the 4.0L
engine

|
Before attempting to unfasten the engine fan, check the fan shroud for indications
of normal or reverse threads
Remove the air intake tube. You will need these specialized tools to unfasten
the fan clutch nut
- If necessary, remove the air cleaner outlet tube.
NOTE: According to the manufacturer, the nut uses RH threads
and is loosened counterclockwise.
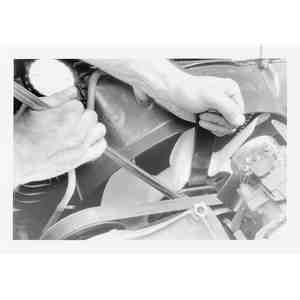
- Using Fan Clutch Pulley Holder T84T–6312–C and Fan Clutch Nut
Wrench T84T–6312–D, or their equivalents, loosen the large nut
attaching the clutch to the water pump hub. Using the special tools, loosen
the fan clutch nut in the direction indicated on the shroud.
NOTE: Some models have enough room between the shroud and
the engine to remove the fan without unbolting the shroud.
- Remove the two upper fan shroud retaining bolts. If the overflow hose is
routed through the fan shroud, remove it from the shroud.
- Lift up on the fan shroud to disengage the lower mounting clips. Remove
the fan and clutch assembly from the vehicle
- Remove the fan/clutch assembly and the fan shroud together.
- If necessary, remove the fan-to-clutch bolts to separate the fan from the
clutch.
To install:
- Installation is the reverse of removal. Torque the fan-to-clutch bolts to
55–70 inch lbs. (6–8 Nm); the hub nut to 30–100 ft. lbs.
(41–135 Nm) for 1991–95 models and 34–46 ft. lbs. (46–63
Nm) for 1996–97 models. Don't forget, the nut uses RH threads and is
tightened clockwise.