NOTE: The oil pumps are not serviceable. If defective, they
must be replaced.
- Follow the service procedures under Oil Pan Removal and remove the oil pan
assembly.
- Remove the oil pick-up and tube assembly from the pump.
- Remove the oil pump retainer bolts and remove the oil pump.
To install:
- Prime the oil pump with clean engine oil by filling either the inlet or
outlet port with clean engine oil. Rotate the pump shaft to distribute the
oil within the pump body.
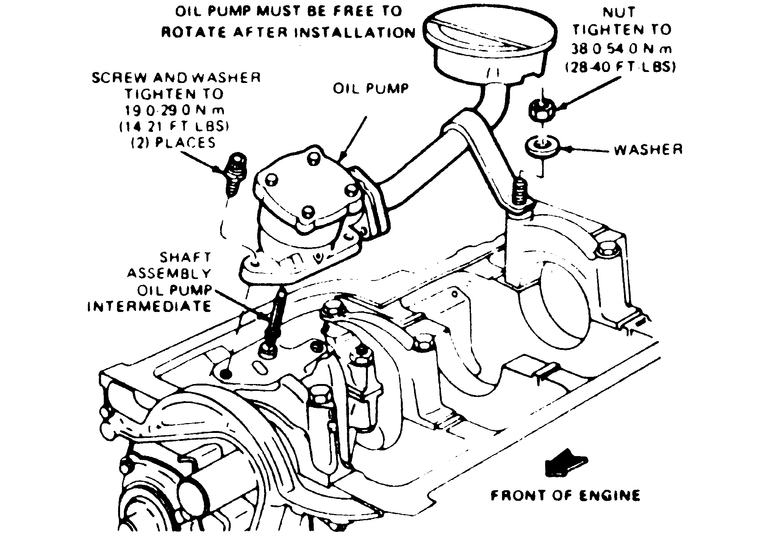
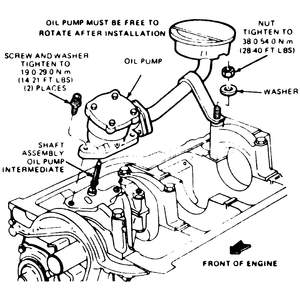
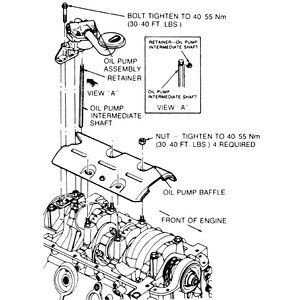
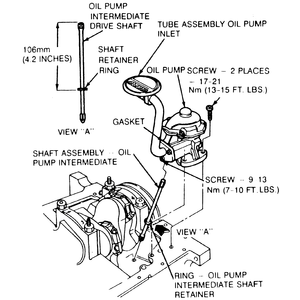
- Install the pump and tighten the mounting bolts to:
- 14–21 ft. lbs. (19–29 Nm) on 1994 2.3L engines
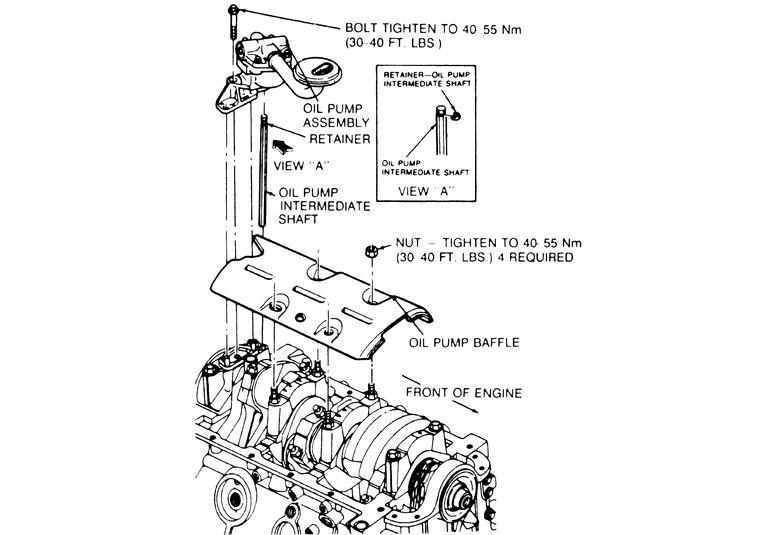
- 30–40 ft. lbs. (40–55 Nm) on 3.0L engines
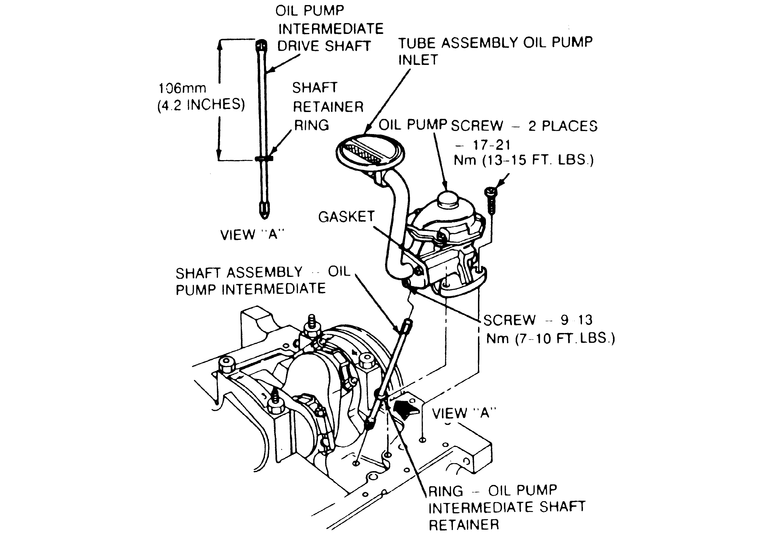
- 13–15 ft. lbs. (17–21 Nm) on 4.0L engines
WARNING
Do not force the oil pump if it does not seat readily. The oil pump driveshaft
may be misaligned with the distributor or shaft assembly. If the pump is
tightened down with the driveshaft misaligned, damage to the pump could
occur. To align, rotate the intermediate driveshaft into a new position.
- Install the oil pick-up and tube assembly to the pump. If there is a gasket
between the pump and the pick-up, use a new gasket when installing.
- Install the oil pan as previously described.
| Fig. 1: Oil pump installation on the 1994 2.3L engine
|
| Fig. 2: Oil pump installation on the 3.0L engines
|
| Fig. 3: Oil pump installation on the 4.0L engines
|
NOTE: The oil pump is located on the front of the engine and
is turned by the timing belt.
- Disconnect the negative battery cable.
- Remove the timing belt.
- Detach the camshaft position sensor (CMP) electrical connector.
- Remove the oil pump sprocket bolt and sprocket.
NOTE: Use a prybar or drift through one of the holes in
the pump sprocket to keep it from turning while loosening the bolt.
- Unbolt the camshaft position sensor.
- Remove the four bolts retaining the oil pump to the engine block.
- Remove the oil pump from the front of the engine and discard the pump-to-block
gasket.
- Inspect the oil pump and O-rings and replace as necessary. Clean all gasket
mating surfaces thoroughly.
- Installation is the reverse of the removal procedure, however note the following:
- Prime the oil pump and with 8 ounces (236ml) of new engine oil and lubricate
the O-rings with same.
- Use a new pump-to-block gasket.
- Tighten the oil pump bolts to 89 — 123 inch lbs. (10 — 14
Nm), the camshaft position sensor bolts to 45 — 61 inch
lbs. (5 — 7 Nm) and the oil pump sprocket bolt to 30 — 40
ft. Lbs. (40 — 55 Nm).
| Fig. 4: Exploded view of the oil pump assembly
|
- Disconnect the battery ground.
- Drain the cooling system.
CAUTION
When draining the coolant, always drain the coolant into a sealable container.
Coolant should be reused unless it is contaminated or several years old.
- Remove the accessory drive belts.
- Remove the fan and shroud.
- Remove the water pump pulley.
- Unbolt and remove the water pump.
- Remove the crankshaft pulley.
- Remove the oil pan.
- Remove the timing chain cover.
NOTE: The pump is built into the cover
- Remove the oil pickup tube.
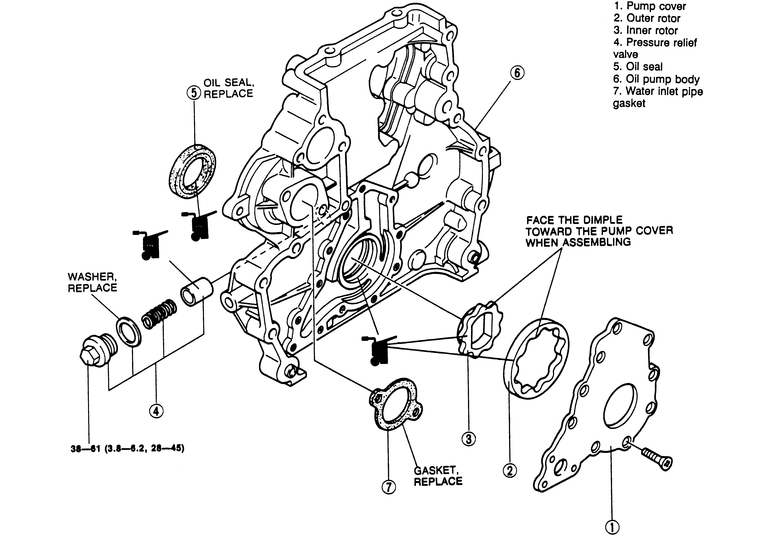
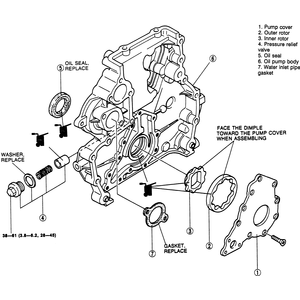
- Remove the pump cover from the case.
- Remove the inner and outer rotors.
- Remove the pressure relief valve.
- Remove and discard the water inlet pipe gasket.
To install:
- Install a new water inlet pipe gasket using adhesive sealer.
- Install the oil pickup tube using a new gasket. Tighten the bolts to 95
inch lbs. (11 Nm).
- Install the pressure relief valve. Tighten the plug to 28–45 ft. lbs.
(38–61 Nm).
- Install the inner and outer rotors.
- Install the pump cover.
- Using new gaskets coated with sealer, install the timing chain cover. Tighten
the bolts to 19 ft. lbs.
- Tighten the oil pickup brace bolt to 95 inch lbs. (11 Nm).
- Install the oil pan. Tighten the bolts to 95 inch lbs. (11 Nm).
- Install the crankshaft pulley. Tighten the bolt to 145 ft. lbs. (197 Nm).
- Install the water pump.
- Install the water pump pulley.
- Install the fan and shroud.
- Install the accessory drive belts.
- Fill the cooling system.
- Connect the battery ground.
| Fig. 5: Exploded view of the oil pump assembly
|
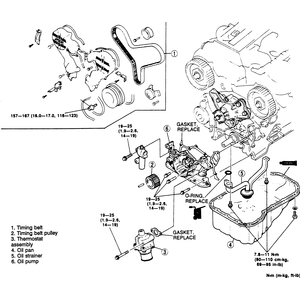
- Disconnect the negative battery cable. Raise and support the vehicle safely.
- Drain the engine oil and the cooling system.
- Remove the crankshaft pulley and the timing belt covers.
- Remove the timing belt, crankshaft sprocket and key.
- Remove the thermostat and gasket.
- Remove the oil pan, oil strainer and O-ring.
- Unbolt and remove the oil pump and gasket.
To install:
- Press in a new oil seal and coat the seal lip with clean engine oil. Use
a new gasket, O-ring and sealant as required. Tighten the oil pump retaining
bolts to 14–18 ft. lbs. (19–25 Nm).
- Install the oil pan and tighten the pan bolts 5–8 ft. lbs. (8–11
Nm).
- Install the crankshaft sprocket and key.
- Install the timing belt and covers. Install the crankshaft pulley and tighten
the pulley bolt to 116–123 ft. lbs. (157–167 Nm).
- Install the thermostat and gasket. Tighten the thermostat housing bolts
14–18 ft. lbs. (19–25 Nm).
- Fill the crankcase to the recommended level with fresh oil. Fill the cooling
system.
- Crank the engine to prime the oil pump.
- Start the engine and check for leaks.