Previous Next

Thermostat

REMOVAL & INSTALLATION

NOTE: If the replacement thermostat is equipped with a &inch;jiggle pin&inch;, the pin must be install facing upwards toward the top of the engine (12 o'clock), and should be on the side facing the water outlet. When installing the thermostat gasket, the seal print side should face the cylinder head.

2.3L Engine
  1. Disconnect the negative battery cable.
  2. Drain the cooling system below the level of the coolant outlet housing.

    CAUTION
    When draining the coolant, keep in mind that cats and dogs are attracted by ethylene glycol antifreeze, and are quite likely to drink any that is left in an uncovered container or in puddles on the ground. This will prove fatal in sufficient quantity. Always drain the coolant into a sealable container. Coolant should be reused unless it is contaminated or several years old.

  3. Disconnect the heater return hose at the thermostat housing.
  4. Remove the coolant outlet housing retaining bolts and slide the housing with the hose attached to one side.
  5. Remove the thermostat from the outlet.
  6. Remove the gasket from the engine block and clean both mating surfaces.

    NOTE: It is good practice to check the operation of a new thermostat before it is installed in an engine. Place the thermostat in a pan of boiling water. If it does not open more than 14 in., do not install it in the engine.

    Fig. 1: Exploded view of the thermostat assembly for 2.3L engines

    To install:

  7. Coat a new gasket with water resistant sealer and position it on the outlet of the engine. The gasket must be in place before the thermostat is installed.
  8. Install the thermostat with the bridge (opposite end from the spring) inside the elbow connection and turn it clockwise to lock it in position, with the bridge against the flats cast into the elbow connection.
  9. Position the elbow connection onto the mounting surface of the outlet, so that the thermostat flange is resting on the gasket and install the retaining bolts. Tighten the retaining bolts to 14–21 ft. lbs. (20–30 Nm).
  10. Connect the heater hose to the thermostat housing.
  11. Connect the negative battery cable.
  12. Fill the radiator and operate the engine until it reaches operating temperature. Check the coolant level and adjust as necessary.
2.5L Engine
  1. Disconnect the negative battery cable.
  2. Drain the cooling system.

    CAUTION
    When draining the coolant, keep in mind that cats and dogs are attracted by ethylene glycol antifreeze, and are quite likely to drink any that is left in an uncovered container or in puddles on the ground. This will prove fatal in sufficient quantity. Always drain the coolant into a sealable container. Coolant should be reused unless it is contaminated or several years old.

  3. Disconnect the heater return hose at the thermostat housing.
  4. Disengage the ECT sensor and engine coolant temperature sender wiring connectors.
  5. Disconnect the upper radiator hose from the thermostat housing connection.
  6. Loosen the mounting bolts and remove the housing from the cylinder head.
  7. Remove the thermostat and gasket from the housing.
  8. Clean both thermostat gasket mating surfaces.

    To install:

  9. Position the thermostat gasket properly onto the housing. The gasket must be in place before the thermostat is installed.
  10. Install the thermostat into the housing by first turning and then locking into the recess of the housing.
  11. Position the thermostat and housing onto the mating surface of the cylinder head. Install and tighten the retaining bolts to 14–21 ft. lbs. (20–30 Nm).
  12. Connect the upper radiator hose to the thermostat housing connection.
  13. Connect the ECT sensor and engine coolant temperature sender wiring harnesses.
  14. Connect the heater return hose to the thermostat housing.
  15. Connect the negative battery cable.
  16. Fill the radiator and operate the engine until it reaches operating temperature. Check the coolant level and adjust as necessary.
2.6L Engine

The thermostat housing is at the end of the upper hose, on the cylinder head side, above the alternator.

  1. Disconnect the negative battery cable.
  2. Drain the cooling system to a point below the housing.

    CAUTION
    When draining the coolant, keep in mind that cats and dogs are attracted by ethylene glycol antifreeze, and are quite likely to drink any that is left in an uncovered container or in puddles on the ground. This will prove fatal in sufficient quantity. Always drain the coolant into a sealable container. Coolant should be reused unless it is contaminated or several years old.

  3. Remove the upper hose.
  4. Remove the upper nut and lower bolt and remove the housing.
  5. Remove the gasket and thermostat. Discard the gasket.
  6. Thoroughly clean the mating surfaces of the head and housing.

    Fig. 2: Exploded view of the thermostat assembly — 2.6L engine

    To install:

  7. Position the new thermostat in the head with the jiggle pin on the upper side.
  8. Coat the gasket with an adhesive sealer and stick it in place on the head.
  9. Install the housing and tighten the nut and bolt to 14–18 ft. lbs. (19–25 Nm).
  10. Connect the negative battery cable.
  11. Fill the radiator and operate the engine until it reaches operating temperature. Check the coolant level and adjust as necessary.
3.0L Engine (MPV)

The thermostat housing is located at the engine end of the lower radiator hose.

  1. Disconnect the negative battery cable.
  2. Raise and support the front end on jackstands.
  3. Drain the cooling system.

    CAUTION
    When draining the coolant, keep in mind that cats and dogs are attracted by ethylene glycol antifreeze, and are quite likely to drink any that is left in an uncovered container or in puddles on the ground. This will prove fatal in sufficient quantity. Always drain the coolant into a sealable container. Coolant should be reused unless it is contaminated or several years old.

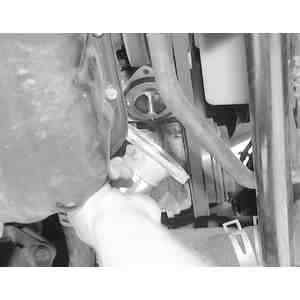
    Fig. 3: After moving the hose clamp away from the thermostat housing pipe, disconnect the lower radiator hose

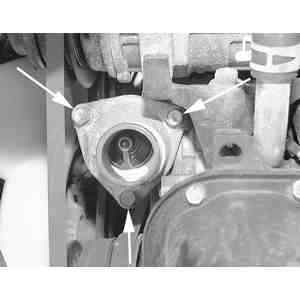
    Fig. 4: Using a socket, remove the three thermostat housing mounting bolts

  4. Remove the lower hose.
  5. Unbolt and remove the housing and thermostat.

    NOTE: Some engines have a housing which incorporates an O-ring, eliminating the need for a gasket. On these engines, use no sealer when replacing the housing. On engines which incorporate a gasket, thoroughly clean the mating surfaces and use a new gasket coated with adhesive sealer.

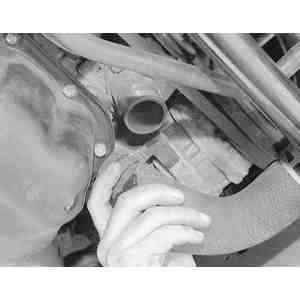
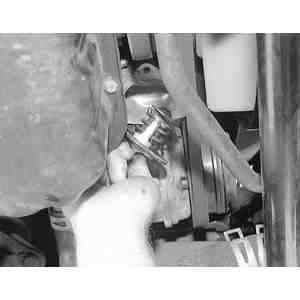
    Fig. 5: After the mounting bolts are removed, remove the thermostat housing from the engine

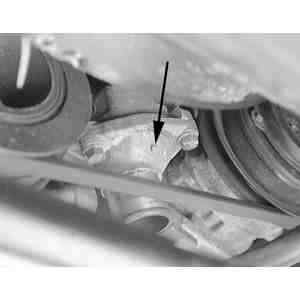
    Fig. 6: Pull the thermostat down out of the opening in the engine

    Fig. 7: During assembly, make sure that the notch sticking out of the side of the housing is facing outward

  6. Install a new thermostat in the housing and position the housing on the engine. Some housings are equipped with a location mark on the side, the mark should face the front of the engine when the housing is installed. Tighten the bolts to 14–18 ft. lbs. (19–25 Nm).
  7. Install the lower hose.
  8. Connect the negative battery cable.
  9. Fill the radiator and operate the engine until it reaches operating temperature. Check the coolant level and adjust as necessary.
3.0L Engine (B Series Pick-up)
  1. Disconnect the negative battery cable.
  2. Drain the cooling system.

    CAUTION
    When draining the coolant, keep in mind that cats and dogs are attracted by ethylene glycol antifreeze, and are quite likely to drink any that is left in an uncovered container or in puddles on the ground. This will prove fatal in sufficient quantity. Always drain the coolant into a sealable container. Coolant should be reused unless it is contaminated or several years old.

  3. Remove the upper radiator hose.
  4. Remove the thermostat housing bolts.
  5. Remove the housing and thermostat as an assembly.
  6. Remove the thermostat from the housing.

    Fig. 8: Thermostat installation for the 3.0L engine

    To install:

  7. Clean all gasket material from the housing and engine.
  8. Turn the thermostat clockwise into the housing until the thermostat bridge is perpendicular to the mounting holes.
  9. Position the housing on the engine, using a new gasket coated with sealer. Tighten the bolts to 18 ft. lbs. (25 Nm).
  10. Install the hose, fill and bleed the cooling system, connect the negative battery cable and start the engine. Check for leaks.
4.0L Engine
  1. Drain the cooling system.

    CAUTION
    When draining the coolant, keep in mind that cats and dogs are attracted by ethylene glycol antifreeze, and are quite likely to drink any that is left in an uncovered container or in puddles on the ground. This will prove fatal in sufficient quantity. Always drain the coolant into a sealable container. Coolant should be reused unless it is contaminated or several years old.

  2. Disconnect the negative battery cable.
  3. Remove the air cleaner duct assembly.
  4. Remove the upper radiator hose.

    Fig. 9: Exploded view of the thermostat housing for the 4.0L engine

  5. Remove the 3 thermostat housing attaching bolts.
  6. Remove the thermostat housing. You may have to tap it loose with a plastic mallet or your hand.
  7. Pull the thermostat from the intake manifold.

    To install:

    WARNING
    Do not use a sharp metal tool for scraping. Damage to the sealing surfaces could result and cause a leak.

  8. Clean all mating surfaces thoroughly.
  9. Make sure that the sealing ring is properly installed on the thermostat rim. Position the thermostat in the housing making sure that the air release valve is in the up (12 o'clock) position.
  10. Coat the mating surfaces of the housing and engine with an adhesive type sealer. Position the new gasket on the thermostat and place the housing on the engine. Tighten the bolts to specification.

Previous Next