CAUTION
Fuel injection systems remain under pressure after the engine has been turned
OFF. Properly relieve fuel pressure before disconnecting any fuel lines. Failure
to do so may result in fire or personal injury. Do not allow fuel spray or fuel
vapors to come in contact with a spark or open flame. Keep a dry chemical fire
extinguisher nearby. Never store fuel in an open container due to risk of fire
or explosion.
- Relieve the fuel system pressure, and disconnect the negative battery cable.
- Drain the cooling system and engine oil.
- Remove the fan shroud and cooling fan.
- Remove the cylinder head.
- Remove the oil pan.
| Fig. 1: Timing chain and related components — 2.6L
engine
|
- Remove the drive belts.
- Remove the water pump pulley.
- Remove the alternator and bracket.
- Remove the power steering pump and bracket.
- Without disconnecting the A/C lines, remove the A/C compressor mounting
bolts and remove the A/C compressor. Secure the compressor out of the way.
Remove the bolts and the A/C compressor mounting bracket.
- Remove the water pump.
- Remove the coolant bypass pipe.
- Remove the bolt, and by using a suitable puller, remove the crankshaft pulley.
- Loosen the mounting bolts and remove the timing chain cover.
To install:
- Install the timing cover with a new gasket Torque the timing cover bolts
to 14–19 ft. lbs. (19–25 Nm).
- Install the crankshaft pulley.
- Install the coolant bypass pipe.
- Install the water pump.
- Install the power steering pump bracket and the power steering pump.
- Mount the A/C compressor bracket and install the A/C compressor.
- Mount the alternator bracket and the alternator. Plug in the alternator
wiring harness connector.
- Install the water pump pulley.
- Install the drive belts and adjust to specifications.
- Install the oil pan.
- Install the cylinder head.
- Install the fan shroud and cooling fan.
- Fill the crankcase with the proper type and quantity of engine oil. Fill
and bleed the cooling system. Run the engine and check for leaks and proper
operation.
- Check the idle speed and ignition timing and adjust, if necessary.
NOTE: The A/C system must be discharged to remove the front
cover. Have the A/C refrigerant reclaimed by a MVAC certified shop. The front
seal can be serviced with the engine in the vehicle. Remove the crankshaft damper,
then follow the seal replacement procedure under installation.
- Disconnect the negative battery cable.
- Drain the cooling system and crankcase.
CAUTION
When draining the coolant, keep in mind that cats and dogs are attracted
by ethylene glycol antifreeze, and are quite likely to drink any that is
left in an uncovered container or in puddles on the ground. This will prove
fatal in sufficient quantity. Always drain the coolant into a sealable container.
Coolant should be reused unless it is contaminated or several years old.
- Remove the cooling fan.
- Loosen the water pump pulley bolts. Remove the accessory drive belts. Remove
the water pump pulley.
- Remove the alternator adjusting arm and brace assembly. Remove the heated
air intake duct from the engine.
- Remove the upper motor mount retaining nuts. Remove the A/C compressor upper
bolts, then remove the front cover front nuts on vehicles with automatic transmission
and A/C.
- Raise the vehicle. Remove the A/C compressor bolts and bracket if so equipped
and position the assembly aside.
- Remove the crankshaft pulley and damper assembly. Remove the oil pan.
NOTE: According to the manufacturer, you must remove the
water pump to remove the cover. However, we have found that on some models
and/or years the water pump can be left bolted to the cover, thereby reducing
some of the labor. Try removing the cover with the water pump attached first.
- Lower the vehicle. Remove the lower radiator hose. Remove the water pump.
- If necessary, remove the crankshaft position sensor.
| Fig. 2: Front cover removal — 3.0L
|
| Fig. 3: Front cover bolt installation chart — 3.0L
|
- Remove the timing cover to cylinder block attaching bolts. Carefully remove
the timing cover from the cylinder block.
- Inspect the oil seal. If the seal needs replacing, follow the procedures
under installation.
To install:
- Clean timing cover and oil pan sealing surfaces. Clean and inspect all parts.
The camshaft retaining bolt has a drilled oil passage for timing chain assembly
lubrication. Clean oil passage with solvent. Do not replace with standard
bolt.
- Install timing cover assembly. Install retaining bolts with pipe sealant
and tighten to 19 ft. lbs. (25 Nm). Refer to the illustration.
- If the front seal needs to be replaced, proceed as follows:
- Using a front cover seal removal tool, or equivalent, remove the front
seal.
- Lubricate the engine front cover and oil seal lip inner lip with engine
oil.
- Using a seal driver/installation tool, install the new seal into the
front cover.
- If necessary, install the crankshaft position sensor.
- Install oil pan and water pump. Refer to the necessary procedures in this
section.
- Install crankshaft damper and pulley assembly.
- Install drive belt components. Install drive belts and adjust.
- Fill crankcase. Refill and bleed cooling system. Connect the negative battery
cable. Start engine check for coolant, oil and exhaust leaks.
NOTE: Review the complete service procedure before starting
this repair. Refer to the necessary service procedures in this section. The
front seal can be serviced with the engine in the vehicle. Remove the crankshaft
damper, then follow the seal replacement procedure under installation.
- Disconnect the negative battery cable. Remove/lower the oil pan.
- Drain the cooling system.
CAUTION
When draining the coolant, keep in mind that cats and dogs are attracted
by ethylene glycol antifreeze, and are quite likely to drink any that is
left in an uncovered container or in puddles on the ground. This will prove
fatal in sufficient quantity. Always drain the coolant into a sealable container.
Coolant should be reused unless it is contaminated or several years old.
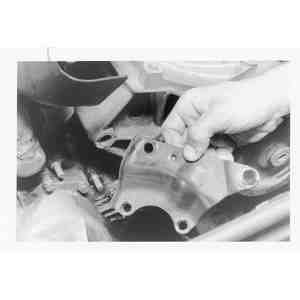
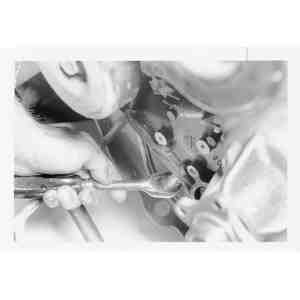
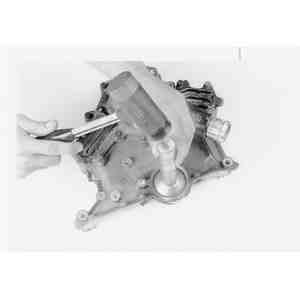
| Fig. 4: To remove the front cover, remove the fan,
shroud and unbolt the front cover-to-accessory bracket brace . . .

|
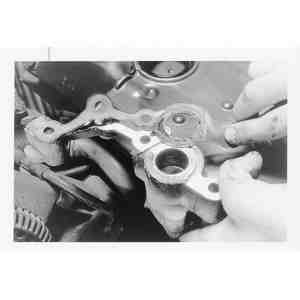
| Fig. 5: . . . then remove the brace. Also remove
the damper and any other obstructions to the cover
|
- Remove the engine fan and shroud.
- Remove the air conditioning compressor and position it out of the way. DO
NOT disconnect the refrigerant lines!
- Remove the power steering pump and position it out of the way. DO NOT disconnect
the hoses!
- Remove the alternator.
- Remove the water pump.
- Remove the drive pulley/damper from the crankshaft.
- Remove the crankshaft timing sensor.
| Fig. 6: Front cover mounting — 4.0L
engine
|
| Fig. 7: Remove the front cover attaching bolts

|
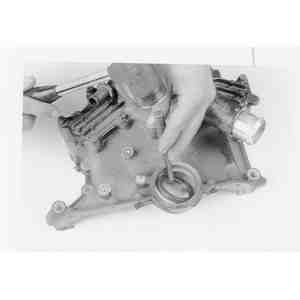
| Fig. 8: Don't forget about the oil pan-to-front cover
attaching bolts!
|
- Remove the front cover attaching bolts. It may be necessary to tap the cover
loose with a plastic mallet.
- Inspect the oil seal. If the seal needs replacing, follow the procedures
under installation.
To install:
| Fig. 9: Remove the old gaskets and thoroughly clean
all of the mating surfaces
|
- Thoroughly clean all of the gasket and sealing surfaces and remove all traces
of the old gaskets, oil, grease and/or dirt. Use new gaskets and apply a thin
layer of sealant/adhesive to them.
NOTE: If the specialized tools aren't available, the front
seal can be replaced using normal hand tools. Before installing the cover,
use a punch to carefully knock the old seal out of the cover, and a seal
driver to seat the new seal.
| Fig. 10: Place the cover on a bench and carefully
knock the old seal out of the cover using a hammer and punch
|
| Fig. 11: Use an ordinary seal driver, and seat a
new seal into the cover at the same position as the old one
|
- Install the front cover and attaching bolts. Tighten the bolts to 13–15
ft. lbs. (17–21 Nm). Refer to the illustration.
- If the front seal needs to be replaced, proceed as follows:
- Using a seal removal tool, remove the front seal.
- Lubricate the engine front cover and oil seal lip inner lip with engine
oil.
- Using a seal driver/installation tool, install the new seal into the
front cover.
- Install the crankshaft timing sensor.
- Install the drive pulley/damper.
- Install the water pump.
- Install the fan.
- Install the alternator.
- Install the power steering pump.
- Install the air conditioning compressor.
- Install the oil pan.
- Fill the cooling system.
- Fill the crankcase with the proper grade and amount of engine oil. Connect
the negative battery cable. Start the engine and check for leaks, then roadtest
the vehicle for proper operation.