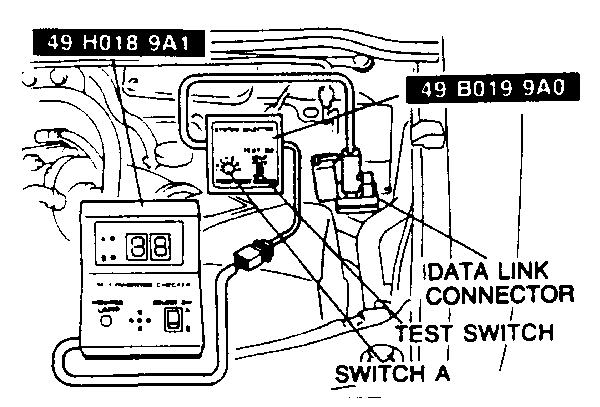
| Fig. 1: Location and installatioon of the System Selector
and Self-Diagnosis Checker tools
|
- Connect System Selector Tool 49-B019-9A0 to the data link connector, located
on the left side of the engine compartment.
- Set switch A to position 1, then set TEST switch to SELF-TEST.
- Connect Self-Diagnosis Checker Tool 49-H018-9A1 to the System Selector and
a ground.
- Set the select switch to position A.
- Turn the ignition switch to the ON position, but do not start the engine.
Check that number "88'' flashes on the digital display and the buzzer sounds
for 3 seconds after turning the ignition switch ON.
- If the number "88'' does not flash, check the main power relay, power supply
circuit and check the DLC wiring.
- If the number "88'' flashes and the buzzer sounds continuously for more
than 20 seconds, check for a short circuit between the engine control module
terminal 1F and the data link connector. Replace the control module if necessary
and perform steps 2–4 again.
- Note the code numbers and check the causes. Repair as necessary. Be sure
to clear the codes, then recheck for code numbers after repairing.
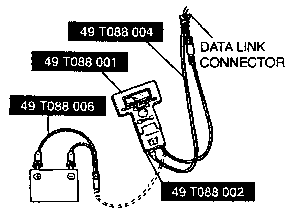
| Fig. 2: Correct hook up of scan tool for the MPV
|
The 1996–98 MPV models utilize On Board Diagnostic II (OBD-II) Diagnostic
Trouble Codes (DTC's), which are alpha-numeric (they use letters and numbers).
The letters in the OBD-II DTC's make it highly difficult to convey the codes
through the use of anything but a scan tool. Therefore, to read the OBD-II DTC's
on these vehicles it is necessary to utilize an OBD-II compatible scan tool.
- Connect the New Generation Star (NGS) diagnostic tool, or equivalent, to
the data link connector located under the driver side dashboard.
- Read the manufacturer provided instruction manual for the correct operation
of the scan tool.
NOTE: Some Diagnostic Trouble Codes (DTC) are detected
only when the engine is running. Before checking the DTC's, start the engine.
- Start the engine, then select "DIAGNOSTIC TROUBLE CODES" function and press
"TRIGGER".
- When the scan tool displays the words "NO CODES RECIEVED/SYSTEM PASS-ED",
all systems monitored are judged okay.
- If any DTC'S are displayed, perform the troubleshooting according to the
code.
- When the scan tool displays "LINK MONITOR ERROR", check the connection of
the scan tool.
- After all the problems have been repaired, clear the DTC's.