WARNING
Do not pierce the wires when testing this sensor; this can lead to wiring harness
damage. Back probe the connector to properly read the voltage of the HO2S.
- Disconnect the HO2S.
- Measure the resistance between PWR and GND terminals of the sensor. If the
reading is approximately 6 ohms at 68°F (20°C). the sensor's heater
element is in good condition.
- With the HO2S connected and engine running, measure the voltage with a Digital
Volt-Ohmmeter (DVOM) between terminals HO2S and SIG
RTN (GND) of the oxygen sensor connector. If the voltage readings
are swinging rapidly between 0.01–1.1 volts, the sensor is probably
okay.
NOTE: MPV models equipped with the 2.6L engine do not have
Heated Oxygen Sensors (HO2S), but instead, are equipped with Oxygen Sensors
(O2S), which do not contain an integral heating element.
WARNING
Do not pierce the wires when testing this sensor; this can lead to wiring harness
damage. Back probe the connector to properly read the voltage of the O2S.
- Warm up the engine and allow it to run at idle.
- Disconnect the O2S.
| Fig. 1: Inspection of the O2S terminal voltage
|
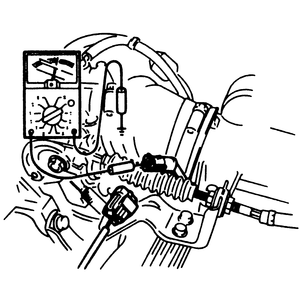
- Connect a voltmeter between the O2S and a good ground.
- Run the engine at 4,500 rpm until the voltmeter reading indicates approximately
0.7V.
- Increase and decrease the engine speed suddenly several times. Check to
see that when the speed is increased, the voltmeter reads between 0.5V–1.0V
and when the speed is decreased, the reading is between 0V–0.4V.
- If the actual readings are out of specifications, replace the O2S.
WARNING
Do not pierce the wires when testing this sensor; this can lead to wiring harness
damage. Back probe the connector to properly read the voltage of the HO2S.
- Warm up the engine and allow it to run at idle.
- Disconnect the HO2S.
| Fig. 2: Inspection of the HO2S terminal voltage
|
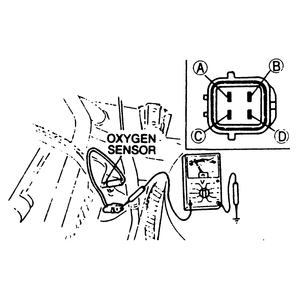
- Connect a voltmeter between the HO2S connector terminals A and B on the
sensor side.
- Increase and decrease the engine speed suddenly several times. Check to
see that when the speed is increased, the voltmeter reads between 0.5V–1.0V
and when the speed is decreased, the reading is between 0V–0.4V.
- If the actual readings are out of specifications, replace the O2S.
| Fig. 3: Inspecting the continuity of the HO2S heating
element
|
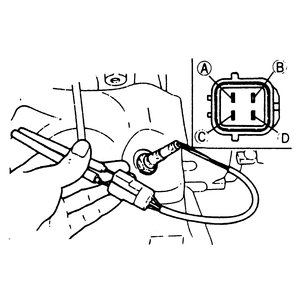
- Inspect the continuity of the HO2S heating element by connecting an ohmmeter
between connector terminals D and C on the sensor side.
- If there is no continuity, replace the HO2S.
WARNING
Do not pierce the wires when testing this sensor; this can lead to wiring harness
damage. Back probe the connector to properly read the voltage of the HO2S.
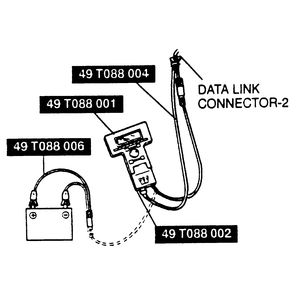
- Connect NGS tester 49-T088-001 and 49-T088-002 scan tools or equivalent
to the data link connector-2 located under the driver side dashboard.
| Fig. 4: NGS tester scan tool hook up
|
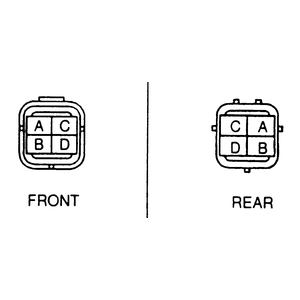
| Fig. 5: HO2S connector terminal identifications
|
- Select the "PID/DATA MONITOR AND RECORD" function on the NGS tester display.
- Select "FHO2S" and "RHO2S" on the NGS tester display. The NGS tester measures
and displays the voltage.
- The specifications should read as follows:
- With the ignition ON, or at idle: 0V–1.0V
- At deceleration: 0V–0.5V
- At acceleration: 0.5V–1.0V
- If the readings are out of specifications, inspect the intake air, fuel
and On-board diagnostic systems.
- If these systems are working properly, replace the HO2S.
- Disengage the HO2S wiring connector.
- Inspect the continuity of the HO2S heating element by connecting an ohmmeter
between connector terminals D and C on the sensor side.
- If the reading is measures approximately 13 ohms at 68°F (20°C).
the sensor's heating element is in good condition.
- If there is no continuity, replace the HO2S.

